Learning how to sew an envelope for a newborn is not difficult, you just need to have basic sewing skills and a couple of free hours. A detailed master class can help you express your love for your baby, because you can convey warmth and care into a handmade product.
Advantages of hand-made
First of all, we note that sewing a blanket for discharge is not at all as difficult as it might seem to you at first.
The main advantages of home crafts are:
- Selection of fabrics of suitable composition.
- Individual choice of colors.
- Creating a model that fits perfectly. After all, you can adjust the blanket (envelope) depending on the height and weight of the baby.
- With the help of lace and other decorative elements you can create a truly exclusive item.
A transformable blanket for a newborn is suitable for both walking and home use.
How much fabric will you need?
The amount of material will depend on the chosen model and the presence of additional decorative elements. The base of the product can consist of three parts - top, inner and insulation.
Each one usually uses different types of fabric. Therefore, the calculation of each part should be carried out separately.
The envelope should not be very large. If this is a classic “blanket” model, its total length is 70-110 cm and 85-100 cm wide when unfolded. When folded - about 45-50 cm. We buy fabric with this calculation.
It is customary to make a blanket envelope in one piece, and not from separate pieces. Therefore, if the width of the product is less than 90 cm, you need to buy the length, plus 10-15 cm with a canvas width of 100-110 cm.
If the “bag” model is chosen for sewing, it can be cut out of two parts – front and back. In this case, when calculating the required amount of fabric, you need to focus on the length of the product multiplied by 2, plus 10-15 cm.
In exactly the same way, the fabric required to make the interior and insulation is calculated.
When adding handles and a hood, you need to add one more length of the product to the total fabric size.
Materials and fillers
Making a blanket for a newborn with your own hands is possible without super professional tools. The main thing is the right choice of fabric and filler. It is desirable that the material be natural, at least in places of contact with the baby’s skin.
During the winter months, a warm blanket will protect your little body from the cold wind and keep you warm.
Pay special attention to the decor. It is clear that a completely laconic model is not the best option, but an overly decorated blanket is not only ugly, but also dangerous. After all, the sharp corners of buttons or flowers can injure the baby.
Sewing a baby blanket for discharge with your own hands is not as difficult as it might seem.
So, let's move on to the list of necessary materials:
- Two types of fabric. One canvas will be located outside, and the other inside. As already noted, the inner layer must be natural in order to avoid allergic reactions and irritations on the skin. Cotton is considered the most suitable material. Despite the fact that cotton fabrics wrinkle very much, they are superior to all others in their hypoallergenic properties. In addition, cotton is a pleasant bonus for beginning needlewomen, because it is quite easy to work with: the fabric does not slip or stretch. The outer side can be made of satin or silk fabric - it all depends on your wishes and preferences. However, since working with satin and silk requires some skill, you can make a newborn blanket the same on both sides. Satin and poplin are used most often than other materials.
- Sewing elastic and satin ribbons for decoration on the outside.
- Lace and frills.
- Pins and needles for fixation.
- Scissors.
- Centimeter.
- Sewing machine.
- Filler (usually padding polyester).
Sewing yourself does not require unusual fabrics or tools. The main thing is that the product contains as many natural materials as possible, especially in those places where the fabric comes into contact with the newborn’s skin.
Step-by-step sewing master class
To cope with the task, you need not only to know how to sew an envelope, but also to find a good pattern. It is important to remember that if discharge occurs during the winter months, the product must be insulated. When the baby is taken home in May, June or July, a light option is sufficient.
Summer blanket blanket
It is considered most suitable for beginners; with minimal experience, sewing will only take a few hours. The model is cut from 2 layers of fabric. It is recommended to use jacquard or satin for the outer layer, and thick cotton for the inner one.
To sew a product using this algorithm, you need 2 pieces of fabric measuring 135 x 80 cm. The envelope pattern must first be transferred to graph paper. After this you can start sewing.
- Attach the paper model with pins to the fabric and outline it. In this case, it is necessary to leave allowances for the seams.
- Next you need to cut the workpiece.
- Machine sew the outer and inner layers.
- Now you need to make beautiful frills from lace and sew them to the top of the envelope.
- Next, finish the edges with an overlocker. If desired, they can also be decorated with lace.
All that remains to be done is to sew the ribbons to the envelope. Alternatively, you can attach buttons instead. Making such a model will not cause any difficulties. Its only drawback is its minimal functionality.
Winter with hood
If the child was born in cold weather, the envelope should not only be warm, but also windproof. As the outer material, you can use denim, plush or raincoat fabric, which will not get wet. The middle layer is made of holofiber. The lining is made of flannel. Also, to make such a model you will need an elastic band, 3 buttons and 2 zippers. The envelope is sewn according to the following algorithm.
- First you need to print out the pattern. Next, attach it to the fabric and prepare the necessary parts, not forgetting to leave seam allowance.
- Now sew the outer layer, insulation and lining together using a machine.
- Next, insert the zipper on the sides.
- Then fix 3 buttons on one side at the top and make 3 elastic loops on the other. When they are fastened, a hood will form.
Finally, the envelope can be decorated with bows or frills. It will be very warm and guaranteed to protect the baby from the wind. For the first few months you can walk in it.
Step-by-step instruction
It's no secret that the success of sewing a particular product largely depends on quality tools. By making sure that the scissors are sharp, the needles are comfortable, and the chalk or pencil is visible enough, you will ensure that your work is pleasant and fruitful.
Cutting the pattern and sewing does not take much time. The main thing is to have good tools and prepare materials in advance so as not to waste time searching for missing parts.
So let's get started.
- Let's make a pattern.
- From the fabric for the outer and inner sides of the blanket, as well as from padding polyester, we cut out identical squares according to the pattern. They should be 1 cm larger than the planned size of the blanket.
- On the cut-out square of padding polyester we place two fabric squares, folded with their front sides facing each other.
Sew, leaving a small section free from stitching. Important: before you start stitching, baste or pin the fabric and padding polyester with pins. In this case, you will get the most even stitch possible. - Turn the blanket inside out and sew the free section.
- To ensure that the product does not lose its shape and lasts as long as possible, stitch the blanket so that it looks like a quilt. It is better to lay diagonal stitches so that diamonds remain on the canvas. The line should be small.
To preserve the product in its original form, extend its service life and give additional strength, it is necessary to stitch the blanket diagonally with a fine seam, creating the contours of diamonds.
Lush Trim Blanket
To make such a blanket you will need: fabric of either one or two types, organza lace of two types (wide and narrow), filling - padding polyester.
The length of wide lace available should be at least 1-1.5 meters, but the length of narrow lace is 80 cm.
Cut two squares from fabric and one from padding polyester. The length of one side of the part has the estimated length of the blanket plus an overlap of 1 cm for each side.
How to make a bow
The most common way to decorate a blanket for a newborn is with a bow. In this case, you can use a ready-made bow (flower), or make it yourself.
For the bow, take a wide strip of fabric, measure the middle and bend the edges to it.
So, a DIY bow:
- Cut two strips of 12 cm wide from satin fabric.
- We fold the two parts right sides to each other and stitch along the edges. Then turn it face out.
- For the bow itself, take a wide strip of fabric, measure the middle and bend the edges to the middle.
- We sew from the top and bottom, and then turn it inside out and fill it with holofiber.
- To make the “belt” functional, insert an elastic band into the resulting ribbon and sew on a voluminous bow with holofiber. The “bridge” for the bow can be made from any ribbon or braid. The lace trim looks very impressive.
For decoration, you can sew a large bow or a flower made of ribbons on top. The decor made from lace sewn onto the top side of the lettering square looks beautiful.
Baby craft with terry center
This blanket will require two types of fabric and a ribbon to decorate the outside of the blanket. The inside of this blanket is special, it is made of cotton terry fabric. This one is sold in fabric stores marked for children. You can use a baby blanket for this part of the blanket.
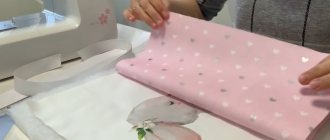
Cut a long strip 12-15 cm wide from the facing fabric, fold it in half lengthwise and stitch along the cut edge. Now sew the resulting ribbon by hand to the square piece of fabric using a simple seam. Lay a piece of outer fabric face up on a flat surface. The resulting tape is placed on it along the perimeter of the fabric so that the seam of the tape coincides with the seam of the fabric, and its free part lies on the fabric and not around it. As you sew, gather the ribbon into large or small gathers.
How to calculate the amount of material
Each newborn has its own height and weight. Usually the height does not exceed 55 cm, and the weight is rarely more than 3.5 kg. Based on these parameters, you can imagine what size envelope you will need.
It is important to take into account that a novice seamstress may not succeed in the first test copy, so the fabric must be purchased with a reserve.
In most cases, you have to sew a blanket for discharge before giving birth, so it’s unlikely to be possible to accurately guess the size. This means that you can use existing standards. Typically, the envelope for extract has the following parameters:
- 140x110;
- 120x80;
- 135x110.
You need to put a warm lining in the winter envelope, which, if desired, can be pulled out.
And one more thing, before you start sewing a blanket, try to answer yourself the question: until what age do you plan to use this accessory? And only at first glance this question seems strange. Over time, you will be able to wrap only the legs, for example, in a stroller or sled, and then any additional decor will be clearly unnecessary. Some parents prefer to use such an accessory strictly for its intended purpose: they picked it up from the maternity hospital, went to see a doctor a couple of times, and forgot about the envelope. This is also possible, and for such a model you can use as many additional parts as possible.
To prevent the baby from freezing during the first trip home from the maternity hospital, it is necessary to use not ordinary fabric, but good, dense insulation.
The season, which accounts for the bulk of the “use” of the envelope, is also important. If it is winter, you need to wrap your baby up warmer. And if the baby was born in the summer, just cover it slightly.
You can sew a blanket blanket for a newborn with your own hands in one day, but to speed up the process, you need to determine in advance what shape the product will have.
And one more thing: even if you decide to sew a blanket with “spare” sizes, don’t overdo it. The baby will get tangled in a blanket that is too bulky, and believe me, this is very inconvenient.
The child will sleep peacefully all the way home if you choose the right filler.
Ties or zipper?
In answering this question, the time of year becomes decisive. The zipper will reliably protect you from the wind, which means that for winter, early spring and late autumn it is better to choose envelopes for discharge from the maternity hospital with a zipper. By the way, this model will be more convenient for parents - try straightening or tying a bow with frozen hands?
To sew a transforming envelope for a newborn, you need to choose not only the material, but also the filling, and also prepare the parts for fastening the different elements. You can use zippers, buttons, Velcro and tape.
And ties are an ideal choice for summer and warm spring. The main thing is to make sure that the baby’s fingers do not get caught in the knots.
Putting your baby in an envelope is quite simple.
Envelope for discharge
Newborn envelope - a warm blanket in the shape of an envelope to protect the baby from bad weather conditions and other things. In the first months of life, it is necessary to protect the baby from everything: strong wind, sun, snow, rain - all this can affect the little person’s immunity.
For a newborn
In addition, this is the most convenient device. Today there are models with a hood, zippers, zippers, and straps so that you can wear them not only on your arms, but also on your shoulders, back or stomach.
Winter and summer
Winter and summer models differ primarily in fabric. Cotton, silk and satin are used for summer blankets. And it is not necessary to insert padding polyester between layers of fabric, the baby will start to sweat. In this case, the edges of the fabric are sewn immediately and around the entire perimeter.
Many doubt whether an envelope is needed for discharge, but doctors unanimously answer that it is necessary. This is not only a beautiful, but also a functional thing that protects the baby from cold, sudden shocks, as well as some aggressive environmental factors.
For winter models, be sure to use a padding polyester or cotton wool layer. And for the inside, you can take brushed fabrics for additional insulation. And take into account the degree of warmth of the envelope when dressing the baby, otherwise you can “overheat” the child.
The envelope protects the child from both cold and sun.
Fastenings and transformation mechanisms
When thinking about how to make an envelope for a newborn from a blanket, they immediately consider several options for securing the edges. Acceptable fasteners:
- Zipper is the most practical and convenient item. You just need to choose products that are difficult to get hurt on.
- The ribbons are beautiful, but not practical, bows take a long time to tie and need to be ironed.
- Buttons – you need to choose reliable ones so that they snap easily and hold well.
- Buttons, for them it is better to provide air ribbon rather than slotted loops.
The choice of fixation depends on the age and activity of the baby.
An original envelope blanket, how to fold it and secure it with buttons.
DIY blanket
If your baby was born in a hot summer, then perhaps a knitted blanket will be the best option for him.
You don’t have to spend a lot of money on buying a special kit; if you practice, you can do everything yourself without any problems.
This accessory also has enough advantages:
- Can be used as a beautiful blanket in a crib or stroller.
- It is convenient to use both on a walk and at home when the baby is sleeping.
- If necessary, a soft knitted item can also be used as a lining between a mattress and a sheet: it will be warmer in winter, and more comfortable and soft in summer.
- Knitted blankets often look more impressive and exclusive when leaving the hospital.
- When the baby grows up, a knitted blanket will cope with the role of a play mat.
You can make a blanket for discharge with your own hands in various versions depending on your tastes and preferences.
An important point: knitted blankets are made without the use of complex techniques and overly textured patterns, which means that even a novice needlewoman can knit it.
Before you start working, decide what kind of blanket you will have: knitted or crocheted. Buy suitable threads, decide on the pattern and dimensions.
A cotton blanket has one drawback - it is heavy.
If you decide to knit a whole fabric, then the fishing line should be long enough. If you prefer a blanket made from individual fragments, then the knitting needles can be anything.
You can knit a blanket either by knitting or crocheting.
The thickness of the knitting needles is selected depending on the thickness of the thread. As a rule, the thread description contains appropriate recommendations. In addition, you should take into account the peculiarities of your knitting: some knit too tightly, while others, on the contrary, are too loose, and a blanket for a newborn should be of medium density.
A snow-white plaid is always a win-win option.
The most commonly used types of yarn are:
- 100% cotton. This option is ideal for the warm season. However, cotton itself is somewhat stiff, so it is better to choose a thread with the addition of acrylic.
- Acrylic. Today, special yarn for children's clothes is available, this is indicated on the packaging. The products are very soft and do not cause irritation.
- 100% wool. This is more suitable for winter, but such yarn can “bite”, which is very undesirable for children's clothes. Therefore, either choose threads with the addition of acrylic, or simply give up wool. In addition, the child may be allergic to wool fibers.
A blanket for a newborn should be practical and beautiful.
When choosing a drawing, be guided by your own preferences. As already mentioned, you should not knit items that are too textured. The smoother the canvas, the more comfortable the baby will feel.
The cocoon is a convenient device.
Today there is a huge range of ready-made blankets available for discharge. Models are offered for every taste and color. But by making an envelope with your own hands, you will not only save money, but also trace all the stages of creation. This means that the result will be a more practical model suitable for your baby.
Winter option
For winter, spring-autumn or demi-season options are additionally insulated with sheared sheepskin or knitted fabric. Envelopes should not be made too warm; walking at low temperatures is prohibited.
Ready-made transformable blankets and envelopes are chosen for growth to make it easier to dress the baby.
If you know how to sew, you can make a useful and convenient thing for your son or daughter yourself. When choosing ready-made products for discharge or the first half of life, choose bags with hoods without compartments for arms and legs. A baby at this age sleeps outside, nothing should bother him.

