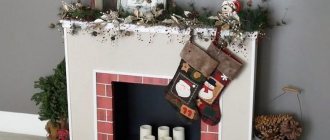
If you still have sheets of polystyrene foam that are used to package household appliances, do not rush to throw them away - they will be useful for creating a small New Year's fireplace. Not real, of course, but during the holidays this hearth will become the highlight of your interior. Gift boxes, souvenirs, and candles will look great around it. It’s easy to make a fake fireplace made of polystyrene foam with your own hands for the New Year, without having any special accessories other than those listed below.
Materials and tools
To make a decorative fireplace from sheet foam with your own hands you will need:
- foam sheets, size is not important, but larger ones are better;
- toothpicks;
- PVA glue;
- textured braid;
- a sharp knife, you can use a stationery knife;
- primer or putty;
- acrylic paint for decoration, preferably “gold” or “silver”, but other shades are also possible.
How to make a fireplace from polystyrene foam with your own hands: step-by-step instructions
Depending on the size of the foam fireplace, you need to cut out its main parts. In my case, with a decorative fireplace height of approximately 40-45 cm, the details are as follows:
- 2 sides (I have a size of 45 by 20 cm);
- 1 back wall (60 by 45 cm);
- 1 front wall (60 by 45 cm);
- fireplace cover (can be replaced with a cardboard cover if there is not enough foam), size 70 by 25 cm.
CLUE. The dimensions can be changed depending on the size of your foam sheets. The decorative fireplace will not suffer from this.
Diagram or drawing of a foam fireplace
The fireplace diagram is approximately the same as in the figure below, use it as a guide.
Before cutting out the surfaces of the fireplace according to the drawing, make markings on a sheet of foam plastic with a pencil. For cutting, use a sharp knife, but a stationery knife is better - it is thinner and crumbles the foam less.
On the front wall, you additionally need to cut out a rectangular or round arch.
New Year's false fireplace with imitation brickwork
The city is looking forward to the New Year holidays; preparations are beginning in homes for the most magical night of the year! In anticipation of the New Year, more and more often a picture appears in my head: a fluffy Christmas tree, colored lights, champagne, tangerines and a fireplace... But! Where to get a fireplace in a city apartment? Make it yourself!!! It’s not as difficult as it might seem at first glance, maybe it won’t be a little unreal, but it will be warm and cozy :) There’s still a whole month before the New Year and you’ll have time to make yourself a perfect New Year!
Required materials and tools:
1. Extruded polystyrene foam (something like polystyrene foam) - 4 slabs 3 cm thick (60x120cm).
2. Universal glue, transparent for polystyrene, etc.
3. Self-tapping screws (2 cm and 4 cm), screwdriver/screwdriver.
4. Corrugated cardboard for bricks (about 2-3 medium-sized boxes).
5. White acrylic enamel, semi-matte, for exterior and interior use, odorless (I have a 0.9 liter jar, it took less than half).
6. Thin white paper napkins - 1 pack.
7. PVA glue.
8. Flat brush, 3-4 cm wide (I have No. 35).
9. Paper cutter/knife etc.
Everything you need can be bought at a construction hypermarket. If you buy everything (that is, you have nothing at home, no glue, no brushes), then it will cost no more than 1000 rubles.
I think polystyrene foam is the ideal material for such a fireplace, it is lightweight, easy to cut with a knife, the finished fireplace is easy to move from place to place, easy to screw in screws, easy to glue, unlike, for example, plywood or drywall, I think you will definitely need it to work with them man. Oh, this fireplace can be completely made by women’s hands :)
The bricks can be made from beer cardboard, then the fireplace as a whole will be more neat and even and you won’t need to use napkins, which will speed up the process much! In my case, I specifically made “old brickwork”.
Let's start creating a fireplace!
1. It is necessary to cut out the parts of the fireplace from polystyrene foam. Below is a drawing of the layout of parts on polystyrene foam boards. Parts of the same size: 1 and 1a, 2 and 2a, 3 and 3a, 5 and 5a, the rest in a single copy.
Parts 7 and 8 (the backdrop of the fireplace) are slightly different from what I made, since I made the fireplace “by eye”, without a drawing, and it took me probably 5 polystyrene boards.
2. Now you need to connect all the parts using glue and screws. Unfortunately, there are no photos of the collection process, since it was late in the evening, and everything happened very quickly :)
We connect part 1 and 1a. You need to coat the ends with glue, glue a connecting strip on the back side (made from leftovers, about 10 cm wide, it’s not on the drawing), just to fasten the parts, we screw it with self-tapping screws. Then we attach the sides of the fireplace with glue and self-tapping screws - parts 2 and 2a. Next is the “bottom” of the fireplace - parts 3 and 3a, first glue and screw on part 3, and then part 3a (if you want the fireplace to stand right next to the wall, then you need to make a small bevel at these parts for the baseboard). Next is the “lid” of the fireplace - part 4. Then, when the main frame is ready, we attach the internal vault, first glue and screw the side parts 5 and 5a, then cover them with the “lid” - 6. And the final stage - attach the back wall, first the bottom part 7, and then we place part 8 on it - it stands apart and gives the structure additional rigidity. Above part 8, in the photo, you can see a small square, it supports the lid, you can do without it if you don’t plan to put something heavy on the fireplace :)
3. Now we cut out “bricks” from cardboard; mine turned out to be 16.5 x 6 cm in size. I advise you to think about the masonry and calculate the size of the bricks. Since, again, I did it by eye, and I had some inconsistencies here and there... But overall it’s not that noticeable, I hope :) It took me about 100-110 pieces, to be honest, I thought it was necessary There will be more cutting, but that’s enough.
4. Glue the bricks to the base.
5. When all the bricks are glued, you need to paint the fireplace. If I had used light beer cardboard, then at this stage the fireplace would have been ready :) But let’s continue...
6. We glue napkins to hide all the errors, since the bricks are made of corrugated cardboard with ugly cuts... and with the help of napkins, the texture of the plaster is created. First, we apply a thin layer of PVA glue, and then, ironing it with a semi-dry brush, we attach the napkins; you can make several layers, as sometimes they tear. This way we cover the entire fireplace. On the one hand, the process seems terribly tedious, but for some reason I like it... the napkins “melt” and then dry out to create a pleasant texture :)
6. It turns out something like this :)
7. This is what a fireplace covered with napkins looks like:
8. Final painting (the paint will make the napkins bubble in some places, when the paint dries everything will smooth out)!
9. The fireplace is ready! We put candles in vases, or you can just put candles alone, but of course it’s safer in vases. I intended to make a fireplace only for the New Year, and then take it to the country, but something tells me that I need it at home, always...:) By the way, the fireplace is very warm, such a strong warmth comes from it when the candles are lit, I did not expect!
Thank you for your attention! I wish you magical winter evenings... by the fireplace:)
Connecting the foam fireplace base
It is difficult to glue polystyrene foam; almost no glue “takes” it, so use toothpicks to connect the parts. Pierce through both parts at the joints, pushing the toothpick all the way inside.
The box for the decorative false fireplace is ready. Prime the surfaces, paying special attention to the joints.
How to putty a foam fireplace
There are, of course, special mixtures for polystyrene putty. But in our case, there is no point in buying them; for priming, you can use not only special primer. Any putty will do, even ceiling paint if it has thickened to the point of sour cream. As a last resort, use PVA glue in several layers, letting them dry for 1-4 hours.
Little tips
- The thickness of the material is small, so you need to screw in the screws very carefully. If you are not skilled enough with a screwdriver, use a regular screwdriver.
- How to cut polystyrene foam. Don't try to cut out the part you want right away. First, use a knife to make a shallow cut along the pre-marked lines. You can even do this not with a knife, but with a pencil, pressing it. The second time, push the knife a little deeper into the polystyrene foam, etc.
- Make sure the parts are clean before gluing. If necessary, remove dust and other contaminants from them.
- “Masonry” can be made without paper, but by carefully cutting out the desired “pattern” on polystyrene foam.
- You can see how to make “masonry” from foam plastic in this video.
- How to glue parts together so that they stick firmly. It is most convenient to place the ends on the glue. And then from the “wrong side” (on the side that is not visible) glue tape, tape or a strip of ceiling foam to the seam.
But these are not all the gifts from me! Take a look at the article where we will make a fireplace out of cardboard! As well as garlands and wreaths that will help decorate the fireplace. And don't forget to subscribe to receive all the articles I prepare for you!
Design of a portal for a decorative fireplace made of polystyrene foam
To make the fireplace look elegant, glue braid along the edge of the arch. It can be of any color, the main thing is that it has convex details. To glue the tape, first soak it in PVA glue and then place it along the cut of the arch. PVA will not only glue, but also replace the primer.
Let it dry for at least two hours. In the corners of the arch I added roses made of cold porcelain. You can attach beautiful buttons or other decor to the joints.
Then, using an almost dry brush, paint over the surface of the braid with gold paint, thereby leaving gilding on the relief.
If there is no gold paint, use any suitable one - blue, green or another color - you need to emphasize the relief parts of the braid. You can even use nail polish.
Use the same paint to paint the open sections of the arch and the end parts of the fireplace cover. Let dry for a couple of hours.
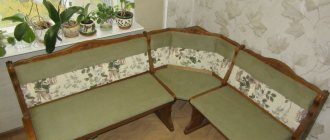
Is it possible to make a false fireplace from old furniture?
Don't rush and get rid of that boring chest of drawers or sideboard. With the proper approach and imagination, this worn-out piece of furniture can easily turn into an interesting false fireplace.
The work takes place in several stages:
- We take out all the shelves, completely freeing up the interior space.
- In front we organize a facade of boards or plywood.
- Inside we measure out the space for the firebox. It can be assembled in different ways: it can be an empty cardboard box or box of suitable size, or the firebox can be simply assembled from plywood.
- We prime the product, sand it and paint it.
It turns out to be an interesting decorative item for the interior.
How to cover a foam fireplace for the New Year
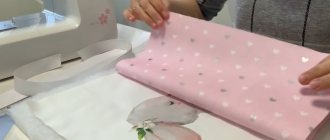
To decorate a decorative New Year's fireplace made of polystyrene foam, use decoupage techniques. Simply put, stick on beautiful New Year’s pictures, braid, pieces of bright fabric or paper snowflakes. I cut out snowflakes from regular table napkins and glued them onto the fireplace base using PVA. And to decorate the arch I used textured braid.
How to glue paper pictures onto polystyrene foam
If you are using napkins to decorate your fireplace, first separate them into layers. Napkins come in two and three layers. You only need the design layer.
Cut out the desired design along the contour, apply it (dry!) in the right place and spread PVA glue over the picture with a wide brush. Smooth the napkin over the surface and let dry.
You can shade the contour of the glued picture with acrylic paints. I did it with the same gold along the joints of the fireplace surfaces.
With an interesting ornament
There are 2 points in this work that I would like to draw your attention to:
- You choose all the sizes, from the height of the craft, width and depth!
- The pattern in the form of a tile-stone is applied using a regular stationery knife.
So what we need:
2 polystyrene foam tiles (5 and 10cm wide).
From them we make:
- First we work with the canvas, which is 10cm. Cut off 1/3 of it. We cut this piece in half.
- We glue these pieces on the sides of the canvas.
- We work with thin fabric. Cut out the top.
- We cut out the bottom from the remaining canvas.
- We connect all the parts.
- Cut a hole.
- “Scratch” the pattern of the stones.
- Decorate with plinth on the sides.
- We paint it with a spray or radiator water-based paint (in this case, it is advisable to use a primer before painting, you can use PVA glue + water).
- We make a background for the “fire” from cardboard. Just paint a sheet of cardboard and glue it as a back wall.
More details in the author's video
It turns out very beautifully. I just want to sit down with the whole family on New Year’s Eve and unpack the gifts!
How and with what to paint a foam fireplace
If you don’t want to use pictures, you can paint the fireplace. However, it must be taken into account that polystyrene foam is a material to which paint does not adhere well. Gouache, watercolor, even acrylic roll into lumps on the surface. The best option is to first prime the surfaces of the foam fireplace, using, if not a special primer or putty, then at least regular PVA glue. And only after that start painting. The ideal option is acrylic paints: they are odorless, dry quickly, and are non-toxic.
CLUE. If you don't have colored acrylic paints, buy regular acrylic varnish at a hardware store. I always have “Interior acrylic varnish, colorless semi-gloss” on hand. Add gouache, pearl powder, pigment to it - experiment with what you have at hand. And paint the already primed foam with this mixture.
Economy idea
With this model you will spend a minimum of time, effort and materials. Detailed master class in a wonderful and understandable video: Part 1 - creating a structure
Part 2 - Painting and decoration You will need:
- Foam strips;
- Decorative cornice made of the same material;
- Glue gun;
- Knife;
- Putty;
- Dye.
How to do:
- We outline the dimensions of the future fireplace on the wall.
- Cut strips to size. We sit on glue.
- If you want to get a more voluminous design, do it in 2-3 layers.
- We fix the cornice from above.
- We cover the seams and irregularities with putty.
- Let's move on to painting. Choose water-based paint, maybe radiator paint, it doesn’t have a strong odor and is easy to apply.
This option assumes any of your capabilities and wishes.
Final assembly and decoration of an artificial fireplace made of polystyrene foam
Place the lid on the finished foam fireplace base and pin it in place using toothpicks.
Place candles (do not light them, only for decoration), pin tinsel, beads, Christmas tree balls and other New Year attributes.
Install a fireplace on a chest of drawers, on a windowsill, on a coffee table - the room will become more comfortable and there will be somewhere to put gifts.
The finished foam fireplace is pictured below.
Interesting solutions for decorating a fireplace
A decorative hearth, first of all, is designed to please the eye, so it is not at all necessary to equip it with logs and place a poker next to it. Modern designers offer many interesting decorating ideas.
A classic of the genre - a clock on the mantelpiece. Why deviate from tradition? In the case where there is an imitation of a hearth in the room, decorators suggest placing the clock in a niche or in the firebox. In addition, it would not hurt to place figurines or books on the shelf.
Natural flowers are usually not placed near a real “home fire pit”, as they will be hot, but it is quite possible to decorate a decorative analogue with indoor flowers and spruce branches.
For gourmets, use a niche as a bottle bar.
see also
Comments 42
regarding the electric fireplace as a heater. for me it is noisy. I like silence. and there the fan is noisy((((
With a convector you need or infrared
I have not seen such panels or slabs. Give a link to understand what it is made of.
It’s called expanded polystyrene, it’s used mainly for insulating houses and apartments, in general it’s good because it’s harder than regular polystyrene foam, but you can also make sheets of foam plastic that are 7 cm wider in width, in my opinion, and there will be less waste
Great! What did you use to glue the polystyrene boards together?
Well done. To bookmarks.
Initial version, the children tore off all the tiles in a year)
I also assembled it 2 years ago) and every year on December 30th I start redoing it))
Initially I made plaster tiles, now I cut them from slabs that are glued to the ceiling
Rubber women will happily celebrate the fake New Year with you under the fake fire of a fake fireplace, eating plastic grapes and drinking non-alcoholic beer. Hurray!
Oh, and I was wondering where these stubborn armchair critics are, I thought this post would do without you, it’s so boring, but then I found ☝️ one expert)))
No, I just have a real fireplace.))
I'm glad for you, you're luckier
I strived for this.
I hope the real fireplace is not in your apartment)))
there is more than one in the apartment (top floor, pre-revolutionary) and in the house.
Beautiful! looks great!
Andriu super theme
Everything looks chic and cozy.
Wouldn't it be better to insert an electrical source there?
I considered all the options, but didn’t want to, firstly, the price is steep, secondly, it was probably necessary to make a frame from plasterboard and profiles, and not from foam plastic, the dimensions should have been taken better when the electric fireplace was already purchased, and thirdly, the 3D fire will be more beautiful , look on the Internet for an imitation of fire, but at home we discussed about heat, as if we decided that heating was not needed, so the electric fireplace disappeared on its own, and plus the timing, and I’ll make an imitation of fire, use Arduino to make the lamps flicker like in a real fire and on the same board, make the firewood crackle, and the smoke will come from ultrasonic water crushers, it’s like an air humidifier, because I think it should be very cool
It is very difficult to create the smoke itself so that it looks like real smoke; in the factory, it is heated by halogen lamps with a special light filter, and passes through a special lid with guides for steam, hence the effect. In short, I’ve been struggling for three months now, and I can’t do exactly the same thing as at the factory. And the portal itself turned out very nicely at 5+.
, I think I’ll implement it like there, the coolers need to be installed correctly to disperse the steam
Yeah, I also have a cooler with speed control to regulate the intensity of steam coming out of the tank. It doesn’t help much because I don’t have it automatic, and the amount of steam released from the evaporator is related to the water level. In the comments to the video, a person wrote that they use a ready-made evaporator from the Supra, but I just have a Chinese element, maybe there is a solution here. It’s just that with the Chinese “fogger” it’s an evaporative element, take too much, or my hands are not sharpened xD
Where to place the structure
Do-it-yourself concrete staircase manufacturing technology
Latex paint or acrylic: what is the difference and which one is better to choose for different types of work (Photo & Video) + Reviews
Corner option
False fireplaces are also distinguished by their shape, which determines their location:
- Rectangular wall
- Angular
- Ostrovny
A wall-mounted specimen is placed in the middle of the wall, in a free area. It is placed permanently or built into furniture walls. The top edge is strengthened so that it can be used as a shelf.
The durable design with a metal frame can serve as a stand for a large TV. The device can also be placed in place of the radiator to aesthetically disguise it. They are placed in niches, between columns, in any room.
A corner hearth requires more careful measurements so that in the end the structure does not seem bulky. The depth of the firebox should appear proportional to the height and width of both sides of the triangle. The dimensions can be chosen arbitrarily, but it is advisable to first draw a sketch on paper.
An island fireplace requires a lot of space in the room. It helps to zone the room. Looks good in an apartment with a modern interior, in which there are no partitions and an abundance of furniture.
Installation features
By following fairly simple tips, you will easily master finishing with your own hands, and installation will seem like an easy task to you.
- Carefully prepare the surface, apply markings for the installation of decorative elements made of polystyrene foam.
- Remove peeling plaster or paint, get rid of efflorescence, traces of fungus, mold, and dirt.
- Try to make the surfaces as smooth as possible to ensure the finish adheres properly. If there are unevenness, use plaster and reinforcing mesh.
- Decorative finishing is installed in accordance with the applied markings. It all depends on your design ideas.
- Installation is often carried out using cement-based adhesive solutions. But experts recommend resorting to this solution in extreme cases.
- Polystyrene foam trim is best attached to special polymer-based compounds with reinforcing fillers. Such mixtures do not crumble after drying and are not afraid of temperature changes or precipitation. This is a special glue developed for polystyrene foam facade decor.
- Elements up to 10 centimeters thick are coated on the back with glue with a notched trowel and pressed against the wall. So the decor is kept for some time until the element adheres to the surface.
- It is recommended to further strengthen more massive decorative items made of polystyrene foam using not only glue, but also dowels.
- The choice of installation method largely depends on the region and climatic conditions. It is recommended to decorate houses exposed to strong winds and frequent precipitation with expanded polystyrene with the obligatory use of self-tapping screws and fungi. Just remember, holes are made in polystyrene foam after the glue has completely dried.
- At the final stage, the finishing made of polystyrene foam with 25f or its equivalent is coated with a primer and painted in the color you need. Use acrylic paints and apply at least two layers. This will only benefit facades finished with polystyrene foam.
Decorative polystyrene foam is an excellent material for exterior decoration. Remember that polystyrene foam is not polystyrene foam, but an improved version of it. At the same time, the price of facade decor made from polystyrene foam is more than affordable. Anyone can afford such decor, and its installation is not difficult even for beginners. In the process of selecting expanded polystyrene for the facade, you should adhere to basic principles. Choose only high-quality polystyrene foam, and familiarize yourself with the technology before installation. Installation and finishing of facades based on facade stucco molding made of polystyrene foam, although it does not require professional skills, to achieve maximum results, it is sometimes better to invite specialists.
Assembly options
If there is a big box
Drawing of a fireplace from a cardboard box
We begin assembling the imitation fireplace from cardboard from the central part. We form the columns first.
Cutting rectangles to size is no problem. The problem is to make even folds in the right places.
Take a large ruler or a straight bar and a hard object with a rounded end. For example, a ballpoint pen will do, or you can take a spoon or fork and use the pen.
The idea is as follows - along the line where the fold should be, apply a ruler/bar, draw the back of a ballpoint pen or the handle of a cutlery along the bar, pushing through the cardboard. But be careful not to tear it.
The sheet bends easily along the drawn line.
Cardboard fireplace parts
We glue the central part or paint it right away. Then it will be too inconvenient. You can paint it black, as in the photo. Another option is to imitate brickwork. Looks good too.
It is convenient to glue the parts together with tape (the type of tape has already been discussed). We glue each connection on both sides. We don't regret scotch. This cardboard fireplace was painted, so the columns were covered with white thick paper. You can use a primer and apply paint over it.
We make a shelf above the fireplace from several pieces of cardboard using the same technology. If you plan to install something, it is advisable to make stiffening ribs - several partitions. If the entire structure turns out to be strong and stable, you can make a shelf from a piece of plywood, for example.
If the cardboard is thin, you can use polystyrene/foam. It is sold in construction stores. You can take the slabs that are used to finish the ceiling. They have processed edges and a pattern is applied to the front surface. In general, it might turn out interesting.
Next comes the finishing touches. In this version, “bricks” were cut from paper of suitable colors. They decorated the portal opening. This is where you will need PVA glue. Do not forget to leave seams between the “bricks”. In the presented model they are painted with a base color, but you can make them, for example, black or white.
The rest of the surface of the false fireplace is painted, and foam (polystyrene) moldings are glued on top.
Expert opinion
Zakharov Igor Vyacheslavovich
Consultant at a furniture store. 5 years of experience.
Moldings can be glued before painting. You need to cut them with a sharp stationery knife. Then the cut will be smooth. Glued with PVA or special glue. Wipe off any remaining residue immediately, otherwise the paint will lie unevenly.
The same structure can be covered with brick or wild stone wallpaper. Self-adhesive film is also suitable. But you have to work with it carefully - you won’t be able to peel it off.
If the boxes are small
Small cardboard boxes are no more difficult to work with. They can be the same or different sizes, thickness and width. Based on the existing set, the structure is assembled.
This is the fireplace we made from existing cardboard boxes
- Seal the opening part of the boxes with tape, then glue them together. You can use PVA glue. Press the boxes to be glued well together and leave for 8-12 hours for the glue to dry.
- Cut off the opening part and glue them together with pieces of tape.
Glue the boxes together with tape from the back side
The second option takes less time, but the design is unreliable. If the dimensions are large, it may sag and sag.
With the lids cut off, the structure becomes shaky
To give a fireplace made of cardboard boxes a presentable look, we paint it “like brick.” To do this, cover the surface with thick grayish-brown paper. This color will be the background.
To paint, you need reddish-brown paint and a large foam sponge. It can be cut to the size of the brick - 250*65 mm. Pour the paint into a flat dish, dip a sponge into it, apply it to the paper and lightly press it, draw the bricks.
When working, you need to make sure that the “seams” between the “bricks” are the same width. This is not an easy task - you get distracted a little, and the size is not the right one. You can do it simpler - cut the masking tape into narrow strips, stick it on, and draw “bricks”. After the paint has dried, remove the tape.
Here's a fireplace made of cardboard
The top part had to be reduced because our fireplace was too wobbly. It is better to use whole boxes.
Symbolic designation of the fireplace
The symbolic designation of a fireplace in this design only in general terms resembles the shape of a traditional fireplace.
Contours with a shape similar to the original image are marked on the wall with wooden guides, decorative stripes, molding and other details on the wall surface.
To authentically reproduce a fireplace, paintings are often painted on the walls, even simulating fire. A symbolic false fireplace is ideal for lovers of non-standard solutions.
Bonus
Summarizing the above, we can draw several conclusions:
- A New Year's fireplace is a bright holiday attribute that will create a festive atmosphere in your home.
- To make a home fireplace you will need simple and affordable materials that everyone has. If you can’t find something, you can easily purchase it at the store.
- The fireplace can be used as a place to place gifts for loved ones. It is not only beautiful, but also a kind of interior decor.
Rate the author of the material. The article has already been rated by 1 person.
Not everyone in their house, and especially not in their apartment, has a fireplace. And sometimes you want to create a festive mood (to have somewhere to put gifts) or you just want to make the room more cozy and intimate. In this case, you can create an imitation. The simplest option is a fireplace made of cardboard. Typically used are packaging boxes from large equipment.
Preparatory activities
The design of a false fireplace, be it corner or rectangular, usually requires the presence of two basic elements: a portal and a device inside. A portal is a massive structure designed to imitate a stove, and the apparatus can be a bio-fireplace burner or an electric fireplace. In principle, you don’t have to install the device inside, then the firebox can be easily decorated with firewood, candles, fir branches or other decorative elements.
In the future, you can easily attach any decorative coating to a plasterboard base: tiles, mosaics, gypsum stucco, plastic panels with imitation brickwork, whatever.
Before starting work, it is advisable to choose a suitable place where the false fireplace would fit perfectly. Many people choose a corner fireplace because it takes up less free space. An excellent solution would be to place a dummy opposite the front door in an unused corner. With this arrangement, the fireplace immediately becomes the main accent in the interior of the room, the center of attention.
A simple sketch of a future fireplace
You can easily get inspired by ideas from the Internet, where you can even find a drawing of a corner fireplace made of plasterboard with dimensions. All you have to do is adjust them to suit your realities. You should choose the appearance of the fireplace in such a way that it does not particularly stand out from the style of the entire room, but better supports the given style.
At the final stage of preparation, you should collect the tools necessary for construction and suitable building materials. Let's briefly go over the materials, you will definitely need:
- Metal profile for the construction of a frame for drywall.
- To make a durable structure, you will need metal and wood screws to secure the drywall.
- Drywall for covering the frame and creating the shape of a false fireplace.
- Plaster will be required to level the corners and recesses from self-tapping screws.
- To prepare for tiling, you will need a primer. It is also better to prime the drywall before painting.
- At the preparation stage, you should decide how the finishing will be done and purchase the appropriate material: tiles, plastic panels, mosaics.
Additionally, various decorative elements may be needed: corners, moldings and more.
Successful placement of an imitation of a real fireplace
To make a corner fireplace from plasterboard, you will need construction tools:
- For marking you will need a pencil or marker, ruler, tape measure, level, plumb line.
- For basic work you will need a screwdriver, hammer drill, jigsaw, construction knife, metal scissors, pliers, screwdriver, hammer.
Other tools may also be useful, it all depends on the complexity of the structure and the methods of finishing it.