Toys are an indispensable attribute of childhood, appearing from the first days of a child’s life; bright rattles are gradually complemented by cubes and pyramids, soft toys and dolls, board games and balls. The number of toys is growing exponentially, and there comes a time when parents are simply forced to think about how to store them.
Even if you get rid of rattles and broken, spoiled copies, there are still a lot of toys left. And then the solution becomes a variety of containers in which you can put all this wealth for storage. In our case we will talk about toy baskets.
Features of the choice of material, depending on the purpose of the basket
According to the materials of the basket there are:
- From felt
- From jute, rattan and others
- From fabric
- From yarn
DIY toy basket
This is interesting: Pattern Sets of outfits for Barbie doll
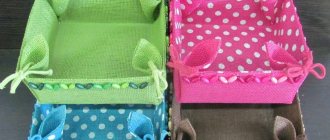
Textile basket
A house for dolls and cars can be sewn from fabric. The main thing is to calculate the dimensions so that all the baby’s toys fit in it.
Don't be afraid to make a big basket: you can never have enough toys, so you may have to create more than one of these in the future.
A basket made of fabric without a frame will be easy to make and safe for your baby. The shape will be maintained by padding polyester or other filler. Making such a basket is quite simple: you need to cut out the parts for the bottom and side walls, sweep out a rectangular bag, and baste the padding polyester on the outside. Then you need to cut out the external parts: the bottom and side parts (they should be 1–2 cm larger than the internal ones). Then sweep away the outer layer of the basket. Then sew the parts on a sewing machine. If necessary, you can sew on handles.
It’s worth thinking about the design: sew a basket from scraps or make an applique, or you can decorate the finished product with special iron-on stickers or braid patterns.
Knitted house for dolls
A basket for toys can be crocheted. After studying the master class, even a beginner in knitting can do this.
In order to crochet a toy basket, you will need:
- ribbon yarn (can be replaced with any ribbons or ribbons);
- scissors;
- hook No. 10;
- needle.
First you need to make the bottom. It's not difficult at all.
First, you should make a loop and secure the working thread between your index and middle fingers.
Then, through the loop, grab the working thread with your hook and pull it out in front of the loop.
After this, grab the working thread and pull it through the resulting loop.
Pull the thread and tighten (this loop does not count as the first stitch!).
Place the hook under both threads from below and grab the working thread.
Pull the loop through and grab the working thread again. Pull the working yarn through the two loops on the hook. 1st Art. b/n. ready.
Second row: increase after each stitch: ch. p., then 2 tbsp. b/n. in each loop of the first row. There should be 16 loops. Finish the row with a connecting column.
Third row: add loops through one (v. p. p., 1 tbsp. b/n.; 2 tbsp. b/n.; 1 tbsp. b/n.; 2 tbsp. b/n.). Alternate until the end of the row. You should get 24 loops.
Fourth row: 1 ch, * 1 st. b/n., 1 tbsp. b/n., 2 tbsp. b/n.*, repeat “from * to *” until the end of the row, finish with a connecting column. Total: 32 loops.
Related article: Jumping paper frog: origami technique diagrams
In the fifth and sixth rows, add 8 stitches evenly. The result should be 48 loops. The bottom of the basket is ready.
To knit the walls of the basket, you need to make a lifting air loop and knit a series of non-woven stitches. and no raises. Crochet under one side of the loop to make the transition clearer. At the end of the row, make a connecting half-column. Then knit in the usual way without increments in the round using single stitches.
In order for the basket to turn out striped, after knitting part of the side, you need to take another yarn and continue knitting (1 ch with a new thread and then non-woven stitches). Knit a couple of rows.
Now you need to make handles to make the basket easier to carry. To do this, we knit the next row like this: 2 ch, 10 tbsp. s/n., 5 v.p., skip 7 p., 17 tbsp. s/n., 5 v.p., skip 7 p., art. s/n to the end of the row and 1 tbsp. b/n. Then knit 2 ch.p.p., st. s/n. above st.b/n. previous row, and st. b/n. over chains of 7 v.p.
Ideas for advanced needlewomen are presented in the photo. If you wish, you can knit a pattern or a whole picture on a basket; you can also decorate the finished product with crocheted parts.
Newspapers keep order
Deposits of newspapers can serve as an excellent material for making baskets from newspaper tubes. Such a product will keep its shape, can be stored as a drawer in a closet, and it is also very light, so that the baby can handle it.
To make a basket from newspaper tubes you will need:
- a stack of newspapers;
- cardboard;
- long knitting needle;
- PVA glue;
- varnish;
- dye;
- ruler;
- pencil;
- scissors;
- cardboard box for base.
First you need to make newspaper tubes. To do this, you need to cut strips 7 cm wide from newspaper sheets, then wind them one by one on a knitting needle, starting from the corner, coating them with glue from time to time. When the strip is wound, you need to carefully remove the knitting needle. If the strips are short, you can glue two strips together by inserting one into the other.
Then you need to glue the edges of newspaper tubes to the outer base of the box so that there is an odd number of parts on each side. Bend the tubes, pressing them against the walls of the box. Let the corners of the box remain empty, then the product will look neater. Next, cover the bottom of the box with cardboard.
Finally, the time has come to begin the main work - weaving from newspaper tubes. To do this, you need to take a newspaper tube and run it horizontally between the vertical elements. The end of the tube should be glued. Repeat until the entire box is braided in a circle. When performing this step, you must ensure that the tubes are pressed tightly against each other and the walls of the box.
Bend the ends of the vertical tubes inward and glue them.
Now comes the fun part! Decorating the resulting wicker basket. It needs to be painted, then varnished for strength. If desired, you can decorate the inner walls of the box.
Even more ideas are offered in a selection of video lessons.
Handles and lining
For two handles, select 2 pieces of cotton fabric measuring 7.6 x 40.6 cm, also prepare two identical pieces of duplicating material measuring 5.7 x 40.6 cm. Using an iron, glue the dubbing material to the main fabric, placing it strictly in the middle of the cotton details. Sew the fabric along the long edge, turn the resulting strips right side out, and iron.
The lining of the basket is sewn according to the same principle as the main part of the product, with the difference that it does not need to be reinforced with duplicate materials. First, stitch the rectangle along the narrow edge, then, marking the bottom in quarters, baste or pin both parts with tailor’s pins. Sew the lining along the main seams, and if possible, overcast the seams to prevent the fabric from fraying. Leave the lining right side inward and press the seams.
By date of birth, you can calculate the optimal interior color for everyone
Miracle or legend: Samara local historians conducted an investigation into “Zoya’s Standing”
The fate of Archil Gomiashvili’s daughter and son, who also became actors
Step-by-step instructions for sewing baskets
To begin with, to understand how to make a felt basket, you should decide what color scheme it will be in. It will be made from a single piece of fabric or from several. You can adopt the idea of patchwork (forming a whole product from small pieces of fabric). Since felt is a type of felt, it will perfectly hold the desired shape without additional devices or seals.
So, how to make a felt basket with your own hands:
- You need to find or draw patterns for the basket.
- Next, the threads or ribbons with which the template will be sewn are selected.
- Then, the pattern is transferred to felt and cut along the contour.
- Now you need to sew it into the finished product.
- You can decorate a felt basket with beads, ribbons, or some felt elements.
Felt basket
Where to store old children's things?
Most parents are faced with an abundance of children's clothing due to the fact that young children grow very quickly. Although some people decide to sell clothes that their children no longer need, there are others who choose to keep clothes for future children or even grandchildren. However, if children's clothes are not stored properly, then later, when they are needed, it may turn out that the items are damaged and unfit for wear.
A self-storage warehouse is best suited for this. This method has many advantages:
- The space in the apartment will be freed up and it will become “easier to breathe.”
- The storage room has racks and boxes - this is convenient.
- The optimal temperature is set in the warehouse.
- Stable humidity is maintained.
- The common areas of warehouses are cleaned so that dust does not accumulate on objects.
- Treatment against insects and rodents is carried out.
- You get 24/7 access to storage boxes. You can pick up the necessary items at any convenient time.
- Boxes with sizes that suit you.
- Unlimited visiting time.
- Modern security system.
Storing things in a personal warehouse is the best way to solve the problem of “cluttered” space.
How to sew a toy basket with your own hands from fabric?
- Let's try to sew a basket for toys from a piece of material that has been lying idle for a long time. For this, in addition to the fabric, you will need a round template (you can use a dish, a large plate, or just a lid from a frying pan or pot). We stock up on a tape measure and scissors, needles and threads, and a few pins. We will also have to iron the fabric, so the iron should also be at hand.
- So, we place the fabric with the wrong side up and mark a circle on it, for which we outline our dish or another round object of your choice. Now we cut it out according to the resulting template, at the same time measuring how much the circumference is. Measure the fabric so that its length matches this indicator, and add another 5 cm for the seam, and make the width as you need, leaving allowances for the hems. By the way, the more folds there are, the more durable and rigid your basket will be. The width will affect the height of the product.
Cutting out a circle
- Now we fold the fabric in half with the face inward and tuck the edges, pinning them together. We try on whether the bottom matches the length of the fabric. If necessary, the width can be changed. Now we sew our fabric, after which we fix the bottom with pins . The edge is stitched (or machine stitched) along the length of the circle.
We fasten
- If you need a more rigid basket, use the method described above to make another cover for it. We insert one into the other so that they are wrong side to each other, and combine the edges, tucking and pinning.
Turn it inside out
- To prevent the fabric from fraying, use an iron and press out any wrinkles. All that remains is to sew our edge and the comfortable, beautiful basket in which we will put the toys is ready.
Fasten and stitch
- Don't be alarmed if it seems shapeless to you - as soon as you put toys in it, it will transform.
The finished result
This is interesting: Paper Cat pattern
Progress
Now we will talk about how to sew a neat and spacious basket for toys.
Sequencing:
- We put together the main fabric, the backing and the padding polyester. First you need to do the side seam. To do this, the wrong side is applied face to face of the main fabric and padding polyester is placed on top. Everything is stitched together using a machine seam. It turns out to be a long pipe.
- Now you need to process the top edge. It is stitched, then the fabric is turned outward. It turns out that the walls are ready. To make them stronger, you can stitch the edge of the basket several times and even quilt the walls several times along the entire length.
- The walls must be connected to the bottom. To do this, fold three layers of the bottom and carefully pin them to the walls of the basket. It is stitched around the circumference. This must be done with a thick needle at low speed. Otherwise there is a risk of breaking it. The edge will turn out rough and ugly, so it is better to decorate it with bias tape.
- The basket turns inside out, you need to iron it well on both sides and you can use it.
Below is a master class on how to sew a basket yourself.
Basket made of newspaper tubes for toys
- Crafts from old newspapers are a very popular hobby, and a do-it-yourself toy basket made in this way is light in weight and at the same time stable in size and shape. Simple things like paints, pencils, a ruler and glue will help you make it. You will also need a box and sheets of cardboard, varnish and, of course, the newspapers themselves.
- Let's start by cutting the newspapers into several strips about 7cm wide. We wrap each one around a skewer (knitting needle, pencil or any other similar object), sealing it with glue, adding it little by little as we wrap the newspaper.
- After wrapping the remaining edge of the strip, first lubricate it with glue, and then let it remain suspended for a few minutes, drying. How many of these tubes you will need depends on the volume of the basket you want to make.
- Now we take the prepared box and glue the edges of our tubes to it so that there is an odd number of them on each side, and let the corners of the box remain free, they will be useful for beautifully bending the basket. We coat the bottom with glue and glue a sheet of cardboard to it, and then, so that the glue sets well, we press down the bottom with a weight.
Preparation
- And now - weaving the tubes themselves between the edges of the box. This must be done, carefully ensuring that the tubes fit neatly and evenly to each other. Having reached the height that you would like to have in this way, cut off the excess edges of the box, and secure the last tube with glue. All tubes must be bent inside the future basket and also glued.
- All that's left is to coat the bottom with glue and place a sheet of newspaper on it. Wait for it to wrinkle a little, and after the adhesive layer has dried paint the basket using stain or regular brown paint. The remaining touch is to open the product with varnish and decorate it at your discretion.
Result
Storage racks
A very convenient option for storing many toys is to make a wooden rack (open). In it, each shelf can be occupied either by pull-out cardboard boxes or standing books, lying soft toys and many children's necessary items. The main thing is that the child can take them out independently and subsequently put them back.
The rack is made of wood with square cells. At first it can be placed horizontally (while the child is small), and then turned over and placed vertically (when he grows up). Subsequently, such racks can be installed in several different sizes and heights, resulting in a whole furniture system for storing not only toys, but also necessary items for study.
Idea for making a toy box (1 video)
Other ideas (35 photos)
Plastic boxes
Pockets for toys
Toy storage suitcase
Jute basket
There are two manufacturing methods - weaving and knitting.
To make a wicker jute basket with your own hands you will need a little more materials and time. Namely - scissors, good glue, jute twine, and a form for weaving (you can take a large bucket or something similar). Or, for another design, for a knitted basket, you need thin jute, a hook, and also a base in the form of a bucket. It is worth knowing that such a basket will be more durable than, for example, a fabric one.
Step-by-step master class on making a thick jute basket:
- First, you need to prepare all the materials so as not to waste time on this later. You need to make pieces of jute, relative to the diameter of the chosen shape. The length of the segments should be twice the width of the form. You need to understand that this basket will need to be woven.
- Then, take 4 threads and intertwine them with each other.
- Next, on the sides, 2 more ribbons are woven.
- Checkerboard weaving is done in this way until a stable square is obtained.
- You need to glue a long ribbon, then the square is woven in a circle.
- Once you have a circle of the desired diameter, the remaining tapes are lifted and secured on top with tape or adhesive tape.
- Next, you need to take a thread the size of 2-3 jute ribbons and start weaving the base to the desired height.
- Once the desired height of the basket is obtained, the excess tapes are cut off, but secured with glue for strength.
- The basket is ready. You can decorate it with ribbons, artificial flowers, felt figures, and so on.
You might be interested in this: The procedure for sewing a bedspread with your own hands
Interesting! The knitting technique is complex. To make such a craft, you need to be able to crochet or be able to read diagrams; if someone cannot do this, it is worth reading about it separately.
- You need to take a hook relative to the size of the jute.
- First, the base is crocheted, also according to the size of the solid base, according to the pattern of a regular crochet circle.
- Next, the walls are knitted, but without allowances, as in a circle.
- The end of the thread is fixed with glue.
- You need to mix glue and water and saturate the threads with the resulting solution. Let dry.
- The basket is decorated with beautiful decorative materials.
Jute basket
These products are at the peak of popularity due to the fact that the materials do not harm health, as they are made from environmentally friendly materials, which is good news. Wear resistance is perhaps the most significant advantage; with careful storage, such a basket will last for decades. They look quite stylish and fit into literally any interior.
Additional Information! To prevent such baskets from losing their appearance, they need to be cleaned with a brush dipped in a saline solution, and then wiped with a rag, dabbing it in clean water.
Cleaning jute baskets
How to use decorative boxes?
Thrifty owners do not have anything superfluous or unnecessary, and they will use everything that can be reused. Sometimes masters approach their work so creatively, the degree of transformation is simply impressive. For example, creative people are able to decorate an ordinary box with their own hands in such a way that it will compete with antique boxes.
It's amazing how you can transform an ordinary cardboard box
Imagination and resourcefulness are the best advisers in decorating. You can use other people's ideas, adapting them to your capabilities and materials. But not only the method, technique or technique of decorating the box is important; the consistency of the filling and the appearance of the packaging, which was given a “second life,” is much more interesting.
Organizer for storing handicraft items
Stylish boxes will decorate the interior of any room
So, the original appearance of the container is not important for the work, the main thing is that the old shoe boxes for decor are intact and of the correct geometry. Most often this is an ordinary parallelepiped or cube, but there are also octagonal boxes. Although it is not necessary to take shoe containers, polygonal boxes are produced most often for candies, and they are quite aesthetic in themselves.
You don't have to be a professional decorator to decorate an old box.
Craftswomen use several boxes of different sizes and shapes, which are decorated with common materials or decorated using common techniques. Then they are stored, tied with a ribbon, somewhere on a visible set. There is no shame in giving such packaging as a gift, for example, 3 polka dot boxes, as in the photo.
A scrap shoebox, polka dot paper and ribbon are all you need to create a unique decorative item.
Boxes with intricate decor will decorate any interior; they are suitable as an original idea for decorating a room with your own hands. Containers of the same format are proposed to be decorated from the inside. These new lidless "boxes" can be nailed to the wall as a good alternative to shelves.
You can place a carrier in a decorative box on the computer desk where gadgets will be charged. The idea of hidden charging is interesting because all the wires will be hidden. It also eliminates the need to search for something that should not always be in sight, but may be needed at any time.
Now chargers will not be scattered around the house
Wall-mounted cardboard boxes can be used to store or display small, lightweight items:
| 1. | Hidden socket with carrying case | For storing and powering chargers, cords and headsets for mobile phones. |
| 2. | Hand-made | Display beautiful knitted toys, homemade jewelry, and children's crafts. |
| 3. | Cosmetics, nail polish/nails, hair care items | Hair dryer attachments, combs, hairpins, elastic bands, hairpins. Hairspray and foam. Bottles of gels, files and nail polish remover. |
| 4. | Collection of mini toys | Kinder surprise figurines, origami toys, knitted characters, Barbie clothes. |
| 5. | Souvenirs brought from vacation | Shells, starfish, corals, urchin fish, and other objects of marine fauna. |
| 6. | Designer details | Lego, unassembled puzzles, detachable blocks. |
| 7. | Stationery | Writing instruments, pencil boxes, rulers, squares, colored erasers. |
| 8. | Handicraft tools | Buttons (in small boxes), sewing threads and needles, knitting needles, hooks, scissors. |
| 9. | Shade-loving indoor plants | Mini succulents and cacti (many need additional lighting). |
Filling a shoebox with DIY decor depends on many factors, including lifestyle, hobbies, and the overall number of small items in the home.
Convenient place to store jewelry
Shoe boxes can be used to store books
For decoration, you can take old maps from the atlas
The original design of the boxes with your own hands can eloquently remind you of what is inside. A small box for pencils, crayons and brushes is decorated according to the theme. Containers for handicrafts are pasted over with buttons and other small things to be opened with a silver or golden aerosol, as in the photo.
Of course, skillfully decorated boxes cannot but be used for their intended purpose. It is suggested to store evening shoes worn on a special occasion in decorative containers. You can store shoes or sandals in golden boxes in a place of honor to leave a tangible memory of a happy event (wedding, graduation, sea cruise, trip to Paris).
To make such a vintage suitcase out of a box, you will need paint, a belt and a little imagination.