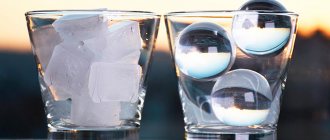
When approaching this issue, it is worth understanding that water frozen in molds and ice for cocktails and other drinks are different products. Ordinary water, due to the gases dissolved in it, becomes cloudy during the freezing process, and cracks and chips form on the cubes.
Types of ice for alcoholic drinks
To prepare ice for a drink, you can use ordinary forms, which are placed in a regular refrigerator, and to make ice in large quantities, you can use a special unit called an ice maker.
Although few people know this, ice can be made in several categories and varieties:
- Food. This type of ice appears in the form of individual pieces of ice, shaped like small cylinders or cubes. Most often made using an ice maker from filtered drinking water. This type of ice is used as a cooler for alcoholic and non-alcoholic drinks or cocktails.
- Lump. It is prepared in the form of pieces of different shapes and is added both to cool the liquid and for beauty in alcoholic cocktails. In this category, ice can also be divided into cups, cubes and nuggets.
- Chipped. This type of ice is usually used at presentations and exhibitions to keep drinks and food cool. This ice has the form of crushed pieces that have an irregular shape. This type of ice is also used in bars and restaurants for preparing cocktails in a shaker. You can prepare crushed ice at home, by breaking chunks of ice with a kitchen hammer and using a cloth so that the fragments do not fly away. Because crushed ice melts much faster than other varieties, it is prepared right before use.
- Ice Frappe. This name is given to finely crushed or shaved ice, which is used to make cocktails with the addition of fruit, cruchons, Mojitos, and other drinks that are usually drunk through a straw.
- Granulated. This type of ice has the shape of small hailstones, approximately 1 cm in diameter. This ice is easy to store, it does not freeze and mixes quickly with the product and never damages its soft tissues. Most often, such ice is used to serve wine, champagne and some types of dishes on an ice bed.
- Ice cubes Fancy. This sonorous name was given to ice cubes in which a variety of candied fruits are frozen. Such cubes can also be made from coffee or tea, and if preparing a cocktail involves using juice, berries or mint leaves, then all this can be frozen in Fancy ice cubes.
- Color. This ice is used not only to cool drinks, but also to create their original design, or decorate the glass. Juices, lemonades and cocktails are usually served with this ice, although it can be used for any other purpose at the user’s request. To obtain colored ice, fruit and berry juices are used, which have different colors, and in addition, such ice cubes have a pleasant original taste. In order to give the ice greater originality, layer-by-layer freezing is sometimes used, then each ice cube has an impressive and beautiful appearance.
- Fried. Despite the unusual and controversial name, this ice is quite simple to prepare. To do this, small pieces of fruit are frozen in the freezer, then the egg white is beaten and a meringue is made, the diameter of a tennis ball. A piece of ice is pressed into it, after which it is doused with cognac and set on fire. has time to burn before the ice melts, and the meringue turns out toasted, maintaining a cool and refreshing effect, with ice inside.
Today, in order to make any type of ice, you can use an ice maker or a wide variety of freezing molds, which are usually made of plastic or food-grade silicone.
Use a cooler container or a special bucket to maintain temperature
Buy a container whose shade is light
You need to purchase a special container or a regular bucket that has isothermal properties. They should be made of light-colored materials. Products of this type, due to their color, absorb a minimal amount of heat. Accordingly, the ice in them melts much more slowly.
Containers and plastic buckets are quite convenient products. For the reason that the temperature of the ice here will remain for at least a day. Avoid using metal containers and buckets. They are very impractical because they absorb a lot of heat. Accordingly, the ice in them can melt quite quickly.
Strengthen the walls of your container (or bucket) with foil
The foil must be aluminum. In this case, you can protect the ice. Don't let it melt. To improve the condition of the ice, be sure to cover the edges of the container with foil. You can do the same with a bucket.
Take a towel and wrap a container of ice in it
Another effective way to keep the container warm is to take a towel. And then use it to wrap the container. Or an ice bucket.
This method is quite effective, but not long-term. Of course, the towel will make the ice melt more slowly. However, it will still happen. And very quickly. Literally within an hour after you take the ice out into the air.
Home methods
Experienced bartenders know exactly how to make clear ice at home, without the use of special equipment. There are several simple methods for this.
Method one
For this option you will need to prepare:
- clean water, passed through a filter, or purchased in a store, but without gas;
- a boiling container, such as a saucepan;
- forms for freezing.
Making ice using this method involves several steps:
- Clean the water from excess salts and suspended matter or use already purified water.
- Pour the liquid into a container and boil.
- Cool it at room temperature.
- Boil the water again - this will remove more air.
- Cool the water and pass it through the filter.
- Pour water that has cooled to room temperature into the molds and freeze.
Important! Ice obtained in this way is more transparent than freezing ordinary water. There is also a method that does not require boiling water.
There is also a method that does not require boiling water.
Method two
In order to make clear ice at home without boiling, you will need:
- clean water (it is better to filter it several times or buy it);
- large capacity for freezing;
- ice molds.
What to do with all this:
- About two liters of clean water are frozen in a large container, after which the frozen block is removed (the easiest way is to dip the bowl in warm water and turn it over onto a lint-free towel).
- Then you can chip off the ice from the edges with something sharp, gradually getting to the cloudy middle, which is not needed. There is also an option when the middle with air is washed out with water. Next, the extracted chopped pieces are again laid out in molds, waited until it melts, and again sent to freeze until ready.
Method three
If the freezer functions allow it, you can use slow freezing. To do this, you need to set the temperature in the chamber to -1, wait until the chamber reaches it, and put the prepared water in the freezer. In this case, it is better to wrap the forms with cling film.
Important! This freezing lasts about a day, but all the air will have time to completely leave the water, and the ice will turn out smooth and beautiful.
Method four
This option involves creating a salty environment. First you need to prepare a saline solution from sea or regular table salt.
Steps to make clear ice:
- Water is poured into the container and salt is added - the required concentration of the solution is achieved experimentally, since freezing conditions are different.
- The salt should completely dissolve in the water.
- Next, the container is placed in the freezer at a temperature of -1 or -2 degrees, but not lower.
- Afterwards, you should wait about ten minutes and place the molds filled with water in the salty solution.
- This freezing will take about 12 hours.
Important! This method is considered the most effective. Another advantage is that salt water can be kept in the freezer constantly, and ice can be frozen as needed.
The listed methods will help you prepare crystal clear and beautiful ice for drinks, without bubbles. And it will definitely be no worse than in the coolest bars. If you don’t have an ice mold on hand, don’t worry, you can also make it yourself, at home.
Recommendations
To make clear and clean ice, you need very little, but do not forget about these additional recommendations:
- Water absorbs odors well, so when cooking, make sure that there are no strong-smelling foods nearby.
- You can also use a thermal bag for freezing. Just put the molds in the bag and put it in the freezer at a temperature of about minus 8 degrees. The water will freeze in the opposite way - from top to bottom, which means the air will come out of it in a different way. This ice may be a little cloudy on top, but not in the middle. This means that if you leave ice in a bowl at room temperature for a short time, the cloudy water will melt.
- When using boiling, it is better to take stainless steel dishes. Aluminum containers are not suitable for this method.
- Do not pour hot water into plastic molds, and do not put hot water in the freezer. Otherwise, the mold may melt and the refrigerator may leak.
- If you want to surprise your guests, make fruit ice: beat the fruits with a blender and add juice, sugar or syrup. Afterwards, pour the mixture into molds and freeze.
- When serving ice without drinks, the best option is to use a special bucket - a cooler.
- It is more convenient to take the ice with tongs, so it will not melt ahead of time.
How to get clear ice
In fact, everything is simple - ordinary physics:
- If there are no air bubbles in frozen water, it will be transparent.
- If there are a lot of bubbles in the water, it will turn cloudy when frozen.
Why is this happening? When freezing, the liquid hardens unevenly, starting from the edge. Therefore, layer by layer, the water accumulates all the air in the center. And when the air has nowhere to escape, and the center begins to freeze, that same cloudy center appears. Therefore, to make ice transparent, you need to remove air from it. There are several options for this.
Ice maker - professional option
You can always purchase a special device for freezing water, which is used in most bars. There are many different options for ice makers available today, from simple home models to large professional ones.
The essence of how the device works is that the water in it freezes in layers, not giving any chance for air to get inside. But this device is a rather expensive entertainment, and if you do not need a large amount of ice, you can get by with improvised means.
Ice Cube Design Options
Before pouring water into ice molds, you can place mint leaves, linden flowers, fruit slices, and berries.
In order for the decor to be in the center of the cube, water must be poured into the molds in layers as it freezes. This way you can even get cubes of different colors with different tastes.
Celebration on a grand scale
Many readers may be interested in the question of how entertainment venues manage to create large quantities of ice cubes. How to make clear ice so that there is enough for hundreds of visitors and guests? For this purpose, special units are used - ice generators. With their help you can freeze a lot of water; they maintain an optimal temperature inside the chamber, which allows you to make the ice transparent.
But even when working with such a machine, it is important to observe certain conditions. In addition to the fact that the quality of the water must correspond to the specified parameters (the absence of impurities is mandatory), batches of ice must be made simultaneously
That is, adding water to the cells while ready-made cubes remain in the chamber will lead to a poor final result. It is best to use the liquid at room temperature: as practice shows, cooler water freezes unevenly, and the ice turns out cloudy.
Interesting fact
To confirm that ice actually stops skin aging, researchers conducted an experiment lasting a month. It was carried out for two women, aged thirty years. One needed to wipe her face with ice twice a day for a whole month, the second just needed to wash her face twice without ice.
A month later, it was possible to state: the girl who used ice on her face stopped the aging of skin cells. Her face was visually fresher, younger, her skin was smoother, there were no bruises or swelling under the eyes, and there was no irritation. The second girl showed no signs of improvement within a month.
How to make ice without an ice mold - affordable creative
It is not necessary to have special molds at home or design them yourself to make beautiful and original ice. If you wish, you can find many worthy solutions to the situation:
- If we are not talking about preparing cocktails, but about serving single-ingredient drinks, then you can prepare ice directly in glasses. To do this, you will need suitable dishes that can withstand temperatures of -1ºC. Just pour a little chilled drinking or boiled water into the bottom of the glass and put it in the freezer for slow freezing. Be sure to ensure that the remaining parts of the container are completely dry. This method allows you to achieve the necessary cooling, and gives the drink itself an unusual look in the glass.
- To freeze water, you can use plastic cups with bottoms of different diameters. Pour the liquid no more than a centimeter and freeze as usual. The output will be original round pieces of ice. They can even be divided into halves or quarters if you initially line them with pieces of plastic cut out with your own hands from unnecessary bottles.
- Some people manage to make ice using lids. They can be made of plastic or metal, twisted or rolled. The only difficulty is that when removing ice from such products, it is difficult not to damage it.
- If desired, you can use Lego parts or silicone molds as blanks. You just need to thoroughly disinfect them before use.
- In the worst case scenario, you will have to make do with plastic bags. We cut them into large pieces or initially take very small packages. Pour water into them and roll them into balls of various sizes. Place in a bowl and freeze according to instructions.
In addition, you can come up with other equally original options for making ice. The main thing is to act according to the rules, then the components will become a real decoration of the drinks served.
How to do
You can make crushed ice at home. Edible ice is small pieces of ice in the form of cubes. Simply put, ice is nothing more than water in a crystalline state. Ice is prepared from purified water using an ice maker.
At home, you can prepare it in the freezer by pouring water into a special form for making ice. This form is a plastic structure with small cells. Once the ice freezes, it will need to be removed. To do this, you need to bend the freezing container a little until all the pieces of ice fall out. Ice is placed in a bag. You can crush the ice using a regular wooden hammer. Ice should be crushed very carefully so as not to damage the bag. If you don't have a hammer, you can use any blunt object. Place a plastic bag of ice on a wooden board and gently crush it with a hammer.
You can also make crushed ice using a method known as a Lewis pack. It is a bag for storing coins. The Lewis pack is very inexpensive and makes a lot of ice. The container for freezing ice is bent, as in the previous method, until all the ice cubes fall out. The ice is placed in a Lewis bag and crushed with a wooden mallet. If you don't have this bag, you can use a clean pillowcase. The Lewis Pack is ideal for crushing large quantities of ice. What is the difference between crushing ice in a regular plastic bag and a Lewis bag? A plastic bag contains enough ice to make several servings of cocktails. A Lewis bag holds much more, so it is used when a large company is expected.
Ice made using a Lewis bag is ideal for cocktails and is also drier.
The most popular way to make ice at home is to use a food processor or blender.
Place ice cubes in a food processor or blender, set it to pulsate mode and crush the ice to the desired size.
Ice can also be crushed in a shaker, where it is shaken until the walls are covered with frost.
From the history
Beautiful noblewomen have long used ice to rejuvenate their skin. The main mistress of the French guarantor Louis XV had a habit of sleeping with bowls of ice placed around the room. Catherine the Second had a custom in the morning to wipe her face with ice. Diana, King Henry's mistress, had a habit of rubbing crushed ice on her body. Even Napoleon's mistress watched her face in this way. Ice cubes were also used by magnificent actresses: Marilyn Monroe, as well as Marlene Dietrich. Ice is an excellent tonic.
Immutable condition
So what's the deal? Why is it so difficult to get clear ice at home? How to make it clean, like a tear, smooth and shiny? The answer to the question is quite simple: the cubes will then turn out ideal when the conditions are favorable. There are several of them, and now we will tell you about them.
Firstly, the raw material from which you plan to make perfectly clear ice must also be ideal. What does this mean? It's simple: tap water is not good for us. In the substance that utilities supply through pipes, it is quite difficult to determine the composition. Impurities of metals, chemicals and other nasty things during freezing do not allow water molecules to crystallize as they should; they break the initially clear structure of the ice.
Secondly, liquids often contain air; small bubbles prevent frozen water from becoming transparent and smooth. This suggests a conclusion: the water must be clean and free of gases. It can be an ideal raw material, but doctors strongly do not recommend using it in the diet.
The best recipes for simple vodka cocktails
Of course, it is better to drink vodka in its pure form, with a good snack and in good company. But sometimes it’s out of place, and it’s just boring - you want to try something that will catch you. In such cases, we recommend that you prepare simple cocktails with vodka that can be easily prepared at home.
In general, vodka is ideal for cocktails - it is strong, has no smell or taste (of course, we are talking about high-quality vodka). Many bartenders recognize it as an ideal ingredient for mixed drinks, and in this they are 100% right. The official one can be safely added to a cocktail in order to increase its strength, without affecting the taste and smell.
In addition, you can completely create your own cocktail from vodka, using the formula for the ideal drink, which is floating around the Internet:
A + 2B + 7C , where
A – sweet part (liqueur or syrup);
B – sour part (lime or lemon juice);
C is the bitter part, that is, the alcoholic base.
Thus, by mixing 7 parts of vodka with two parts of lemon juice and adding to this one part of sugar syrup or liqueur, we get the perfect cocktail. However, there is absolutely no need to reinvent the wheel. In fact, there are a huge number of vodka-based cocktails. We chose the simplest ones.
Secrets that will allow you to get clear ice without bubbles
Frozen water and ice for cocktails are two completely different things. Contrary to the promises of manufacturers of ice making devices, it is not enough to pour water into the mold and put it in the refrigerator. Only with preliminary preparation can you count on the final product being transparent and attractive.
There are several methods for producing high-quality ice with your own hands:
- Treated water. Pour water into a steel or enamel container (most importantly, not aluminum) and bring to a boil. After the liquid has bubbled for a few minutes, cool it naturally. Then boil the water again and cool again. In between boiling periods, do not forget to cover the container with a lid to prevent dust from settling. After processing, pour the water into molds and freeze. This approach allows you to obtain transparent ice due to the fact that air bubbles are removed and water molecules fit closer together.
Tip: Regardless of the type of ice making approach, professionals recommend always using filtered or drinking water. Otherwise, the unpleasant smell will go away only temporarily and will be revealed in full after the cube gets into the drink.
- Slow freezing. If time and the capabilities of the refrigeration unit allow, then you need to set the temperature to -1ºC. We wait until the temperature rises to the desired level and place the molds with water poured over them in the chamber. Additionally, it is recommended to wrap the device with cling film. The holding time is at least 24 hours. Slowly pushing out the bubbles as the liquid cools ensures that the ice is clear and smooth.
- Freezing in a salty environment. Some people suggest using sea water to prepare the base, but if this option is not possible, you can prepare a salty medium with your own hands. True, achieving ideal concentration can only be achieved through experience. Practice shows that with this approach you can hope for the desired result even when tap water freezes. Pour water into a bowl, add salt, stir. Place the container in the freezer; the temperature should not be lower than -2ºС. After the liquid becomes very cold, lower the ice trays filled with water into it and put them back in the freezer.
The last option is considered the most correct and preferable. During this treatment, ice cubes become not only transparent, but also smooth, without cracks or streaks. All harmful particles will be displaced, so the elements, once they enter the drink, will not cause an unpleasant odor. An additional advantage of this approach is that salt water can be kept in the freezer permanently (provided the set temperature is maintained) and used repeatedly.
Making an ice mold
There are a lot of ways to make ice without a mold, it all depends on your imagination. Here are some interesting options:
- If it is assumed that the drink will be consumed without mixing it in mixes or cocktails, then there is an option to immediately freeze the water in the container for serving the drink. Please note that the dishes must be resistant to temperature changes and compression from cold. Also, its walls must be completely dry. For such freezing, an amount of clean water is required, poured onto the bottom of the dish, and placed in the freezer for a day at a temperature no higher than minus two degrees. Serving drinks in transparent containers, in addition to the necessary cooling, is also very unusual.
- To get frozen water in the form of rounds, you can take plastic glasses of various sizes. Water must be poured only to the bottom, 0.5-1 cm high, and frozen. If you line the bottom with plastic in half or into 4 parts, you can get ice in the form of halves or quarters of a circle, respectively.
- Plastic bottle caps or metal lids are also an interesting option that can replace round ice cube trays. True, you may have difficulty extracting it from the lids.
- If the same ice is not needed, you can use a base from assorted sweets. Choose substrates that will not wrinkle or leak. As a result, you will get interesting shapes of candies.
- There is also the option of using children's construction sets or sand molds as a form. Be sure to rinse, degrease, and disinfect any mold well before use.
- A regular plastic bag can easily be turned into a freezer pan. Just pour some water into it, tie a knot, add more water, tie another knot, and so on until the bag is gone. Of course, the shape of freezing in this way will not be even, but if you follow the preparation rules, then transparency and the absence of bubbles are guaranteed.
You can use any of the options you like or come up with your own to make transparent ice and molds for it.
Vodka cocktail recipes
Of course, it would be stupid to rush into all seriousness when there is an unshakable classic. The simplest mixed drink with vodka has always been and will be the legendary Screwdriver cocktail, we have already written about it. No less popular is the Bloody Mary cocktail, the recipe of which can be easily adapted to suit home conditions by replacing expensive sauces with regular salt and pepper.
An even easier way to make Vodka on the Rocks is to simply pour 50 ml of vodka into an old-fashioned glass with ice, but this requires very high quality vodka. But it's too simple. In the end, we must not forget about more interesting classic drinks, the Black Russian, for example. We went through all this. Today we have new heroes visiting us.
Cocktail Vodka Sprite (long drink, build)
Ingredients:
- 50 ml vodka;
- 150 ml sprite;
- 20 g lime.
Preparation:
Everything is very simple. You need to take a highball, a tall narrow glass, and fill it with ice. Then pour 50 ml of vodka into it and top it with Sprite. Gently stir with a bar spoon and garnish with two lime wedges. A very simple and refreshing drink that can be prepared without any difficulties. The next mixed drink is just as good.
Energy Vodka / RedBull Vodka (long drink, build)
Ingredients:
- 50 ml vodka;
- 150 ml energy drink (RedBull);
- 10 g lemon.
Preparation:
Everything is very simple. Take a highball and fill it with ice. Add vodka and top up with RedBull. Mix it all with a bar spoon and garnish with a slice of lemon. If desired, you can add a couple of drops of grenadine for color. This is probably one of the most popular cocktails in nightclubs - it invigorates in a way that is not childish. It is not recommended to drink no more than two copies, because its heart is not iron. The next drink is safer.
Cape Coder (long drink, build)
Ingredients:
- 50 ml vodka;
- 150 ml cranberry juice;
- 5 g cranberries optional.
Preparation:
Everything is very simple. Pour ice into a highball glass and pour 50 ml of vodka. Add cranberry juice to the top, stir with a bar spoon and decorate with cranberries. The latter, however, is not necessary. By the way, an incomparable cocktail with a very subtle and unusual taste. To enhance the effect, we recommend using cranberry vodka (for example, “Finlandia Cranberry”).
IQ (long drink, build)
Ingredients:
- 50 ml vodka;
- 20 ml honey syrup;
- 150 ml grapefruit juice;
- 10 g orange.
Preparation:
Everything is very simple. Fill a highball glass with ice and fill it with 50 ml of vodka, 20 ml of syrup and juice to the top. Stir everything with a cocktail spoon and garnish with orange zest. This drink is intended for lovers of bittersweet cocktails.
Vodka martini (short drink, shake)
Ingredients:
- 50 ml vodka;
- 15 ml dry vermouth;
- 1 olive
Preparation:
It's a little more complicated. Fill the mixing glass with ice, stir it until frost appears on the walls of the glass and drain the melt water through a strainer. Add 15 ml vermouth and 75 ml vodka. Stir the cocktail with a bar spoon and pour it through a strainer into a cocktail glass. Garnish with green olive.
Tips for making edible ice
Not only impurities, but also air bubbles reduce the transparency of ice. To get high-quality ice at home, listen to our recommendations:
- The water in the water supply network contains many impurities; ice is not transparent when produced. One of the basic rules of professionals is that ice must be made from purified water. If you take water from a tap, be sure to thoroughly clean it with a filter and boil it, preferably twice. Boiling will help get rid of unwanted air.
- Leave the water to stand for several hours, all impurities will settle. Carefully, being careful not to stir up sediment, pour the water into another container.
- You can prepare a variety of ice figures using silicone molds.
- When ice freezes, it absorbs foreign odors; try not to cook it near strong-smelling foods.
If you don’t have the required number of ice trays on hand, use improvised means. For example, fill small disposable plastic cups to the required height and freeze. The cups are flexible, removing the ice is not difficult. Another option is to cut pieces of food-grade polyethylene into squares, pour in a lot of water, tie them in a knot, and freeze them. You will get neat balls that will look impressive in a cocktail glass.
Simple alcoholic cocktails with vodka at home
The bar list of each night establishment offers a wide range of such drinks.
The most popular cocktails based on this alcohol are included in this list:
- "Blue Lagoon";
- "Cosmopolitan";
- "Screwdriver";
- "Bloody Mary";
- "Boombox";
- "Breakfast";
- "Bitter Pill"
- "Royal shot";
- "IQ";
- "Flag of Russia";
- "Cossack dose";
- "Morning with my beloved";
- "Reanimator".
You can easily prepare any alcoholic cocktail with vodka at home, organize a party and invite friends.
Delicious ice
Using ice you can change not only the temperature, but also the appearance and taste of the cocktail:
- Add aromatic herbs to the ice figures; they will decorate it and give it a spicy original taste. The most suitable options are mint, thyme, lemon balm, and basil. Be sure to consider the compatibility of the drink and herbal supplements. Instead of herbs, you can freeze tiny edible flowers - small buds of roses, violets, nasturtiums.
- Freeze berries (after removing the seeds), fruit slices, olives, citrus slices, melon or watermelon slices. Fill the mold to about a third of the volume and freeze. Place a slice of product and fill with water. An unusual cocktail can be served by placing pieces of nuts in ice cubes.
- Use juices, lemonade, fruit drinks, liqueur. This will enrich the taste of the cocktail and make its color brighter. The main thing is not to forget about the compatibility of tastes.
- Add crushed chocolate or shavings to ice; you can freeze the finished chocolate drink.
- Take food coloring and flavoring. Multilayer ice cubes look especially interesting. Pour some water into the mold, add flavoring and coloring, and freeze. Pour in a little more water, add another flavoring and coloring, freeze, etc. These cubes are an excellent decoration for cocktails.
Watermelon frozen dessert
What ingredients will you need:
- bright-colored watermelon pulp – 400 grams;
- granulated sugar - 170 grams;
- one medium-sized lemon;
- kiwi – 2 pieces;
- blueberries – 100 grams;
- chilled water – 150 ml.
It will take 4-5 hours to prepare.
Calorie content – 118 kcal.
How to make popsicles from watermelon:
- The granulated sugar should be divided into three parts because this ice is made of three layers;
- Place the seedless watermelon pulp into a blender and add a third of the granulated sugar;
- Cut the lemon into two parts, squeeze the juice from half and pour it into a blender with the watermelon with sugar;
- Grind everything until puree is formed;
- Pour watermelon mixture into molds;
- Dip the blueberries into the watermelon mixture; they will become watermelon seeds;
- Place the molds in the freezer and leave for a while;
- As soon as the mixture freezes a little, insert a stick into each mold;
- Put it back in the freezer;
- Make a second layer in the container. Pour in water, juice from half a lemon and a third of sugar;
- Stir thoroughly until the sugar is completely dissolved;
- Take out the molds and pour the second layer;
- After this, we make a third layer of kiwi. Peel the fruits, cut them into medium pieces and place them in a blender container;
- Add sugar, add a little water and puree in a blender;
- Place the last layer of kiwi into the molds;
- Place in the freezer for several hours until completely frozen.
Fruit ice
If you have at least once read the composition of store-bought fruit ice, you know that it contains nothing but chemicals. But in fact, ice made from natural ingredients is an excellent low-calorie treat. Let's figure out how to make popsicles at home.
"Pineapple Delight"
To prepare the dessert, prepare:
- 250 g pineapple (fresh or canned);
- 250-300 ml water;
- 150-200 g sugar.
Preparation:
- Pour water into a stainless steel saucepan and add granulated sugar into it. Over low heat, stirring continuously, cook syrup from it. As soon as the mass thickens, it is ready. Adjust the amount of sugar to personal preference. If you use canned pineapple, you will need less sugar than if you use fresh fruit.
- Puree the pineapple in a blender. Add lemon juice to it. Gradually introduce sugar syrup, focusing on the sweetness of the mass. You may not need all the syrup.
- Pour the mixture into special ice cream molds. If you don't have these, use tall glasses for these purposes, inserting an ice cream stick into each of them.
- Put ice in the freezer. After 6-10 hours (the time depends on the characteristics of your chamber), wonderful fruit ice will be ready.
"Cherry Cool"
This recipe is even simpler than the previous one.
You will need:
- 500 ml cherry juice;
- 80 ml water;
- 1 tbsp. Sahara.
Preparation:
By analogy with the previous recipe, cook the syrup. When it cools down a little, add cherry juice. We adjust its sweetness according to your taste preferences. Pour the resulting mass into molds and freeze it. In a few hours you will be able to enjoy delicious fruit ice.
Hawaiian ice cream – shaved ice
Hawaiian ice cream has captivated many people and is actively in demand on the Russian market. This is not just fruit ice, but regular ice crushed into thin chips. The finished portion of shaved ice is poured with various sugar syrups to taste, and nuts, condensed milk, halva, jams and aromatic herbs are also added to Hawaiian ice cream. Crushed ice is produced using a special machine called a shaver.
How to make ice without special ice molds
The lack of molds is not a problem if you have imagination. You can make them yourself or even use improvised means. The approach option and the specifics of its implementation depend on the type of drink consumed and what is on hand:
- If you plan to serve not cocktails, but simply pour one-ingredient drinks, you should take care of the dishes in advance. To do this, take the selected glasses (preferably thick glass, it will not crack from exposure to cold air), pour about 1 cm of boiled drinking water into them, wipe them thoroughly so that no moisture remains on the surface. Next, carefully place the containers in the freezer (temperature is -1ºC), trying not to spill anything on the walls. The finished ice will not only be beautiful and perform the specified functions, but will also give the spilled drinks an original look.
- It's very easy to make your own ice using plastic or metal lids. For the first ones, it is better to trim them inside in advance so that the thread does not interfere with the extraction of the product. The main secret of the process is to pour the liquid to the maximum and reach the very edge. In this case, it will expand, protrude above the surface and the pieces will be easier to get out. You just need to keep them at room temperature for a few minutes until they melt.
- One of the easiest options for making ice is to use plastic cups. Pour pre-prepared water onto the bottom, determine the thickness yourself, but remember that the mass will still expand. Freeze the product and carefully remove it. You don’t have to settle on round “cubes”; if you insert homemade plastic dividers inside the cup, the shape can be adjusted.
- It’s worth looking around the kitchen and rooms; in most cases, something can be adapted for making ice. These include parts from children's construction sets, candy inserts, and silicone baking molds. Only available products must be thoroughly disinfected before use.
If you are short on time, and you can’t prepare something worthwhile with your own hands, you need to limit yourself to the simplest option. We take plastic bags, cut them into shreds, fill the blanks with a small amount of water and tie them in a knot. We will get small, neat balls that will look very original in a glass.
https://youtube.com/watch?v=aGqnkW59bNM%3Frel%3D0
Technology and cooking features
Before you start making ice, it’s worth considering the features of the technology for preparing this cold dessert. In fact, preparing it does not require much effort; everything is done quite simply and easily.
The main thing is that you must have juice from natural berries and fruits. Various spices and granulated sugar are also added to it.
But still, before you start preparing it, you should carefully study some important features:
- Making ice using fresh fruit. This treat can be made from fresh seasonal or frozen fruit. But before you start cooking, be sure to thoroughly rinse all components from dust and dirt. As soon as the fruits are washed, it is recommended to wipe them and after that you can start making ice;
- Juice based ice. This is the most common cold dessert technology. In this version it cooks very quickly. To do this, you need to squeeze juice from fruits or berries. It can then be mixed with the ground pulp. The liquid mixture is poured into molds and placed in the freezer for a while. As soon as a crust of ice forms on the surface, a stick is inserted into each mold and put back into the freezer until completely frozen;
- Ice from sugar syrup. The technology for making this ice is quite simple. For preparation you need juice from fruits, berries, granulated sugar and water. Water is poured into the container, sugar is added and everything is mixed. Next, the berries or fruits are ground to a puree-like mass. Then the berry or fruit puree is poured into sugar syrup and stirred. The finished composition is poured into molds, which are placed in the freezer.
Recipes for making alcoholic cocktails with vodka at home
"Blue Lagoon"
Compound:
- 25 ml lemon juice;
- 100 ml soda water;
- 25 ml each of vodka and Blue Curacao liqueur;
- ice cubes.
Cooking sequence:
Fill a tall glass to the top with ice cubes.
Pour all the alcohol into this cocktail container and mix these ingredients thoroughly with ice.
Pour soda water into the drink, garnish the glass with a cocktail cherry and drink the refreshing drink through a straw.
The Blue Lagoon is perfect for hot summer evenings.
"Screwdriver"
This is one of the simplest alcoholic cocktails with vodka that can easily be prepared at home.
A popular alcoholic drink consists of the following two components:
- vodka – 50 ml;
- orange juice – 150 ml.
“Screwdriver” is very easy to prepare. The two components need to be combined in a cocktail mixing container and poured into a beautiful chilled glass. Not a single Halloween party is complete without a Screwdriver.
"Bloody Mary"
You will need the following ingredients:
- 50 ml vodka;
- 25 ml tomato juice;
- lemon juice – 5 ml;
- a pinch of salt and pepper.
Instructions for preparing an alcoholic cocktail with vodka at home:
All components of an alcoholic drink should be cooled in advance. Pour all the necessary liquid into the glass.
Sprinkle salt and pepper on top.
The drink should be drunk, without stirring, in small sips.