Every housewife has at least once thought about reusing the multi-colored string bag in which fruits and vegetables are sold in supermarkets. Thanks to our master class, you can bring this idea to life and assemble a washcloth from a mesh with your own hands in just 5–10 minutes. This washcloth is good for washing dishes, other household chores, bathing and showering. It foams well and dries faster than store-bought ones.
Choosing your natural washcloth
Washcloths made from plant materials not only perform the main function of caring for the human body, but also provide an additional healing effect. Typically the material used is:
- Bast is the subcortical layer of linden, subject to special steam treatment. Has medium abrasiveness. During use, it releases phytoncides that help treat diseases of the upper respiratory tract.
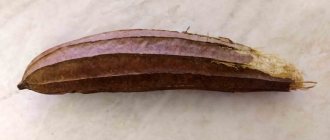
- Loofah (pictured) is the dried fibrous fruit of a plant from the pumpkin family. Provides a good skin massage.
- Sisal is a fiber made from agave leaves with a woven or knitted structure. Allows you to deeply cleanse the skin, providing excellent peeling and anti-cellulite effect. Increases blood circulation intensity.
- Rami. Thanks to their mesh structure, ramie washcloths help smooth the skin, cleanse pores and improve overall body tone. They also provide a good anti-cellulite effect, gently polishing without scratching the skin.
No less useful and in demand are natural washcloths made from bamboo, jute, rubber, volcanic pumice, and sea sponge.
One of the disadvantages of natural washcloths is their fragility. In the plant environment, pathogenic bacteria quickly multiply, and rotting processes are observed - regardless of the quality of sponge care (heat treatment, washing).
The service life of natural washcloths is short. Compared to their synthetic counterparts, they break down much faster. In addition, as they are used, they quickly become worn out and pathogenic microorganisms are more likely to appear in them.
Doctors say that washcloths made purely from natural materials are more useful, since only they can improve a person’s well-being and mood in a record short time. However, you need to understand that each product has its own pros and cons.
One of the trends in the modern market is that natural products are slowly but surely replacing analogues made from artificial materials. The reason for this is that every year there are more and more people leading a healthy lifestyle.
Disadvantages of washcloths made from natural materials: • noticeably inferior to synthetic products in terms of service life; • dry for a long time; • this is a favorable environment for microorganisms; • require care, which consists of thorough washing, drying in well-ventilated places and treatment with antibacterial agents.
Linen washcloths
The healing properties of flax products were known to our ancestors. After the Second World War, scientists were puzzled by scientific research into the properties of flax. The results of these studies made it possible to confirm folk wisdom regarding flax and its ability to relieve ailments. Linen products stimulate blood circulation and have a beneficial effect on the psyche.
Unfortunately, linen washcloths are a rare “inhabitant” of store shelves.
Loofah sponges
Loofah is a plant belonging to the Cucurbitaceae family. You can often hear the second name of this representative of the plant world – “mad cucumber”. Loofah fruits are very similar to zucchini. If desired, you can make a washcloth from such material at home. When ripe, the inside of the fruit is dry and fibrous. Therefore, to obtain a washcloth, it is enough to dry them, then soak them in water so that the skin softens, and peel the “cucumbers” and remove the pulp from the inner fibers. The washcloth is ready. All that remains is to wash it in soapy water and dry it in the sun.
It is impossible not to note the strength and long service life of such washcloths. Of course, these hygiene accessories have disadvantages: • foam does not form on the surface of the washcloth; • before use, the washcloth is pre-soaked in hot water. This softens the material.
Loofah washcloths are a great purchase for people with oily skin. For people with thin and sensitive skin, a washcloth is not suitable: it is too rough. According to customer reviews, the presentation of washcloths-mittens after several water procedures leaves much to be desired, so it is better to purchase washcloths from a single piece.
Sisal washcloths
Sisal is a coarse, durable material derived from the leaves of the Mexican agave plant. Ropes, twines, mattresses, brushes and washcloths are made from it. Typically, such washcloths are produced in the form of woven mittens that have high peeling properties. Due to their hardness, these washcloths should be used a maximum of twice a week. Sisal washcloths are primarily recommended for people fighting cellulite.
It is better to avoid such a hygiene accessory if you have delicate skin or a large number of moles. These washcloths require pre-soaking, do not hold foam well and are quite expensive, but they exfoliate old cells well and last a long time.
Bast sponges
Not only bast shoes and matting are woven from non-woody wood, but also washcloths, which are considered a bath masterpiece of naturalism, obtained from the lower part of the bark of a young linden tree. There is an opinion that such washcloths are the most beneficial for the skin.
We invite you to familiarize yourself with: Mixture for plastering the stove: composition and proportions of the solution for plastering with your own hands
Don't be afraid that the bast sponge will be too hard. In water, bast softens and gently exfoliates dead cells, deeply cleanses pores, and also releases phytoncides. This version of washcloths does not shine with durability, but this is justified by their cheap price.
Ramie washcloths
In stores you can often see woven washcloths made from ramie - Chinese nettle. In terms of hardness, such washcloths are somewhere between loofah and sisal. A hygiene product made from Chinese nettle, like all hard washcloths, has anti-cellulite and massage properties. Only, unlike other hard washcloths made from natural raw materials, these are gentle on the skin, gently sanding it.
Bristle washcloths
Such accessories are produced in the form of brushes, the material for which is natural bristles. The design feature of such washcloths is a long wooden handle. They provide deep cleansing of the skin from dirt, dust and dead cells. These washcloths are great for massaging problem areas. The massage is performed in a circular motion from the wrists to the shoulders, from the legs to the thighs, bypassing the chest and areas with lymph nodes. A 2-5 minute procedure is sufficient.
Birch bark washcloths
Birch bark is a rich source of the natural antiseptic betulin, which contains many silver ions. The biological role of betulin is to protect the tree from fungal diseases and pests (it is the reason for the white color of the bark of birch trees).
Birch bark washcloths have a good scrubbing effect and help fight orange peel.
But, like all natural products, native Russian washcloths are not cheap, and they are also a rare commodity. Disadvantages of birch bark washcloths: before use, the washcloth should be soaked in boiling water for 10-15 minutes; Dry thoroughly after washing.
♦ How to weave a box and casket from birch bark
♦ Hut on a chicken leg - birch bark craft
Eco-scrubbers
The material for such washcloths is cellulose. Although they are made of wood, they feel soft and elastic to the touch. Outwardly, they are very similar to foam sponges, but differ in their fibrous structure. Washcloths have a lot of advantages: soft; beat the foam well; after drying, they become hard, so they do not collect microbes inside them.
Sea sponges
These are very delicate washcloths, obtained from primitive multicellular organisms, subjected to special processing, after which only a “skeleton” remains of them. Washcloths are sold in solid form, but after soaking they acquire a soft, porous structure. Once dry, the sponges harden again, which prevents germs from growing in them.
You probably won’t find a more delicate natural washcloth. True, the price of sea sponges is steep, and this is even with a short service life. Sponges should be changed every two to three months.
How to fix a mesh washcloth. How to put it back together)
15368 93 9
מאת: Tatyana Glushko People amp; Blogs
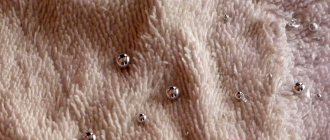
Mesh washcloths are not made to last. However, among them there may be both longer-lasting ones and shorter ones. My new bow-shaped washcloth was purchased from the Pyaterochka chain for 51 rubles. This is not a high price, but I still expected that the purchase would serve me well for the required 3 months. To my regret, it completely blossomed within a week of use.
Place your hand inside the net and slide it over your hand like a stocking.
Using your free hand, gather one edge of the mesh into a pile.
Holding the edge, remove the structure and grab the other edge of the mesh with your other hand. You've got an elastic donut.
Continuing to hold opposite edges, turn the donut until it looks like an infinity sign.
Hold the resulting squiggle with one hand. Wrap the second around it with the cord that originally held the washcloth together.
Pass one end of the cord through the other and pull tight.
Spread the edges around the circumference to create a “rose”.
Wash with pleasure!
PS To hold the washcloth tighter, tie another knot. Slide the outer end of the cord under the part that is wound around the core of the washcloth. The result is a loop; insert the end of the cord into it and tighten it.
06 Aug 2022 OLga 211
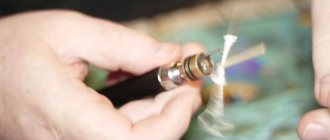
If the red thread on your wrist breaks or comes undone
Due to its characteristics, the thread can wear out or break. What to do if your red thread breaks? Kabbalists believe that this happens because the amulet has taken on too much negative energy intended for you. If the red thread breaks, it must be destroyed. This means that now she no longer has any protective forces, but only negativity, which simply has nowhere to go. It is strictly forbidden to throw away the bereginya, which contains part of your soul, otherwise it will become a very powerful weapon against you.
Information from some sources suggests that the red thread must be buried, and when burned, a prayer must be said for the remission of sins. Experienced magicians and practitioners believe that the best option for old amulets is incineration. In the ground, the material will eventually begin to undergo rotting processes, which will have a completely unfavorable effect on your energy field.
The magic of the amulet only works when a person believes in it. When wearing a rope against the evil eye, you need not only to think about your protection, but also to live righteously yourself, not to do harm to others, not to allow reckless thoughts or envy in anyone’s direction. The rope may break under the pressure of your personal internal negative energy. By creating a positive aura around yourself that will fuel the amulet, you will not be afraid of any damage.
When the red thread unties or the amulet on the hand stretches and begins to fall off, this means that it is in effect and reflects negative influence from the outside. The main thing is not to lose your amulet. If the thread does come off your wrist, you need to incinerate the amulet. When the red thread on the wrist is untied, the witches say that the time has come, which means that it has already served its purpose, having taken the main blow, protecting you from misfortune. If the red thread amulet comes undone, then you must burn it after reading a special prayer.
If the red thread is frayed or torn, there is no need to despair, this is considered a good sign. All negative energy has left you forever. You should not tie it again, the old one must be destroyed and a new one put on. If the red thread tied to the fulfillment of a wish is untied, this means approaching your cherished goal. As you get closer to what you want, one knot will be untied.
Useful hand-made: making accessories for the soul and shower with your own hands
Sea sponges
A shower sponge is an intimate personal hygiene device that is found in every home. Lately, high-quality sponges and washcloths that can be used to wash really well have become increasingly rare on sale.
All of them are made of synthetic fabric, and their weaving is sometimes very far from ideal. Therefore, reasonable remarks that any similar bathroom accessory can be bought in a store are not very appropriate here.
How to properly destroy a used amulet
The red thread is broken - what to do and how to deal with it correctly? Where to put a used amulet?
How to restore the Sponge — How to assemble Bath Sponge from a mesh / Life hacks
The enchanted red thread is the most famous and effective amulet that protects a person from adversity and disease. If you just started wearing a wrist amulet, and it already looks like it has been worn for a year, or even more, then first pay attention to the people who surround you. This is a sure sign that you encounter an ill-wisher every day.
When the pressing question arises of what to do with a torn red thread, magicians claim that without the appropriate ritual, its destruction can be very dangerous. During burning, all the negative energy that the amulet has absorbed is released. Prayer will protect you from this negative force. Each person reads a prayer or conspiracy, based on his religious beliefs. Christians can read the Our Father or the Virgin Mary about the salvation of sins.
Soft or hard?
In the refrigerator and on the brush. Where do bacteria most often accumulate?
Bast washcloths are thin strips of bast that can be tied into a bun or sewn onto a fabric base. The bast itself is made from the inner bark of linden or other deciduous trees. Bast sponges are good for baths, but they are not recommended for use in ordinary bathrooms: the material crumbles and can clog the drain.
Suitable for: bast is a fairly hard material, so it can be used for deep cleansing of the skin. The washcloth can be softened a little by dipping it in boiling water for 10-15 minutes before use.
It is better not to use if you have delicate skin or if you prefer to shower with foam - the bast loofah does not foam well.
We suggest you read: How to decorate walls in a bathhouse
Loofah (sometimes spelled luffa) has recently become a popular material for bath accessories. It is a dried vine fruit that has been freed from the skin and seeds. Loofah can be found in the form of a roll, cut into pieces or “packed” in soap.
Who is it suitable for: the loofah is quite hard, so it can be used for peeling and anti-cellulite massage during water treatments.
It is better not to use for people with delicate skin and those who want to maintain a tan longer - a hard washcloth quickly erases the top layer of skin.
Linen washcloths are famous for their durability, ability to absorb water well and lather well. Items for water procedures can be knitted from linen threads or sewn from linen. In the second case, a piece of soap is sometimes placed inside the washcloth.
Suitable for: lovers of foam bathing and allergy sufferers.
It is better not to use for people with particularly delicate skin.
Sisal fiber is also used to weave washcloths, which are quite stiff, but have enviable strength.
Suitable for: those who want to get rid of dead skin on their elbows and heels.
It is better not to use if you have sensitive skin.
Bristle brushes of different sizes and different hardness are suitable for the whole body: with an accessory on a long handle you can scrub your back, small brushes will clean your fingers and feet.
Suitable for: Those who like a good back rub
It is better not to use for those with sensitive skin, or choose especially soft bristles.
Toys will help to accustom your child to water procedures.
For sensitive and problem skin, you should not choose hard washcloths made of sisal, jute, or coarsely knitted washcloths made of polypropylene tape. They will irritate the skin and provoke excessive secretion of sebum.
What to do if the red thread on your wrist breaks
Such a talisman as a red rope is given leading importance in protecting the human essence from dashing eyes. Followers of Kabbalah claim that the amulet can protect you from unkind thoughts and actions towards you. The material used to make the talisman is not durable, so users are naturally faced with the question of what to do if the red thread on their wrist breaks.
The red thread on the wrist has broken or become untied
This kind of amulet performs many functions. The Slavs mostly tied charmed red ropes on the hands of sick people, wishing them a speedy recovery, and small children to protect them from the evil eye. In the East they believed that with its help you can fulfill your cherished desires. One way or another, the red thread strangely influenced human destiny. You can use it throughout your entire life, changing it periodically if it has lost its main properties and breaks.
A little history and purpose
It is not known for certain when the first devices appeared to help cleanse the skin, but already in references in Babylon and Ancient Greece there is information about the first washcloths. Wealthy people used wood or bronze to wash their skin, while poor people used bunches of plants or sand.
Now, a washcloth is already an absolutely necessary household item for every person. Beautifully designed, of different sizes, colors and purposes, they decorate the bathroom and are indispensable assistants in the bathroom.
A washcloth can be made from any available material: natural cotton or chintz, using old terry towels, woven from burlap, and for those who are not looking for easy ways - knitted.
Loofah for whipping foam (for washing)
Not all women know, but cleansers work much more effectively in the form of foam. Koreans even produce special nets for whipping it. But why overpay if you can make an almost identical device with your own hands from an onion string bag?
- Sew a rectangular mesh pocket.
- Cut the foam dish sponge into large squares.
- Place them inside your pocket. Sew up the hole.
- Place the foam squares on both sides of the mesh.
- Tie the rectangle in the center with twine and form a loop for hanging.
Using a washcloth to wash your face is very simple. Wet it and add just a few drops of cleanser. Actively rub the product and squeeze the foam into your palm. Apply it to your face without touching your skin with your fingers. The result will certainly please you.
Thus, vegetable mesh is an indispensable thing for creating washcloths. You can make kitchen sponges-bows, bath roses, bagels for household needs, and a Korean-style washing net from a string bag. Choose the option you like and follow the step-by-step instructions.
Source
Burlap washcloth
If you don’t know how to knit or don’t want to, you can make a beautiful washcloth with your own hands using burlap, for this you will need: burlap, foam rubber or sponge, gauze, soap and elastic, and also a piece of cotton fabric.
From burlap you need to cut two identical rectangles slightly larger than your palm, and the same ones for the gauze lining. A holder for a bath accessory is made using an elastic band, assembled like an accordion and covered with fabric. One end is secured in the middle of a burlap rectangle, and the other is sewn to the side.
Next, the burlap is sewn together to form a bag and pieces of soap and a sponge are placed in it to create foam; dried lavender or mint can be added for scent. The washcloth needs to be sewn up. It is ready to use. When the soap in it stops foaming, you will need to rip it open and pour in a new portion.
Loofah with filler
You can make a more elegant sponge from large and fine mesh.
You will need
- two types of mesh - large and fine. A large mesh can be taken from potatoes or fruits, and a small mesh can be taken from sweets, garlic, or old ribbons from a bow or tulle
- thread and needle
- scissors
- For the base of the washcloth, we use a large mesh (it is advisable to wash it before use). Cut a square piece 15 x 15 cm and bend it in half to form a pocket.
- Fill the pocket with tulle or fine mesh and sew up the open end. Then pass the thread through the edge of the mesh, pull it out and secure it with a couple of knots. The result should be a “bag”.
- Now let's give the sponge a finished look. Pass the needle and thread through the center of the washcloth, leaving a 10cm tail, then do the same in the opposite direction.
- Repeat this several times until a depression is formed in the middle of the sponge. At the end, secure the ends of the thread and trim off the excess.
- Now rinse the sponge thoroughly in hot water and soap to remove any remaining odors and dirt.
As you can see, nothing is complicated. Give this simple dish sponge a try and see if it's worth the effort. Even if the savings are small at first glance, our handmade product will pay off in the long run: it can be used for 2 or 3 months. Take this kitchen life hack and share your impressions with us.
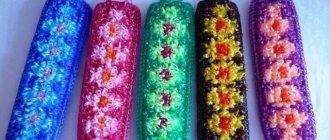
Polypropylene washcloth
To knit such a bath “helper”, it is enough to purchase the appropriate threads and a hook size 5-6 with a round head. Initially, you need to knit a chain of loops 20 cm long and connect them into a ring.
Next, you need to knit the main fluffy part of the washcloth using the “DC” method and finish with several rows of “SC”, and at the end knit the handles. This way you can knit a washcloth from any material.
These artificial materials, from which various shower sponges are most often knitted, are convenient because they are quite easy to work with. The thread does not fluff for obvious reasons and does not get tangled, so it is easy to handle both with crochet and knitting needles. Another positive factor of polypropylene yarn is the wide range of colors.
You need to knit from polypropylene with knitting needles and crochet no finer than number four or even number five. This thread is quite stiff, and therefore it is advisable not to pull it very tightly, since a washcloth that is too coarse is not suitable for use. Moreover, you need to be especially scrupulous about this issue if you plan to knit a washcloth for a child.
Polypropylene makes beautiful washcloths in the shape of a hedgehog toy. To do this, you will need threads of two different colors: darker - to create its needles and lighter - for the muzzle. You need to crochet a hedgehog with elongated loops as follows.
- Cast on 20 cm of loops with a dark thread, connect them into a ring and knit two rows with single crochets.
- Make several rows of elongated loops: pull out the loops two to three centimeters long and remove them from the hook, knitting the loops through one stitch.
- Knit with elongated loops 10 centimeters in height.
- Next, use light threads to knit the cone-shaped face of the animal.
- Knit according to this pattern - two single crochets, then skip the next loop and two double crochets again - so that the knitting begins to taper.
- Knit in this way until all the loops come together.
- Make the nose and eyes of the animal from black thread - and the washcloth is ready.
In addition, you can make a knitted washcloth in the shape of a mitten from polypropylene thread, which will be not only beautiful, but also a convenient bath accessory. Two identical parts of the product are knitted. First of all, you need to crochet 20 loops and knit five rows with single crochets. Then, to knit a finger at the end of the row, you should cast on eight air loops and tie them with double crochets.
Return to the main fabric and knit five more rows with single crochets, then begin to cut the loops, rounding the top of the mitten. To do this, do not knit one stitch from each edge of the knitting until the mitten is completely rounded. Complete the second part of the product in the same way and sew the finished halves together.
We suggest you read: How to assemble a log house yourself
Amulet Jerusalem red thread
The red thread is associated with the winding from the grave of Saint Rachel, which is a symbol of the feminine and maternal principle, mercilessness towards one’s life, on the way to protecting one’s children. Her tomb symbolizes the hopes of the Jewish people returning to the Holy Lands. Then there are two versions of the appearance of the thread. The first says that all the coffins were wrapped in wool threads, it is this fiber that has the power. The second version says that Raquel spent her entire life weaving the thread, rubbing her fingers into blood, which explains its red color.
Initially, it was believed that you need to wear a thread from a winding, which has the corresponding magical power. Later, they began to talk about the fact that any wool fiber could be used. If you attach a string to Rachel's coffin, the talisman will be filled with positive energy. Afterwards, any red thread brought from Jerusalem began to embody a powerful amulet. Today there are many variations of the use of red thread, not only as a talisman, but as a stylish accessory.
Quickly made washcloth. A washcloth for a soldier.
A person of any nationality and any religion, starting from infancy, can walk with a red thread on his wrist. A relative or a very close person can tie such a talisman. The bereginya, which is placed by the mother on the baby’s hand, has the greatest power. As she ties each knot, the woman reads prayers, thereby increasing the insulating properties of the thread. The power of the talisman grows as the child grows older.
How to tie a talisman correctly:
- The left wrist is tied with a red thread for protection; seven knots must be tied;
- you can take woolen threads or silk rope;
- When tying knots with a thread, a person should read a prayer for each one or visualize what he wants to change in the life of a dear person, what to protect from and say it out loud, for example, “Wherever he goes, my dear friend, his fate cannot conquer, Dashing people cannot win his heart, cannot take away his freedom, cannot captivate his thoughts.”;
- an amulet is tied to the right wrist in order to attract wealth and prosperity into one’s life;
- it is believed that the right hand takes, and the left gives, therefore an amulet tied on the left hand connects with human energy, adding new strength to it;
- this talisman must be purchased and not given as a gift, otherwise its unique properties will be lost;
- it is desirable that the thread be brought from Jerusalem;
- an amulet that a person made himself will also have no power;
- You are allowed to knit a talisman for yourself, but only for wearing it as a remedy; the rope will not protect you from the evil eye and damage.
How to knit a fishing sponge. Fishnet Washcloth. From A to Z
Results
If you look at examples of photos of do-it-yourself washcloths in books, brochures, craft magazines or on the Internet, you will see what a variety of these bath items there are. In addition to the original accessory, spending a minimum of time and effort, you will receive a real decoration for the bathroom, an indispensable cleanser suitable for your skin and save money.
Such washcloths can be given as a gift or an addition to a gift, or they can also be sewn for children in the form of various animals or cartoon characters. The child will be more willing to bathe with such a gift.
Threads come in different thicknesses. The thicker the thread, the tougher the finished washcloth will be. Select threads of such thickness that it is convenient to use them for crocheting No. 3-4. Although the most delicate and soft washcloths are crocheted No. 2, i.e. thin threads. Some people like washcloths that are harder and denser, while others like them softer.
Buy bright threads to match your bath accessories. For children, it is better to knit a washcloth from thin threads in the shape of a mitten or a funny animal.
Before the first use, be sure to keep the washcloth in boiling water for 5-7 minutes, the washcloth becomes pleasant to the body and lathers well.
A washcloth with elongated polypropylene loops can be knitted in the form of a pipe in a circle. It is convenient to insert foam rubber into such a washcloth.
- You can knit a flat rectangular washcloth according to the usual pattern using single crochets (only every third row is knitted with elongated loops):
- The crocheted washcloth can be oval-shaped (in this case, every third row is also knitted with elongated loops):
- A washcloth can be crocheted in the form of a mitten:
- Round washcloth (do not forget to knit every 2 or 3 rows with elongated loops):
- A crocheted washcloth for a child can be crocheted in the shape of any toy.
There is one more nuance: the longer the loops, the softer the washcloth.
If you have never knitted with elongated loops, then you should first try to knit a sample from simple threads in order to practice and work out the tightness of the knitting. The fact is that you need to knit tightly with long loops, i.e. Tighten each loop with columns so that the fabric is not loose. It will be especially difficult for beginners to immediately knit elongated loops from polypropylene threads.
Weaving knot how to tie a diagram. Weaving knots: diagram. How to tie a weaver's knot?
To overcome obstacles (descents, ascents, crossings, traverses, etc.) during travel, especially mountain travel, ropes, carabiners, safety systems and various components are used. It is important for every tourist to know how this or that knot is knitted and where it is used. Nodes can be classified according to their purpose.
1. Knots for tying ropes of the same diameter: “straight”, “weaving”, “counter”, “grapevine”.
2. Knots for tying ropes of different diameters: “academic”, “bracket”.
3. Knots for belaying (non-tightening loops): “simple conductor”, “figure eight”, “middle Austrian conductor”, “double conductor”.
4. Knots for tying ropes to a support: “noose”, “bowline”, “stirrup”.
5. Auxiliary nodes: “grasping”, “stirrup”.
The stirrup knot can be used in two cases, but the tying methods will be different.
The knot can be knitted in two ways: 1. A loop is made with one rope (Fig. 1, a), and with the second rope the necessary turns are made to obtain a knot, as in Fig. 1, b. The running ends should be 15-20 cm long so that control knots can be tied (Fig. 7, e). If one running end is on top and the other is on bottom, or vice versa, then the knot is tied incorrectly. The running ends should come out either only from the top or only from the bottom.
Two ropes are placed on top of each other and two simple knots are tied in different directions (Fig. 1, c, d). If the knots are tied in one direction, then the result is a “woman’s knot” (Fig. 1, e). Next, control knots are tied at the ends (Fig. 1, f).
Two ropes of the same diameter are taken, overlapped, then a control knot is knitted first on one side (Fig. 2, a), then on the other (Fig. 2, b). Next, the knots are pulled together and control knots are tied at the ends (Fig. 2, c).
Rice. 2. “Weaving” knot
We take two ropes of the same diameter, at the end of one we knit a simple knot (Fig. 3, a), then with the second rope towards the running end of the first rope we completely repeat the knot so that it turns out double and the running ends come out in different directions (Fig. 3, b) . After this, the knot is tightened; control knots are usually not knitted (Fig. 3, c).
Rice. 3. “Counter knot”
Two ropes of the same diameter are placed on top of each other, a double control knot is tied on one side (Fig. 4, a), then the same on the other (Fig. 4, b). The nodes are tightened (Fig. 4, c). The control nodes are not knitted. The correct knot pattern is shown in Figure 4, d.
Rice. 4. Grapevine
We take two ropes of different diameters, make a loop from the thicker rope, and wrap it with the running end of the thin one as shown in Figure 5, a, b. Then the knot is tightened, straightened, and control knots are knitted at both ends (Fig. 5, c).
Rice. 5. "Bramshkotovy"
We take two ropes of different diameters, make a thicker loop, and use the running end of a thin rope to twist the loop as shown in Figure 6, a, b. The knot is tightened, straightened, and control knots are tied at both ends (Fig. 6, c).
Rice. 6. "Academic"
Simple conductor node:
It is knitted with one rope, which is folded in half and a simple knot is tied at the end of it (Fig. 7, a, b) to form a loop. A control knot is tied below (Fig. 7, c).
Rice. 7. “Simple Explorer”
Knitted with one rope. It is folded in half and a knot is tied at the end, reminiscent of the number eight (Fig. 8, a, b). The knot straightens and tightens. The control knot is not knitted (Fig. 8, c).
Rice. 8. "Eight"
Knot “middle Austrian conductor”:
How to put the washcloth (bow) back together.
The knot is tied on one rope. The rope is taken by the middle, then by turning 360° it is folded into a figure eight (Fig. 9, a), the top of which is lowered down and pulled, as shown by the arrow in Fig. 9, b, so that a loop comes out. In order to get the correct knot (Fig. 9, c), you need to stretch the ends of the rope in different directions. The control knot does not fit.
Rice. 9. “Middle Austrian Guide”
Knot “double conductor”, or “rabbit ears”:
Knitted on one rope. The rope is folded in half, a “dummy” is knitted on it (Fig. 10, a), tightened (Fig. 10, c) and tied so that it comes undone if you pull it by the loop. In the case when the “dummy” is tied in reverse, the “double conductor” knot will not work. Then the lower loop is carried through, as shown by the arrow in Figure 10, b, so that the two upper loops pass through it, and is pulled together by the upper loops to the knot (Figure 10, c).
Rice. 10. "Double conductor"
A correctly tied knot is shown in Figure 10, d. It is necessary to ensure that when tying the knot there is no overlap of the ropes. "Double conductor" does not have control nodes.
How to reassemble a washcloth.
The knot is tied with one rope around the support. The support is connected first by the running end, which serves to attach the rope, and then by its working end, which is directly used by the tourist (Fig. 11, a). Next, the running end of the rope makes several turns around the working end (at least three) and a control knot is tied (Fig. 11, b). The knot is then tightened.
How to tie and remake a washcloth
The knot is tied with one end of the rope around the support. The running end of the rope is wrapped around the support, then knitted as shown in Figure 12, a. After this, the knot is tightened and secured with a control knot (Fig. 12, b). If a stirrup knot is used when attaching to a support, it is tightened as tight as possible, and the control knot is knitted as close to the support as possible.
How to fix a mesh washcloth. How to put it back together
The stirrup knot can be used as a fulcrum for the leg when climbing out of cracks. It is more convenient than the “guide” and “eight” because it is easier to untie and can be tied even with one hand (Fig. 13, a, b).
Rice. 13. “Stirrup” as a support for the leg.
Knit one end of the rope around the support. Having stepped the required distance from the edge of the rope, make a loop by turning the rope 180° clockwise, then the support is surrounded by the running end (shown in the figure with a cross) and the end is threaded into the resulting loop (Fig. 14, a). Next action: the running end is wrapped around the working rope and threaded into the loop from the reverse side (Fig. 14, b). The knot is tightened and a control knot is tied (Fig. 14, c).
How to put the washcloth back together
The “bowline” can be tied in another way, using a “pacifier”. To do this, instead of a loop, a “dummy” is tied so that it comes undone when you pull the working end, and not the running end. The support is surrounded by the running end (Fig. 15, a). Then it is carried into the “dummy” loop, and when the working end is pulled, the “dummy” loop, together with the running end, passes through the knot (Fig. 15, b). On the resulting bowline knot, all that remains is to tie a control knot (Fig. 15, c).
Rice. 15. “Bowline” using a “pacifier”
The knot is tied with a cord (6 mm) on the main rope (diameter 10-12 mm). The cord is folded in half and the rope is wrapped around it (Fig. 16, a, b). Then the operation is repeated (Fig. 16, c, d). After this, the knot is tightened, straightened and a control knot is tied (Fig. 16, e). A control knot is not needed if the cord is previously tied into a loop with a “counter” or “grapevine” knot.
Rice. 16. “Grabbing” knot.
Sometimes a “grabbing” knot is tied with one end of the cord. The rope is wrapped with one end of the cord twice in one direction, then in the other (Fig. 17, a, b, c). Then the knot is tightened, straightened and secured with a control knot (Fig. 17, d).
Crochet washcloth video tutorials
Crochet washcloth. Master class from Noskova Nadezhda
The washcloth is crocheted in the round from elongated loops. Polypropylene threads.
Crocheted washcloth. Oksana's work
You will need yarn for knitting washcloths and a size 4 hook.
The washcloth is crocheted No. 2; it took half a skein of thread.
This washcloth is crocheted from propylene thread in 2 folds, with crochet number 5. It is knitted equally on both sides, with a “Fringe” pattern or elongated loops.
A washcloth-mitten, just like a regular washcloth, is knitted simply: 1 row of single crochets, 1 row of elongated loops.
Materials: – polypropylene threads of different colors; – crochet hook (select the size depending on the desired density of the washcloth - the smaller the number, the denser the product will be, and vice versa).
Author Irina Kachukova. For knitting you will need: yarn “Housewife - a needlewoman for the soul and soul” 50g, 100% polyamide, package 10x50g and a hook.
The knitting pattern is very simple:
- 3 rows of single crochets
- 3 rows of lush columns
How to knit lush columns, see the diagram below in the article.
You will need: polypropylene threads of 2 colors. hook No. 3 or No. 4, needle with a wide eye. The size of the finished washcloth is 14*21 cm.
Tags: washcloth, back, mesh, collect, diagram
« Previous entry
kak.hepcinatvp.ru
08/12/2019 admin Comments No comments
My husband has a washcloth with elongated loops (the shaggy kind), which I crocheted a few years ago. Since then, it has somewhat lost its “marketable” appearance, and I decided to make him a new one, and at the same time share with you, so to speak, the technology.
What to knit a washcloth from
The most difficult thing in this matter is to find suitable threads. There is, they say, such a yarn under the “code” name “Housewife-needlewoman” (or something similar). And it’s cheap, and it’s great for knitting washcloths... However, the last time I searched the entire Internet, I only found it somewhere in the Urals region (or even beyond it). You can buy it, but postage is quite expensive. It’s easier to buy a washcloth from grandmothers at the market.
But I’m not interested in buying, I want to knit it myself. I even tortured them, grandmothers, I mean, on the topic of where the threads come from. Some are silent, like partisans, some make the excuse that they are being brought from somewhere far away.
And in this situation, we have only one way out - polypropylene thread (twine). But there’s an ambush here too. There are a lot of such wonderful multi-colored twines on sale:
But it is too thick and completely unsuitable for our purposes. The washcloth obtained from it is good for washing the skin of an elephant or rhinoceros. You can believe me, I tried knitting. A stiffer washcloth can only be made from thick wire.
But I was lucky enough to find a place where they sell this kind of twine:
Firstly, it is thinner, and secondly, it is not twisted into a tight cord, but looks like a thin ribbon, which is much more suitable for knitting such a washcloth. It's a pity that the color is only white... But a white washcloth is better than no washcloth.
I almost forgot: if you buy twine, take it with a reserve, since its consumption is more than you can even imagine. It took me four of these rolls (1 skein = 70 m), and I crocheted with size 4 crochet.
Knitting elongated loops
The most important thing when knitting a washcloth is the correct execution of elongated loops. The most common method of pulling out loops, which can often be found in books and on the Internet, is not suitable. With this type of knitting, our elastic “rags” fall to the wrong side at the slightest pressure, and the washcloth turns out “bald”.
There is another, not at all complicated, method in which the loops are tightly secured. It’s not for nothing that they say that laziness is the engine of progress. And I, being too lazy to take pictures and then describe each step of this technique, decided to look for “happiness” on Youtube. And I immediately came across a wonderful video by Natalia (or, perhaps, Natalia) Korneeva, where she very clearly shows how to make such elongated loops. And although the video is designed for more than seven minutes, everything becomes clear from the first loop. Well, you can watch a little longer to fix the sequence of actions in your mind: look
Knitting a washcloth with elongated loops
Now that you know how to properly perform “makhrushki” so that the washcloth with elongated loops does not lose its shape, you can get down to business. They are all knitted differently. Some use one piece of cloth the width of a washcloth, others make a wide cloth, which they then fold in half and sew together... I, and not only me, do it like this:
First, a chain of loops the length of two desired widths of the washcloth:
Here it is necessary to take into account that with “rags” the washcloth turns out to be much wider. I started knitting several times, realized that it was too wide, unraveled it and knitted it again, reducing the number of initial loops. In the end I settled on 20 loops.
The chain needs to be closed in a ring:
After this, you need to knit at least one row of st. b/n, I made two:
You can make more rows, depending on who you like. Now you can start knitting the first row with elongated loops:
You can knit elongated loops through a row, but I decided “to shaggy, so shaggy,” so I knitted them in each row and pulled them out quite long. Each loop is about 4 cm (folded).
And in this simple way we continue our knitting in the round until we reach the desired length. After which you need to knit two more rows (or as many as you want) of b/n columns.
Yes, I want to say that in order for the “yarn” to not unravel in those places where it has to be connected or secured, I left the tip and melted it with a lighter. Then, while the melted piece was still warm and soft, I flattened it so that it would not jump out. This must be done immediately, before it hardens, but not with your hands, but with the blunt end of a pencil or hook, so as not to get burned. Of course, all the knots and secured ends remained on the wrong side.
Now that the washcloth is knitted, all that remains is to make handles for it. You can make a chain of suitable length and tie it with non-woven columns. But I extended the handle to the required length: 3 vp, 1 tbsp. s/n – equals 1st row, 3 vp, 1 st. s/n – second, etc. I got 20 such mini-rows. I secured it on the opposite side with the help of two connections. Art.
Maybe it turns out not so beautiful, but it doesn’t curl.
On the other hand, I made the handle in the same way, first attaching a new thread.
This is the kind of washcloth with elongated loops that I knitted together. In the photo it seems somewhat short, although in reality its length is about 40 cm.
You can do it too, since there is nothing complicated, there would be something to knit from. And tomorrow I’ll go buy new skeins, since other family members are also asking for such washcloths, and give each one their own length and shape.