Greetings to everyone who is just about to buy a snowboard and those who are looking for a second (or next) board.
I want to share my experience in choosing a snowboard. To do this, I propose to consider all the parameters of the boards and how they feel and affect skating.
Let me remind you that I consider the only correct order for selecting a snowboard kit:
- Selection of boots (guide on how to choose boots for snowboarding),
- Selecting a snowboard
- Selection of bindings for boots and snowboards.
Because it avoids situations where elements fit poorly or don’t fit at all.
Go!
- Types of snowboards by purpose
- Universal (all mountain)
- Freestyle
- Freeride
- Split snowboards
- Carving
- Snowboard geometry
- Directional
- Twin-tip (symmetrical)
- Directional-twin
- Snowboard length and width
- Length selection
- Width selection
- Side cut radius
- Snowboard deflection
- Rigidity
- Snowboard design
- Core
- Slippery
- Kant
- Type of holes for fastenings Embedded 2x2, 2x4
- Burton 3D pattern
- Burton ICS (channel)
- Snowboard manufacturer
- Snowboard cost
- Bottom line
Discounts on snowboards: Yandex Market, Sber Mega Market.
Choosing the type of snowboard based on riding styles
Each riding style has its own requirements for boards. This is due to the fact that the loads on a snowboard vary quite a lot.
Snowboards are divided into 5 main types according to their intended purpose:
- Universal boards (All Mountain)
- Freestyle
- Freeride
- Split snowboards
- Carving (sports)
Universal snowboards (all mountain)
Universal snowboard
Classic snowboards, the shape of which everyone is accustomed to.
As the name suggests, these boards suggest riding on various types of slopes: on well-groomed resort slopes and in the mountains, you can try freeride.
They also allow you to try different styles of skating: you can perform tricks and jumps, carve, go through a slalom course, etc.
I recommend that all beginners choose this board.
Freestyle snowboards (freestyle, park)
Freestyle snowboard
Take into account the features of skating and performing tricks. Therefore, they are shorter and softer than all-purpose boards.
Very often they have a twin-tip shape (symmetrical), which allows you to ride with either side forward. This is very useful for spinning tricks.
Freeride snowboards
Skiing is mostly off-piste. Where there is no lift, the slope is not worn out, and the snow has not yet been accepted by anyone, and there are icy areas.
The main requirement for such boards is to float in the “powder”. Therefore, they are wider and longer than universal ones. Often have a directional shape, and the nose is wider than the tail.
Split snowboards
Split snowboard
These are snowboards that are divided into 2 skis. They are needed to go uphill on skis and downhill on a snowboard.
They require special fastenings that, when rearranged, allow you to walk like on skis.
Carving snowboards
Slalom snowboard
Rigid and long directional boards. These can only be ridden on a prepared slope.
They use special bindings and hard plastic boots, like alpine skis.
I don't recommend it for beginners.
Specialization
You need a board for those riding options that take up the most time in your season (we are, of course, talking about the main snowboard). Therefore, if 80% of your skiing takes place on the slopes near Moscow, it is not necessary to buy soft freeride equipment with reverse camber.
Freestyle boards
Universal boards
An article in which you can read - how to choose the right universal board?
Freeride boards
Carving boards
Snowboard length and width
Selecting snowboard length based on height and weight
There is a myth that a snowboard is selected according to a person’s height. This is wrong!
The length of the snowboard is selected according to the weight of the rider.
Each snowboard has an insert from the manufacturer with a table corresponding to the length of the snowboard and the weight of the rider. I highly recommend focusing on them because the manufacturer conducted tests and calculations on this board and entered the results into the table.
However, you can also roughly select a snowboard based on your height. But it is advisable to do this only when it is not possible to study the table of a specific board with weight, for example at a rental.
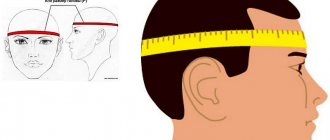
Snowboard length according to height
- a universal snowboard below your chin or minus 20-25 cm from your height.
- Freestyle snowboard - up to the collarbone or minus 25-30 cm from height.
- Freeride snowboard – above the chin or minus 10-15 cm from height.
Why a little shorter? Because this will allow most amateurs to ride with greater comfort, and beginners will master edging even faster.
Yes, this does not correspond to what is written on most sites. I came to this from my own experience. My height is 180 cm, weight 75 kg. Articles on the Internet advise me to have a board -15-20 cm from height, i.e. 160-165 cm. I had a 160 board – you have to fight with it, not ride for fun. 156 cm was already better, but I still settled on 154 cm - and it is incomparably more comfortable, the board does what I want, and not the other way around.
When choosing a board based on height, you still need to make an adjustment for your weight:
- If your weight is above normal , then take a snowboard 3-5 cm longer .
- If the weight is below normal , then stop at that is 3-5 cm shorter .
But I still advise you to rely on the table of the length of the board corresponding to the weight of the person.
Selecting snowboard width
It can be standard (regular) or wide (wide) . Selected based on the stance and size of the boot.
Width of board under boot (ideal, board too narrow, too wide)
It is necessary to ensure that the boot sticks out on both sides no more than 1.5-2 cm if you are a beginner.
And if you are already a confident skier, then look at the edge angle - the boot should not catch the slope when skiing.
- Boot size up to 43-44 - regular width .
- Size 44 and larger - take the wide model.
This is why I recommend choosing boots first, and then a board, so as not to have a narrow board with a large foot size and catch the slope.
If you skate in a stance with both legs pointing in one direction, then this advice will not suit you, and choose the width based on the distance of the boot from the board.
Remember, the narrower the board, the easier and faster it is to edge over, which is why slalom boards have a small width.
Price
The price of a board with boots and bindings will vary from 25,000 to 70,000 rubles, depending on the manufacturer, as well as the materials from which it is made, style and design. The price of your board will depend on your budget and preparation, so it's worth thinking about what you'll be spending before you hit the store.
- on average, boards for beginners cost from 7,000 to 15,000 rubles with boots starting from 7,000 rubles and bindings from 8,000 rubles;
- boards for an intermediate level of training cost on average from 15,000 to 30,000 rubles with boots and bindings costing from 10,000 rubles;
- professional snowboards for a high level of athlete training cost from 30,000 rubles and above with boots and bindings starting from 10,000 rubles;
- You can also buy a used board for a child, with the expectation that it will have to be replaced as they grow. However, it is important to check that the board is of good quality without scratches or damage.
If you're new to snowboarding, it's definitely a good idea to rent a board. This way, you will have time to understand whether you really like this sport, as well as gain experience and choose your riding style.
Some snowboards are sold with bindings, while others are sold without. In this case, the buyer must select and install the fasteners himself. In this case, the store staff will help with selection and installation.
Side cut radius
This is the radius of the circle, which is formed by the difference in the width of the waist (the narrowest point of the snowboard, approximately in the middle) and the toe-tail (the two widest points).
Snowboard side cut radius
It is generally accepted that the larger the radius, the less maneuverable the snowboard, and the smaller the radius, the more maneuverable the snowboard.
This is partly true.
Remember, the radius only works fully when you make a completely carved turn. In other words, when, when turning, you do not push the snowboard with your back foot (accompanied by throwing snow crumbs out from under the tail of the snowboard), but cut the slope with an edge along the entire length of the turn.
Only people who have mastered the technique and have some experience in skating ride this way.
All beginners and many amateurs don’t ride like that. When carving, a fairly high speed develops, and considerable effort is required when riding.
If you throw your board out of a turn, you are not riding the "radius".
Therefore, for beginners and everyone who rides relaxed, it doesn’t make much sense to pay attention to the radius of a snowboard. On All-mountain boards of the same size, the radii will vary slightly between models. You won't feel this difference if you don't carve. The correct length of the snowboard is much more important!
Level of training
There are 4 levels of snowboarding training: beginner, intermediate, expert and professional. A true professional can even classify himself as the 4th highest level. Many snowboards are made for a specific skill level, and reading the instructions can answer many questions.
- Beginners are those who have never ridden before and those who ride slowly and unsteadily;
- those who feel confident when descending, who can already use the front and rear edges of a snowboard board (toe edge and heel edge), who have learned to gain speed without the dominance of one leg and who have tried jumping while riding in a snowpark can be classified as average. and other techniques;
- a snowboarder of the “expert” level is absolutely confident in all his movements, performs any figures, instantly adapts to any terrain and never loses control over his body;
- A professional can consider himself someone who has been skating for so long that he feels more confident on the board than on his own feet.
Choose a snowboard according to your current skill level, don't try to jump to the next level too quickly.
Selecting snowboard camber
The next parameter that you need to understand how it works is deflection.
Snowboard deflections
There are 4 main types of deflections:
- Camber is a classic camber when the middle of the snowboard is raised. Therefore, when pushing, there are 2 points of contact with the slope, which provides excellent grip on the slope and good controllability at speed. They also have an excellent “click” - this is the springing of the snowboard from the slope when jumping. Because before jumping, the snowboard is tensioned like a spring, back to its deflection.
- Rocker (rocker, “banana”) - a snowboard evenly rounded to the ground in the shape of a “banana” (hence the slang name). Point of contact with the surface is 1, which gives excellent maneuverability and ease of turning. But you have to pay for the quality of the grip on the slope. Great for beginners because... maneuverable, and for freestyle, where you need to maneuver a lot. However, it will not be very convenient at speed.
- Flat, zero (flat) - a completely flat snowboard in the area between the bindings. It can be considered a kind of compromise between rocker and camber. Not a bad grip than a rocker, and better agility than a camber. Usually entry-level boards are like this.
- Combined cambers : Flying-V, Rocker-Camber-Rocker, Rocker-Camber, Camber-Rocker-Camber and other camber arrangements. Needed for specific purposes, such as enhanced grip on ice, greater maneuverability at speed, improved floating in powder, etc.
Bend
The definition of bending is taken by comparison with a flat surface. Different snowboard profiles have been developed for different riding styles. We can safely highlight several main profiles:
Camber - a standard board that is suitable for any riding style, has a central bend. When using a board, it evenly distributes the rider's weight over its entire area.- Rocker (rocker or banana) - lovers of freestyle and clean snow have made the profile of this snowboard very popular among them. A curved snowboard is in contact with the central part of the surface, allowing you to slide on the snow on either side without burying yourself in it.
- Flat (flat board) - a characteristic of a rocker with a camber edge, it seems to be created for freestyle, which confirms its popularity in certain circles.
- Hybrid - manufacturers produce specific models to correct certain characteristics.
Selecting snowboard stiffness
There are soft (Soft) , medium (Medium) and hard (Hard) snowboards. Manufacturers can use both the above-mentioned hardness markings and a scale from 1 to 10.
Sometimes a "heat map" of stiffness is used, which shows the stiffness of individual areas of the snowboard.
The stiffness is adjusted to the riding style and weight of the person.
Therefore, on the snowboard information sheet, the manufacturer also writes, in addition to stiffness, a scale for suiting the board to a specific riding style.
Here are some tips for choosing snowboard flex:
- If you need good grip and stability at speed , go harder .
- You need softness when jumping and riding on railings - softer .
- Too thin - you need a softer , it’s easier to bend.
- If you are overweight - tougher .
I note that the choice of rigidity is far from straightforward . Try different options and take what you like.
Rigidity
Another property directly used in certain riding styles. The ability to use the deflection of the board to turn while moving depends on the rigidity The degree of hardness can be high, medium and low. Each rider has their own personal preference for board stiffness.
Directly or indirectly, riding styles are related to the degree of board stiffness.
A rigid board provides stability at high speeds. Provides good grip on the surface, making it great for free skating.
Medium hardness boards are suitable for styles. Non-professional riders use them for freestyle and freeride.
The softest snowboards are used by freestyle enthusiasts. A slight bend allows you to more freely perform various tricks, change the trajectory of movement and keep everything under control.
Snowboard design
Sandwich and cap snowboard design
There are 3 main types of snowboard cover design:
- Cap - the topsheet of a snowboard is also a side wall. This design is easier to manufacture and more rigid in itself. Installed in cheap snowboards.
- Sandwich – there is a separate snowboard cover and sidewalls. It has less rigidity, but works better under extreme loads.
- Combined - in the tail and toe of the snowboard Cap, and the middle - Sandwich or in another sequence. In this way, the desired proportions of stiffness are achieved over the entire length of the snowboard.
Cheap boards are most often cap. Average and expensive - sandwich. Don't worry too much about this parameter. This is more information for general development
Snowboard core
Snowboard core
The snowboard core is only the wooden part without reinforcement with other materials. Consists of one or more types of wood.
Bars of various lengths and shapes are glued together, while the direction of the wood fibers is located at different angles to impart the necessary rigidity in one place or another of the core.
But often the word “core” is understood as a complex “pie” made of different materials. Wood, special “foam”, carbon, metal plates, fiberglass - all this can be combined in one snowboard to give it the desired characteristics of longitudinal and transverse (torsional) rigidity.
Every high-quality snowboard (Chinese know-name does not apply here) has a sticker showing a cross-section of the core.
Naturally, the cheaper the board, the simpler the core, and vice versa. I don’t recommend chasing solely the core when you are still unsure of your snowboarding in general.
Sliding surface
Slider structure sintered and extruded
There are two types of snowboards:
- Sintered (sintered) – sintered polyethylene. Polyethylene granules are sintered under high pressure and at high temperature, resulting in a porous structure that holds paraffin well, but is more expensive and difficult to produce. Sometimes it is polished in a special way and we get a structured base . It glides better when waxed, and glides worse when untreated, compared to extruded slip.
- Extruded (extruded) - cheaper to produce, easily repaired by filling, does not require special care. Paraffin or other ointment does not last as long compared to the sintered structure.
Both types of slipper come with the addition of graphite. Graphite improves the slip and strength of the entire surface.
However, you shouldn’t pray for it: a waxed snowboard without graphite rides better than a bare snowboard containing graphite!
Any sliding surface must be treated with paraffins and ointments.
Without treatment, it dries out and becomes less elastic and less slippery, and in advanced cases it becomes completely “fluffy”.
Kant
Magne Traction snowboard edge
This is a strip of metal along the edge of the sliding surface, which directly clings to the slope. It comes in various forms:
- Normal flat - 2 main points of contact with the slope in the widest parts of the snowboard.
- With several points of contact (wavy, magne traction) - needed for skiing on icy slopes. Provides more aggressive slope cutting and confident grip.
The edge needs to be sharpened periodically so that it continues to hold the slope well.
Type of mounting holes
Types of snowboard mountings for bindings
The next point is the types of mortgages for fastenings. They don’t play a special role, but when choosing a board you need to know that almost all fastenings are suitable for 2x4 and 4x4, and only Burton or look for special circles for 3D-pattern and ICS.
Mortgage fastenings 2×4 and 4×4
Mortgages 4x4
This is a mortgage classic. The fastening disk is attached to the board with 4 bolts, at a convenient width.
- 2x4 – hole spacing 2 cm and 4 cm between “lines” of holes.
- 4x4 – hole spacing 4 cm and 4 cm between “lines”.
Burton 3D pattern
Burton 3D mortgages
The disk is fastened with 3 bolts, so you need to purchase either compatible Burton mounts or look for special disks for the mounts.
Burton ICS (Infinite Channel System)
Burton ICS
A guide channel on a snowboard, into which 2 inserts are inserted, to which the mount is screwed. Designed by Burton and only fits Burton EST mounts.
The main point of such fastening is that the rigidity of the board is not compromised when the fastenings are installed.
When we firmly tighten a circle with 4 bolts, the snowboard becomes stiffer in the area under this circle, which is not always convenient.
And when installed in a special channel, the rigidity of which is known in advance, the rigidity under the mount remains as intended by the factory.
Plus super-fine adjustment of the angle and position of the mount.
In addition, there is no “base” in the mount, so the weight of the mounts is approximately 20% lower than that of models with circles and 4 bolts. And the place of the base is occupied by a shock absorber, which will be very useful when jumping and landing.
Freestyle
This style is chosen by fans of various tricks, jumping and riding a highpipe. The boards for it are soft and short. We select the length according to the formula “height – 8-10 cm”. If you have a small weight, we subtract another 5 cm; if you have an impressive build, on the contrary, we add it. The ends of a freestyle snowboard are symmetrical, so after jumping you can continue riding both face-first and backwards. Another important parameter is deflection. For freestyle, the “rocker” option is suitable. The central part of such a snowboard touches the ground, and the ends are curved upward. The board becomes more obedient and easier to control.
Choosing a Snowboard Manufacturer
Probably the most controversial question in choosing a snowboard is which brand of board to choose?!
In fact, everything is simple - all branded snowboards are made with high quality.
Another question is the technologies used in snowboarding. They vary from manufacturer to manufacturer and often add exclusive characteristics to the boards.
It is worth studying and comparing only the technologies and parameters of specific models.
If possible, it is worth purchasing boards from large brands: Burton, Salomon, Rossignol, LibTech, Arbor and others.
Large brands, unlike Chinese know-name factories, have quality control departments and a guarantee that will protect you from defects. In addition, I can say from experience that when hit, branded boards are less likely to delaminate and withstand critical loads better.
Freeride
Freeride is suitable for those who want to combine downhill skiing with some extreme elements. A freeride snowboard should be 10 cm shorter than your height. The previous formula with weight also applies here. The entire center of gravity for such a board is located slightly from the rear. Ideal deflections for freeride are the already known “rocker” and “zero deflection,” in which the central part of the snowboard is absolutely flat, and the ends are slightly raised above the ground.
Evgeniy Joon Ivanov
, Quiksilver team rider: This season for park skiing I chose the Gnu Head Space snowboard - it’s a real classic: a twin-tip camber with moderate stiffness and an unreal design! For a universal board, I choose Gnu Riders Choice - thanks to its lightweight design and hybrid camber, this board is suitable for both park and freeride. This season I have already ridden this snowboard in Siberia, Japan and the Alps.
Evgeniy Joon Ivanov
Materials
Typically, the core or core of a snowboard is made of wood (beech, ash, poplar, oak, spruce, pine). But with the addition of various materials, it acquires additional properties. For example, foam makes snowboards lighter and cheaper. And thanks to carbon fiber and aluminum, rigidity is added.
The sliding surface can be made of extruded or sintered polyethylene. The first option will cost you less, but it requires special care and expensive repairs.
Edges
Edges - narrow strips of steel along the edges of a snowboard that allow the rider to make sharp turns - can be divided into two types:
- Straight is the most common edge. It can be long (along the entire length of the board) or shortened, when the front or rear part is not protected by an edge (often found in freeride snowboards, it allows you to reduce the weight of the board).
- Magne Traction is a special development of Mervin. This is a wavy edge that resembles a cheese knife.
Waved edge Magne Traction
Due to five or seven edge support points, you can turn without problems on any surface, even on ice crust.
Jibbing
The shorter the board, the faster you rotate around its axis. The longer, the more stable you will land. Most beginner jibbers take soft boards, they are easier to learn on. When the level gets higher, then for a more confident exit from the kicker, as well as a clear hit on the rail, you can switch to medium-hard camber
Artem Pichkhadze, professional snowboarder:
“Usually, the railing board is shorter than the rest in the collection. With my height of 186 and weight 75, I use the following sizes: 151 jibb, 156 park, 158 pipe and large jumps, 159 backcountry, freestyle, 162 freeride and carving"
How to choose mounts
First, let's look at the main fastening elements, and then we'll talk about how to choose an option to suit your needs.
- Base - the basis of the fastening.
- Highback - a heel that secures the heel of the shoe.
- Arc - thrust bearing.
- Straps are two straps that secure the front of the boot.
- Buckley - two fasteners.
- The gas pedal is a retractable bar on the toe of the mount that allows you to adjust its length.
Types of fastenings
Fastenings with two fasteners (Strap-in)
These are the most common mounts.
To put on such fastenings, you need to unfasten two straps, insert your leg and fasten the straps. There are also options with a special lower strap - capstrap. It wraps around the toe of the boot not only from the front, but also from the top, firmly pressing it to the base.
Fastening with capstrap.
With folding highback (Rear-entry)
These are models that can be fastened easier and faster. In such fastenings, the straps are connected to each other for better fixation of the boot. To put them on, you need to flip the highback, insert your foot, and then push it back into place.
Step-in mounts
This is a system where the boot snaps into place when the rider steps on the binding.
On the one hand, it’s easier to fasten the boots this way, on the other hand, snow can get stuck in the fastening and then fastening it will be problematic. In addition, Step-in bindings require special rigid boots, so it is better not to buy them if you want a calm and relaxed ride or if you are getting on a snowboard for the first time. For beginners, it is better to choose soft bindings with not too strong leg fixation with straps.
EST Mounts
These are models for IST boards with a channel system from Burton.
Unlike conventional mounts, ESTs have a lightweight base, and instead of the usual holes, there are runners and lugs on it. It is into these ears that two bolts are inserted, which secure the EST to the board and allow you to adjust the position of the fasteners.
Another important point: the bindings must be selected together with the boots.