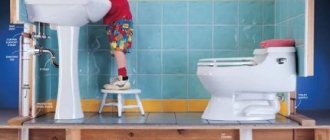
During the construction of a modern private house, as a rule, a comfortable bathroom is immediately installed. But if you want to equip it in an old house, where it was not originally provided for, a number of nuances arise. How to install a toilet in a private house so that it lasts a long time will be discussed in detail, taking into account various installation options, fastenings, drains and drainage features.
Option for connecting a sewer system to a toilet in a private house Source build-experts.ru
The toilet in the house should be warm
You should start by identifying a suitable room for arrangement. It should be small (3x2 m is enough), allowing you to place all the planned plumbing elements and accessories inside.
The best solution would be to choose a room that has at least one external wall in order to minimize the work on organizing waste disposal. Otherwise, you need to plan to lay sewer pipes inside the basement, which will complicate the connection process and make it more expensive.
Sometimes they fence off part of a large room and the bathroom equipment there with all the necessary communications connected. The strength of this solution is the ability to choose the location and allocate the required number of square meters for high-quality arrangement of the toilet room. The disadvantage will be the loss of living space.
When choosing the location of the bathroom in the house, you need to consider the following:
- sewage was discharged through pipes along the minimum path;
- the room was sufficiently distant from the bedrooms, kitchen or dining room;
- the room must be accessible for water supply pipes and sewage disposal, and the issue of ventilation must also be considered.
An example of installing an electric heated floor in a bathroom Source greempol.ru
Ventilation
Ventilation in a private residential space is mainly taken into account during the design: in the bathroom, toilet and dining area there are hidden ventilation shafts with decorative grilles. If the toilet is located on the lower floor, there is no need for artificial ventilation. Often there are several bathrooms, in which case it is necessary to install forced ventilation with air ducts.
Ventilation in the bathroom
A hood in a bathroom in a wooden private house has additional loads, so the requirements placed on it are serious. This material is greatly affected by increased humidity levels, so you need to install a hood and additional ventilation ducts. You should not use air conditioners because they make the air dry, causing cracks to form on the wood.
You may be interested in: Important points when planning a children's room for two children
Features of installing a bathroom for drainage
The sewerage connection to the bathroom is divided into stages: external work and internal work. The first involves connecting to centralized, local or storage systems, and the second involves the installation of plumbing fixtures and pipe distribution indoors.
When laying pipes externally, a number of nuances are taken into account:
- The influence of external factors and climatic conditions, such as the quality of the soil and the depth of its freezing, because they greatly affect the efficiency of the sewer system. Moderate latitudes require burial to a depth of at least 0.8 m, but it is better to go deeper and with additional insulation of the pipe.
- It is necessary to select the correct type of pipes. Often the plastic option is sufficient, but high soil mobility in some places requires the installation of cast iron pipe products.
- When using local purifiers, it is important to find a compromise between minimizing the distance to them and compliance with regulatory documents on construction and sanitation (distance from the building by at least 15 m and 30° pipe slope per linear meter).
Installation of a toilet bowl to plastic pipes of the sewer system Source popgun.ru
In interior work, as a rule, questions arise only about the method of installing the toilet bowl. The main thing is to take care of the presence of a rigid and durable foundation, which is not typical for old private buildings. Installation on a wooden floor is possible, but is considered impractical and unprofitable. It is better to take care of pouring concrete on the floors, which will lead to increased costs and labor costs, but will make the bathroom better and more durable. In addition, this will allow the installation of heated floors.
Required Tools
Before you begin installation, you need to carry out all the preliminary work and select tools and materials in advance.
For installation you will need:
- toilet of the chosen design;
- hammer drill;
- screwdriver;
- set of wrenches;
- hammer;
- screws;
- rubber gaskets;
- dowels;
- pipes for connecting to the sewer: plastic, fan or corrugated;
- plumbing silicone grease.
In addition to these tools, you may need:
- pencil for marking the place;
- a special board for fastening - taffeta, especially for installation on an old wooden floor;
- if the toilet is going to sit on glue, then epoxy glue is needed;
- emery for polishing the surface;
- For final processing you need red lead and tow.
Concreting the toilet floor
First of all, wooden floors (if any) are dismantled. Then a depression of 40-50 cm is created, followed by careful leveling and compaction. After this, a 30 cm layer of sand is poured, compacted and watered. Cover everything on top with fine crushed stone (fraction up to 10 mm), level it and compact it again.
The next stage involves leading the sewer pipe out through the foundation. This will require the use of diamond drilling equipment to prevent cracking or partial destruction of the building’s load-bearing structures.
Diamond drilling of holes for drainage Source specteh-smol.speczakaz.info
See also: Catalog of companies that specialize in the design and installation of sewerage and water supply
The hole inside the building should be 15-20 cm above the floor, and the outlet of the pipe to the outside should be located below the calculated level of soil freezing.
Then the recess is waterproofed, reinforcement mesh is laid and concrete is poured.
Before the solution hardens, future toilet fasteners (threaded steel rods) are inserted into it.
After this, you can install electric heated floors, which will add comfort to the room.
Dismantling
The next stage is dismantling the old equipment.
Required Tools
Before starting the removal operation, check that you have the necessary tools. The minimum kit includes:
- hammer drill,
- drill,
- a set of keys (adjustable – a must!),
- fum tape,
- silicone sealant,
- roulette,
- building level.
Steps
Step 1. Turn off the water supply, drain the tank, drain the drain elbow.
Step 2: Remove the drain hose.
Step 3. Remove fasteners.
Step 4. Clean the joint.
Step 5. Remove the bowl and seal the hole with a lid or rag.
Cast iron sewer pipes were usually treated with a cement mixture. It will be easier to break the layer by drilling along its diameter.
Features of choosing plumbing fixtures
Before installing a toilet with your own hands in a private home, you need to make the right choice of this accessory, based on some recommendations:
- the toilet seat has a standard height of 40 cm with minor differences of 5 cm in one direction or another depending on the manufacturer (it is important to choose the most comfortable model);
- with a horizontal drain, the outlet of the hole in a standard toilet is located 18.5 cm from the floor level (this must be taken into account when organizing the connection to the sewer);
- with an inclined drain, the outlet of the hole is located 15 cm from the floor (normal gravity flow will be ensured by placing the wiring tee 10-15 cm below, i.e. near the floor level);
Possible options for flushing the toilet Source santehnika-nk.ru
- for vertical drainage, these models are usually placed on a drainage pipe and firmly secured with a clamp.
The vertical drain option is only possible if there is an underground of the required size with an appropriate foundation. Otherwise, it is better to use plumbing with an inclined or horizontal drain and install the necessary communications.
Individual moments
It's not just wood flooring that's found. Depending on the material used, the installation method is different.
- Concrete surface. This is especially true in private residential buildings. Then a special technology is used. A footrest is required, and for the cushion effect a cement mortar is already used. It is quite simple to make. You need to take cement, water, sand, connect all the elements together and in the correct proportion.
A wooden or metal frame is placed around the place where the toilet will stand. The solution is poured into it evenly. Until it becomes stone, they are installing the toilet, pressing it in at the same time. Excess material is carefully removed. Just like the frame, which was temporary.
- Ceramic surface. Quite common. A substrate is not used for such a surface; in this case, an adhesive composition is required.
- Adhesive is an excellent option for ceramic surfaces. For best effect, mix it with cement in small proportions. The toilet should be used after the adhesive has completely dried.
Toilet installation option
There is no clear answer to the question of how to properly install a toilet and sewer system in a private house. It depends on many factors. But you can consider one of the most common methods.
You should start by trying on the plumbing fixtures at the location and applying markings, i.e. actually tracing the contour of the base and marking the places for the mounting holes. At the same time, they check for horizontality and stability and take measures to eliminate the identified deficiencies.
They also check whether the toilet outlet coincides with the sewer outlet. If there are no deficiencies, a corrugation is attached to the drainage system of the sewer system using sealant. You should not connect to the toilet yet.
Connecting the toilet to the sewer with corrugated Source otvali.ru
Best answers
Clara Bitchy:
Only with cement mortar, and let it sit. Gypsum is afraid of moisture - a solution with the addition of gypsum is good only in a dry place; moisture will crumble after a while. And to speed up the solution, you can add liquid glass, which will give it waterproofing properties, but it hardens so quickly that you may not have time to lay it :-)
about 100 Yanina:
no need to reinvent the wheel - make it with cement... although my husband put it just like that... didn't fill anything...
Grandfather Au:
yes, fill it with solution
Cat's smile:
Fill it with cement mortar - cement with sand (1:4), put a wooden board on top, and temporarily connect the toilet. , Leave it like that for a couple of days, then you’ll put it firmly in place.
Starr Grandfather:
3 parts cement + 1 part gypsum (alabaster) will set in 2 hours. The more gypsum, the faster. If 1:1 then it will set in 20-30 minutes Sand by itself! It will turn out something like this: 1 part cement: 2 parts sand: 1 part gypsum
Barabas:
Fill it with tile adhesive; it does not need to be diluted with sand, it will harden faster and will not crack.
Online magazine Tips for owners:
The faster the deader. This is the law. You can't think of anything other than a cement mixture. There are quick-hardening cements (dental fillings were made from these in the old days), but they are prohibitively expensive and rarely come across on wide sale.
The solution may be the following composition - mix dry cement with gypsum, 2 hours of cement - 1 hour of gypsum, add 2 parts of sand, for all this water, half of the total amount, even take a little less, add during the mixing process if it turns out too thick. Dissolve PVA in water, 10-15% of the volume of water. Pour the pre-mixed ingredients into the water, mix them thoroughly for about a minute. We wait a couple of minutes, mix again and fill the niche with the resulting solution using a spatula and smooth its surface.
It will set in about an hour. The toilet can be installed and connected to the sewer system in three hours, and it can be used (carefully!). But drill and install the fasteners the next day, or even better, at least let it sit for a day.
For reference, cement mixtures, as well as mixtures with other binders, do not dry out, they set (plastics polymerize).
Drying, a process that has practically nothing to do with setting, and sometimes has a negative effect. For example, if you decide to speed up the “drying” process with a stream of hot air, you will only get cracking. But the strength and speed of setting can be accelerated by steaming, i.e. by being in a humid, hot environment (but this is not for home use, this is how concrete products are made in factories)
As a rule, the setting speed can be accelerated only at the cost of strength or moisture resistance, as in our case... Therefore, filling with the above mixture may begin to deteriorate after just a few years.
Elena Anikina:
you can use rotband or alabaster, they harden faster than all the others
Chuck Kazemierczak:
Indeed, there is no need to rush. Carefully and slowly pour good cement. Place a board on top (through newspaper to prevent it from drying out). Place the toilet and attach it with corrugation. Tell everyone to sit down carefully. After a couple of days, when it hardens, calmly drill and fasten.
Stas Shabanov:
buy a bag of self-leveling floor. It will dry out in 3 hours.
Alexei:
you will also have to screw the toilet into your filled miracle with dowels or screws.
That’s why they put a board, a mortgage, into it, it’s easier to attach screws, ordinary ones, for wood.
They just hammered a hundred nails into the sides of the board, made a hedgehog out of it, and poured it with mortar, the mortar grabbed the nails, and the board didn’t jump out after drying.
In conditions of quick repairs, plumbers simply fitted a new board tightly, dipped it into molten bitumen, ran with it to the floor, and while it was still warm, pressed it into place.
Run:
Cement
Lyudmila Bogoslovskaya:
Regular cement takes a long time to dry. High-speed hydraulic seals are best for such things. For example, PCI Polyfix 5 minutes, which hardens within 5 minutes. And after this time, you can already veneer it on top and fill it with water
Features of connecting to the sewer
After this, the installed toilet requires connection to the waste disposal system. In fact, there are two types of entrance to the sewer outlet - horizontal (relevant for new buildings) and vertical (typical for old buildings). For them, plumbing fixtures with the appropriate outlet are selected - horizontal or vertical. Devices with oblique outlets are considered universal and can be connected to any type of sewer system.
Typically, the type of toilet is selected to match the existing drainage system in the building. In the case of laying sewerage “from scratch”, they are guided by their own preferences.
It is important to maintain the required distances and differences between the plumbing fixtures and the riser. The use of an eccentric helps with this, and the simplest and most universal method is the use of corrugation.
When making connections, it is important to apply plumbing sealant along the edges of the cuff to enhance the sealing effect and at the same time lubricate it in order to facilitate installation, but not much, because its excess will lead to a decrease in the reliability of the connection.
Installation of a toilet with vertical outlet Source teplo.guru
Vertical outlet bathroom
The most common drainage option in European countries due to the versatility of the design, which allows the installation of the bathroom to the wall at the desired angle. The device consists of a siphon in a bowl and an outlet pipe directed downwards.
Installation is quite simple:
- floor markings are carried out and a conventional screw flange with a lock is installed;
- a sewer hole is installed in the center of the flange;
- The toilet is mounted on a flange with reliable fixation of the outlet pipe.
Horizontal outlet toilet
Received maximum distribution in Russia. Another name for this option is “direct outlet into the wall.” The drainage of the device is directed backwards. The connection of the branch pipe to the sewer pipe is made using a specific cuff.
This type of toilet is fixed directly to the floor through special holes in the base of the device.
Recommendation! It is better to begin work on connecting direct outlet plumbing during installation. Fastening is done using dowels and standard screws.
Connecting elements
There are several connection methods.
Branch pipes and bends are indispensable when working with oblique bends. It is considered a practical and durable option.
The drain pipe is a guarantee of reliable operation of the water seal. Used to protect against the formation of air cushions in pipes. This point is relevant if there are a large number of water points. An analogue is a pipe with a check valve, manufactured as an integral mechanism.
The diameters of the pipe and drain outlet must be the same size.
Eccentrics - connecting cuffs with an offset axis - are successfully used. Plastic or corrugated eccentrics are a universal device for non-standard situations. Another advantage of such a coupling is the ability to be inserted directly into the sewer socket without an adapter.
The corrugation is suitable for difficult conditions. Where the discrepancy in the corners is more than 90 degrees, a corrugated cuff is indispensable.
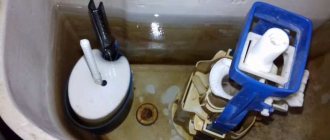
Tank installation process
After installing the toilet itself in the room and connecting its outlet to the sewerage system, it is necessary to install the water storage tank in the appropriate place. To do this, a rubber gasket is installed, which seals the junction with the toilet, and directly on top of the tank itself. After this, both elements are tightened using standard bolts using rubber shock-absorbing and sealing bushings.
When performing these actions, the main thing is not to overdo it, so that there is no overtightening or distortion, which can lead to deformation of the washer and, as a result, constant leakage of water.
Installing a flush cistern on a toilet Source nash-remont.com
After this, the drain mechanism is installed inside the tank, the lid is closed and the drain button is mounted.
Recommendations
Maintenance and possible repairs of the tank can be made easier. To do this, a service hatch is made just below the drain button. When choosing fittings for a button and a tank, preference should be given to those designs that provide a water saving system. There are two varieties of them. In the first case, 2 separate buttons are installed. When you press one, all the water is drained, and when you use the second, half the volume of the tank is released. The second type of system is a single “start-stop” button. It is more expedient to place the element for draining water either in the center of the tile or directly at the joint. Laying of tile elements is carried out from the button to the edges.
Communication between water supply and tank
At the last stage of installing a plumbing fixture, it is necessary to connect the tank to the water supply system using a conventional flexible hose with reinforcing braid. During this connection, it is recommended to use rubber gaskets or sealant without plumbing. To prevent cracks in the housing mount or the plastic fitting of the filling valve, the fitting must be tightened with the utmost care. The last step is to check the entire system for leakage and, if necessary, make final adjustments to the tank fittings.
Hanging models
Recently, hanging varieties with installation have become increasingly popular, the connection methods of which involve hanging the bowl on a false wall and placing a cistern behind it. To do this, a strong metal vertical frame is mounted behind the wall, threaded studs with nuts are removed from it to hold the bowl, and a plastic drain tank is placed inside the frame; a button is placed on top of the wall to turn on the flush.
The advantages of a hanging design are space saving in a small toilet, aesthetic appearance, ease of cleaning (the floor is easier to clean under a hanging bowl).
Briefly about the main thing
Having asked the question of how to install a toilet in a private house, the average person should first think about the location of the future bathroom, its insulation and the connection of the necessary sewer lines to it. After equipping the place, it is important to choose the correct and most convenient model of plumbing fixture, taking into account the peculiarities of connecting to the sewer system - with a vertical, horizontal or oblique drain for sewage. Then the toilet itself is installed directly, with fasteners, gaskets, connection to the sewerage system, installation of a water storage tank and connection to the water supply system. All actions must be carried out in exactly this sequence.
Types of systems
All systems can be divided into 2 types:
- Pressure system.
- Non-pressure.
Gravity sewerage
Gravity drainage is used everywhere, the main thing is to maintain the required angle so that the wastewater reaches its destination. The use of this type is the most common and is used for all types of drainage.
Pressure sewerage involves the use of a pump. Sometimes the geographical location of the house does not allow the use of the simplest non-pressure sewer system. This is possible when the house is located below the main ground level, or it means using the basement of the house where the bathroom is planned to be located.
Pressure sewer
The pressure one does not need to maintain the angle of inclination of the pipes, has a lower likelihood of clogging, and also makes it possible to use a system of smaller diameter.
With all these positive aspects, there is a need to purchase a fairly expensive pump that will be able to serve a fairly large area.
A septic tank or central sewer is used as a waste storage facility for such a system. The well is simply not able to cope with the volume of water that will flow.
Another noticeable disadvantage is the energy consumption to ensure the operation of the pumping station. For ordinary water, a low-power pump is enough, which practically does not experience high loads. Due to the fact that the system contains such a unit as a toilet or kitchen sink, a sufficiently large pumping station is required.
Its operating principle is based on the initial collection of wastewater in a reservoir at the pump. After the tank is filled, all liquid is pumped into a septic tank or central sewer system.
But there is also a risk of damage to the pump from solid objects present in the wastewater. All human waste products must be recycled to eliminate the possibility of breakdown. To do this, a grinder is installed at the pumping station, which easily copes with the task.
Thus, when using this method, there is a need to install a fairly large and expensive station, which will require a lot of space for installation.
Construction of a toilet for a summer house: drawing with dimensions for a “birdhouse” type structure
The design of the Birdhouse consists of wood, which can be covered with any other type of material. Construction of a single or gable roof is allowed. This type of closet is mounted as an above-ground building above the cesspool.
Typical design of a “Birdhouse” with dimensional parameters:
| Design element | Size, m |
| Rear wall (height) | 2 |
| Width | 1 |
| Front wall (height) | 2,3 |
| Base area | 1x1 |
When installing a wooden toilet structure, mandatory control of the placement of surfaces vertically and horizontally is necessary. For these purposes, it is recommended to use a building level.
Drawing of the Birdhouse toilet: 1 - frame, 2 - stand, 3 - door, 4 - handle, 5 - door crossbar, 6 - front wall, 7 - roof rafters, 8 - roof, 9 - ventilation riser, 10 - deflector, 11 — side wall, 12 — cesspool cover, 13 — brick supports, 14 — rear wall
Materials for the construction of the Birdhouse
To carry out the work, make sure you have:
- roofing felt - in the amount of 2 m?;
- concrete curb (2 pcs., length - 2 m) or sand-cement block (4 pcs.);
- door block (2000x900 mm);
- sand;
- linings (40 pcs., 87x3000 mm);
- edged boards (4 pcs., 50x100x6000 mm; 3 pcs., 32x90x6000 mm);
- profile sheet made of galvanized steel (2000x1520x0.4 mm);
- wooden beam (1 pc., 50x50x600);
- components for the door (latch, hinges, handles);
- fasteners (screws, nails);
- material for the finishing coating (varnish or coloring composition).
Toilet “Skvorechnik”, photo 1: preparation of materials and installation of the frame
In order to insulate the structure, you should purchase polystyrene foam. After construction is completed, the frame is sheathed from the inside. You can decorate the interior with beautiful materials (optional).
How to build a toilet in a country house with your own hands: step-by-step construction of a “Birdhouse”
Instructions for building the “Birdhouse” (step-by-step guide):
organization of a cesspool. The minimum size of the tank is 1x1x2 m. At the bottom there is a cushion of crushed stone or broken brick;
Toilet “Skvorechnik”, photo 2: installation of a technological hole in the floor
- construction of the foundation part. To do this, a concrete curb is installed so that the edges of the pit are located at a distance of no more than 0.2 m from it. The curb will act as a ceiling. The process of installing a curb involves digging in such a way that the concrete base rises above the soil level by no more than 0.1-0.15 m. If sand-cement blocks are used, they should be dug in the corners. The entire frame will be installed on them in the future;
- installation of roofing felt. The material is laid on top of the base in 3-4 layers as an insulator from moisture;
- construction of the above-ground part (wooden frame), its finishing. A wooden board or lining can be used as a cladding material for the frame. The flooring is made from thick boards. The minimum thickness for flooring is 4 cm. It is recommended to use wood species with increased strength characteristics. These species include larch, beech, oak, etc.
Toilet “Birdhouse”, photo 3: cladding of the external walls of the structure
Final work on the creation of the “Birdhouse”
The final work includes the following stages:
- creating a hole in the floor. The shape of the slot in this case can be arbitrary (round, diamond-shaped, oval, heart-shaped), the main thing is that its diameter is at least 30 cm;
- installation of door structure. For convenience, you can make a small slot in the door leaf in the form of a window so that sunlight can penetrate inside the frame. This window can be left free or glazed;
- roofing arrangement. The roof of the Birdhouse can be covered with various types of materials. Asbestos-cement sheets, roofing felt, and profile sheets made of steel are best suited for these purposes;
- applying the finishing layer. The surface of the product should be treated with varnish or paint. It is recommended to use oil dye.
Toilet “Skvorechnik”, photo 4: installation of a ventilation pipe and arrangement of the roof
When arranging toilets, do not forget about organizing ventilation. Even the simplest option will be enough. This system is designed to remove air from the waste pit to the outside. A pipe can be used as a material for making ventilation. The minimum diameter of the product is 10 cm.
To install the pipe in the podium part of the toilet, as well as in its roof, slots of the appropriate diameter are made. The pipe must rise above the roof by at least 0.2 m.
Toilet “Birdhouse”, photo 5: country toilet, built with your own hands
What should a master expect: the main stages of construction
When thinking about building a bathroom in a wooden house, you should immediately decide that the plumbing must have access to the sewer or at least to a cesspool. Water must also be connected for the bathroom to function fully.
The arrangement of this zone in a wooden structure has its own characteristics and even some difficulties. But they are easy to overcome if you do everything according to the established sequence.
The construction of the bathroom should take place in the following order:
- Sewerage installation. This is an initial and very responsible activity. If problems arise with the sewerage system, construction may be delayed. In a house that does not have access to a sewer, cesspool or sewage treatment plant, it will be impossible to create a bathroom. The only solution in this case is to carry out sewerage or dig a hole yourself.
- Ventilation. Without it, it is also impossible to carry out hygiene procedures fully. This requirement is easier to fulfill; the main thing is to think about how to arrange everything correctly.
- Waterproofing installation and plumbing installation. This is also an important stage. If you ignore the installation of waterproofing, then over time the wood will deteriorate due to high humidity. It is also better to purchase high-quality plumbing fixtures. It will last much longer and you won’t have to injure the wooden base to carry out installation and dismantling.
- Selection of design and finishing work. In order not to become hostage to one image of a wooden house, you can use the services of an interior designer or come up with everything yourself, inspired by ideas from the Internet or an architecture and design magazine.
Work must be carried out strictly according to plan. You can’t do ventilation without understanding the sewage system, etc.
Also, before starting, you need to consider a few truths about wooden houses:
- Over time, the house shrinks. Therefore, it is better to purchase metal-plastic or plastic pipes so that in case of deformation they can withstand the pressure.
- To secure the pipeline, use special clips.
- A sliding frame is a special technology that will allow you to build a bathroom in a wooden house without complications.