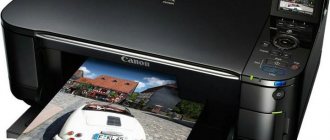
Most often, cleaning procedures are carried out by owners of Epson, HP, and Canon equipment. This manual contains several options for cleaning the printer head. All steps are described in detail and contain explanations for the most inexperienced.
Cleaning the printer print head is required for any model of inkjet machine when the quality of its operation begins to deteriorate over time.
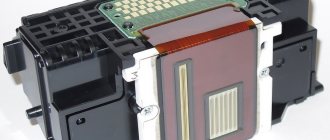
Cleaning involves a kind of direct physical washing of the nozzles, the nozzles through which ink flows onto sheets of paper. Their clogging leads to poor printing and wear on the printer itself. You can wash the head, like any other unit of the device, with special liquids that can be easily purchased at any computer store. Which manufacturer's device is causing the problem?
When cleaning is needed
- When performing a nozzle test, part of the image is missing from the paper, white streaks are visible during printing, colors are not reproduced correctly, or one of the streaks is completely missing. These clog marks occur when the printer is used for a long time.
- The printer has not printed any documents for a long time. Water-based liquid ink may dry out. For different models, paint drying time varies from several days to a month. If the machine has been idle for a long time, it has inkjet printing technology installed and after turning on the print quality has deteriorated significantly or blank sheets have come out completely, the print head is likely completely dry.
- Different types of dyes were filled in or the cartridge was filled with ink from a different manufacturer. When solutions with different chemical compositions are mixed, a reaction occurs inside the ink reservoir that can lead to rapid thickening of the ink and failure of some head elements. If you need to use another brand of ink, first thoroughly wash the cartridge, the channels through which the ink is supplied, and the head itself.
- Refill the ink. After each cartridge refill, it is necessary to clean the print head for preventive maintenance.
Cleaning the steam generator should be done as a last resort, since a decrease in print quality can be caused not only by clogging, but also by:
- failure of piezoelectric crystals due to printer overload (Epson);
- overheating of the heating element (TN).
- excessive pressure caused by installing the CISS above head level;
- Gateway;
- incorrect head position;
If the display shows system errors, the cartridge lights are blinking, or the ink is low, there is no need to flush the print head. Even with frequent and dense printing, cleaning is done no more than once a quarter.
Causes and signs of pollution
The printer needs servicing if:
- Print quality has deteriorated.
- Some colors have "disappeared". However, there is ink left in the cartridge.
- The printed pages have white streaks or other defects.
IMPORTANT. Canon has reliable products. But you need to clean the printer head once a month, even if nothing is broken. For preventive purposes.
The problem may appear:
- Incompatible ink. Pigments and water-based products must not be mixed. There remains a residue that clogs your head. And also do not take paints from different manufacturers. If the device is new and already contains genuine Canon ink cartridges, replace the ink. Select the type of consumable and always use it.
- Using empty cartridges. Do not “squeeze” the remains out of them. Otherwise, the injectors will become clogged. And this will lead to collapse.
- Due to long periods of downtime. The paint has dried.
The injectors become clogged over time. In any case, they will need to be washed. Even if you have good ammo.
Causes of blockages
Most often, the print head does not want to work normally:
After a long period of inactivity
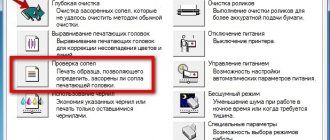
When the ink is dry. In this case, several sessions of cleaning the nozzles using the printer utility may be helpful. If cleaning twice does not help, use the “Deep cleaning” function; it can be repeated after a day. Didn't help again? This means the problem is much more serious and may need to be flushed.
Due to mixing of incompatible paints
Burnt-out nozzles
Water-based and pigment inks absolutely do not want to cooperate, curl, settle, and quickly clog the nozzles. It’s good if you noticed the problem in time and the injectors did not have time to burn out. Also, paints of the same type from different manufacturers may be incompatible. Ideally, ink tanks should be filled with the same consumables. Some experts advise not to even print original new cartridges if you are going to refill them later, but to immediately rinse and refill with the exact ink that will always be used.
As a result of printing with an empty cartridge
Carefully monitor the condition of your ink tanks and replenish them promptly, as printing with residual ink quickly releases greenhouse gases. First, the nozzles become clogged, and then, if you do not pay attention to print quality in a timely manner, the nozzles burn out. Washing will not help here; such a head cannot be restored.
Calibrating the 3D printer bed
We all know that accurate calibration of the 3D printer desktop is the foundation and key to successful printing on any FDM printer. In this article we will talk about the main and most popular methods of leveling a “bed”. So, as mentioned above, 3D printing without calibrating the desktop is impossible. We constantly encounter this process Read more→
- 07 April 2022 22:54:40
- Reviews: 0
- Category: News
Software cleaning
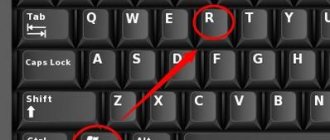
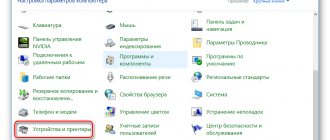
Open the Start menu and go to Devices and Printers.
Find our Epson printer and right click on it. Select "Properties".
On the Tools tab, click Printhead Cleaning. For the first time, select “Clear” and click “Start”.
Once the cleaning is complete, we run a nozzle test and if the image has no gaps, the head is clean. Otherwise, perform simple cleaning 2 more times. If this doesn't work, we'll perform an enhanced injector cleaning. At the very least, physical flushing is required.
Pre-orders for Dazz3D 3D printers are now open
The Chinese company Dazz3D announces the launch of the project on KickStarter and is accepting pre-orders for the Dazz3D Basic and Dazz3D Pro 3D printers. These revolutionary new devices are aimed at both the professional and amateur markets. Read more→
- 27 September 2022 21:48:51
- Reviews: 0
- Category: News
How to remove the print head
Canon iP3600 Print Head Latch
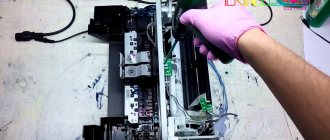
Open the cover while the printer is turned on to remove the carriage from the parking space. Turn off the printer. Remove the cartridges. The print head is clearly visible, but it is too early to remove it.
In different printer models, the latch holding the PG looks different, although the principle of operation is the same in almost all models. On the right side there is a lever or frame has a certain shape. You have to pick it up.
The MG5440 model has a slightly different principle. The catch here is the strip with the image of the ink colors, which does not rise up - you need to pull it towards you until it clicks. Now the PG is free, tilt it forward and carefully remove it from the printer.
Best Low-Cost 3D Printers in 2022
This is our first review of the most popular and inexpensive 3D printers for 2022. The list will include the best-selling devices in two price ranges (up to 30 tr and up to 60 tr). Printers working with both plastic filament (FDM) and photopolymers (LCD/DLP) will be presented. This list will always be up to date, as it is periodically updated and supplemented Read more→
- 07 February 2022 02:24:33
- Reviews: 0
- Category: News
Manually cleaning the print head
First, prepare your work area. A simple desk is ideal. To avoid contamination, cover the surface with several layers of old newspapers or paper.
What you need for cleaning
- A flat container that can then be thrown away. For example, a photo tray, a plastic box with a low side or a saucer.
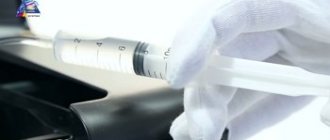
- An ordinary medical syringe with a needle.
- Latex gloves.
- Use scissors to cut the tube to the desired length.
- An eraser for removing stubborn stains that cannot be removed by soaking.
- Small diameter plastic tubes are suitable for droppers.
- Lint-free sponges or cloths.
All about flushing fluids
It is best to use flushing fluid from the same company that manufactured the cleaning consumables. If you can't find it, any certified cleaner will find it. This will not damage the device, but you need to choose a tool based on the type of ink in the cartridge.
To clean water-soluble ink, use:
- Special water. All chemical salts have been removed from it (WWM W01).
- Distilled water. Sold at any auto store.
- Homemade solution. Distilled water is mixed with ammonia (5-10%). The mixing proportion depends on the degree of contamination of the nozzles. The resulting mixture is filtered through a 0.01 micron sieve.
To clean nozzles contaminated with pigment dyes, use a specially formulated solvent or isopropyl alcohol.
WWM cleaning products are popular:
- CL-08 - special liquid for washing and soaking;
- CL-10 is an improved cleaner.
- CL-06 - a product for removing traces of black and colored pigment paint;
- W01 - demineralized water;
- CL-04 - liquid for cleaning the top of the printer from watery ink;
Read more: Liquids for washing printers.
Regular window cleaner is inexpensive. At home, “Mr. Muscle” is often used.
When choosing a detergent, it is important to pay attention to its color.
- Green and pink. Suitable for removing water based inks as it contains ammonia.
- Blue and orange (with isopropyl alcohol). Used to remove traces of pigment ink.
Before rinsing, the detergent must be heated to t = + 40 .. + 60 ° C to improve the effect of the solution.
Before cleaning, you can test the effectiveness of the cleaner. Take some ink and dilute it in different products. After a few hours it will be possible to analyze the result. If sediment has formed or the liquid has become gel-like, the detergent was chosen incorrectly. By using a suitable cleaner, the dye becomes liquid and the ink clumps dissolve.
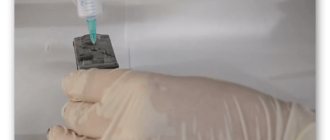
Flushing
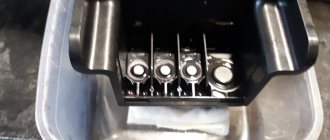
- Place the print head in the prepared container.
- Choose a syringe of a size that fits easily and securely into the head fittings.
- Make a cleaner.
- Release the air from the syringe.
- Put on the fitting.
- Start jumping slowly.
- The liquid should flow into the container.
- Once the color of the cleaner stops changing, you can stop rinsing.
- Follow the procedure with each fitting.
- Clean all items and allow time to dry.
If you notice that the liquid flows poorly or is not absorbed at all, you need to switch to a more aggressive method, which is described below.
Maceration
- Leave the head in the same container.
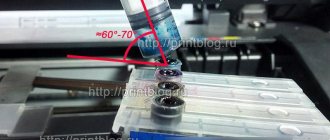
- Fill the syringe with detergent.
- We put the needle.
- Place a few drops on the fitting.
- Perform the procedure for several hours.
- In case of severe contamination, you can leave it overnight.
- Prepare plastic tubes that are easy to fill and fill them with detergent as shown in the picture.
Broach
If all else fails, try force feeding.
- Pour detergent into the bottom of the container.
- Empty the syringe of any remaining residue from the last few treatments.
- Install the fitting securely.
- Try to carefully pull the tissue through the head into the syringe.
Pumping
Pumping the Liquid Through the Steam Generator (Click to Enlarge)
If the liquid still doesn't work after two days of soaking, you can try pumping it in both directions with a syringe. Press the nozzles onto the wet dressing as before and aspirate the liquid in the same way. Extrusion in the reverse direction must be done with a continuous pipe.
The liquid is drawn into the syringe so that there is an air gap between the piston and the flushing agent. This method helps avoid a sharp impact that could damage the nozzle plate.
you need to press the piston very carefully, no more than 2-3 divisions at a time, and therefore even slower, depending on the fluid intake.
Serious blockage in the head
If the blockage is severe, liquid may not penetrate through the sluices.
In this case, it is worth trying to repeat the procedure several times. If this does not help, flush the tubes with plenty of liquid. To do this, take a thin tube and cut it into several small pieces. After this, put them on the suction holes and fill them with a special liquid. The length of each tube should not be more than 6 cm. If the liquid begins to penetrate through the head, you can continue the procedure and add liquid within two days.
In case of failure, you can apply the following technique. Pour some liquid into a plastic container, place a cloth or napkin and press PG on it, then use a syringe without a needle to draw the liquid out of the tube. Repeat the procedure several times, adding cleaner to the tube.
Likewise, you can try pumping liquid in both directions. To do this, repeat the previous steps, pressing the attachment onto the damp cloth. Then use a syringe to draw up cleaning liquid. Then fill the tube and squeeze the extracted product back out. This must be done slowly and carefully so as not to damage the part.
Extreme methods
This effectively ended how likely the print head was to survive. If the goal is not achieved, many other much riskier methods can be used:
- Squeeze out the liquid with a filled syringe without an air cushion. The pressure on the injectors will increase significantly, which will lead to their damage. Do not press your head against the fabric, but lift it slightly. Gently press down on the piston as before, the pressure is much higher due to the lack of air cushion.
- Hold the steam generator nozzles over the steam for several minutes and push through the rinse aid, heated to 40-50 degrees.
- Place the head on the surface of the hot water for a few minutes, without submerging it more than a millimeter, and draw the liquid through the nozzles.
Red print head (photo taken from www.chernila.com) (Click to enlarge)
- Use a more aggressive product: mix 9% vinegar and distilled water in a ratio of 1:9. This composition cleans well, but has a destructive effect on internal parts, and after use it must be rinsed with an alkaline solution to neutralize the acidic environment. Do not use this method unless you are prepared for print head failure within two to three months.
If any of these extreme methods succeeded in achieving your desired goal, do not rush to return the PG to the printer. After such extremes, be sure to dry it with a hairdryer. Don't overheat your head - take breaks for twenty minutes. If you doubt that everything has dried well enough, leave it next to the battery for two days and drop a little flushing fluid into each airlock before installing.
Place and align
To assemble the device:
- Install the print head into the Canon printer.
- Press down on the latch.
- Replace the cartridges. There should be a palette on the cart. Don't mix colors.
- Close the lid.
- Make a test print.
If uneven lines appear on the paper, calibrate the device. Most likely, the carriage has moved. Canon heads must be aligned.
- Refill the cartridges.
- Place 3 sheets of paper in the tray.
- Start - Control Panel - Printers.
- Right-click your Canon device.
- “Properties” item.
- "Special parameters".
- OR.
- Save.
- Service card."
- Click Align.
- In the next window, also click “Align”.
- The printer will print the samples.
- Enter the numbers of the samples that you think are of good quality. Look for examples where the white stripes are not visible.
you can also clean the mounting belt that the carriage rides on. Use soft paper towels and maintenance liquids. Then dry the tape. With proper maintenance, your printer will last longer. And with regular cleaning, severe blockages will never appear.
Cleaning the 3D Printer Nozzle
Cleaning a 3D printer nozzle is a fairly common process that any user of such a device has to deal with. This is not a complicated procedure at all, and anyone can handle it. You can complete this task in 15 minutes, using only handy tools and accessories. Read more→
- 23 January 2022 21:29:51
- Reviews: 0
- Category: News
