A frame for photo wallpaper is an original way of decorating surfaces, which has recently been gaining popularity. This solution allows you to create an interesting accent on the wall without spending a lot of effort. Moldings make it possible not only to decorate a room, but also to divide it into functional zones using various patterns and shades. Modern designers often use frames to give the space expressiveness and a certain structure. A new original decor option can be used in almost any room, both in an apartment and in a country house.
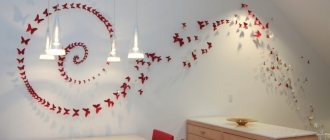
Frame with photo wallpaper Source obustroeno.com
Framing materials
It is quite possible to make a small picture in a frame from photo wallpaper yourself, using available materials. Of course, an easier way would be to buy a finished product, into which the image is simply inserted and secured from the inside. A baguette frame is suitable for this; such options are available for free sale. If you need a more accurate match between the size of the frame and the wallpaper, you will have to think about a hand-made product. It can be made from the following materials:
- Polyurethane plinth for ceilings;
- Wooden baguette;
- Wooden multi-colored slats;
- A strip of wallpaper that is already on the wall;
- Fake diamond;
- Parts of small twigs;
- Gypsum or decorative putty.
The selection of material is carried out depending on the overall style of the interior. Artificial stone is perfect for the country style, and the elegant wooden frame looks decent in the classic design of the room.
Natural materials require a corresponding picture plot. Products made from branches and wood will harmoniously combine with landscapes and rustic motifs.
Bed with photo wallpaper Source izhevsk.ru
If you plan to create a frame from plaster and putty, you should think in advance about the method of performing the work. Not everyone can make a neat outline and apply a drawing in the process, so you should calculate your capabilities and skills. If in doubt, it will be easier to take a plywood frame and distribute the material over it, and then fix the resulting picture on the surface.
Hallway with photo wallpaper Source otdelka-expert.ru
Things to consider
Having figured out how to frame photo wallpaper on the wall, you need to take into account some special points. For example, the following:
- It is important to consider the color scheme of the room. On photo wallpaper there is always a main tone and a contrasting one. It is this contrasting color that you need to focus on - select wallpaper to match it, or vice versa, choose a photograph with a contrasting color that matches the existing design.
- The best place for such decor would be a wall completely free from other decorative items. You shouldn’t load it with additional decorations, much less place other photographs or paintings on it.
- Use only very sharp knives to trim the edges of photo wallpaper if the picture is made up of several fragments - a dull knife blade can cost you completely damaged material.
- Always carefully weigh the decision to purchase a particular image - you will have to look at the picture for a very long time and a bad choice can ruin the whole impression in just a few days.
Otherwise, there are no particular difficulties with decorating walls in this way. The main thing is not to rush, do everything carefully and follow the recommendations of the wallpaper manufacturer. If you are using your own version of the image, printed on a wide-format printer, it would be a good idea to ask the manufacturer how to paste such materials.
Required Tools
Devices for work are selected based on the selected material. To make a neat cut on wood, a hacksaw for metal or wood is suitable. Such a tool must have small teeth for an ideal result. Polyurethane can be processed with a hacksaw or an ordinary construction knife. To accurately trim joints at corners, you will need to purchase a special tool called a miter box. It greatly simplifies the creative process and is sold in many construction stores.
Sofa with photo wallpaper Source grali.ru
Artificial stone does not require the use of special devices, but it is applied to an adhesive composition, which requires a mixture for dilution. Gypsum and other dissolving materials also require a container to hold the mixture.
At the final stage, you will need glue or other fasteners for the frame to fix it to the surface. You can use “liquid nails”, which reliably hold even relatively heavy elements. The ability to fix heavy objects is usually indicated in the instructions for the composition, so you must read it before starting work.
Methods for attaching various types of moldings
As you can see, there are many options for making moldings, both in terms of material, design and method of use. It remains only to find out how much easier and more reliable it is to mount these functional and decorative elements on various surfaces. The most common options for gluing moldings to surfaces with different finishes are:
- adhesive composition;
- silicone (used for gluing plastic, rubber and metal moldings to flat surfaces);
- Liquid nails (also suitable for porous surfaces).
When gluing moldings, accuracy, choice of an even direction and correct cutting of corners are no less important. You need to know very little about self-adhesive moldings: they are glued to a perfectly clean and dry surface, and the protective film is removed during installation.
How to make a frame
When making a blank, it is important to monitor the dimensions of the frame so that it exactly matches the wallpaper contained inside. To do this, it is important to measure the size of the picture and cut the material according to the data obtained. Do not forget that the painting will be placed inside the product, so all parts must be measured from the inside. It is also important to make the corners correctly so that they are absolutely the same. To do this, use a miter box and set the tilt to 45 degrees.
Decorative frames Source serviceyard.net
The parts are sawed off and then the corners are checked for exact fit. After this, the product can be fixed on the surface. Any method will do - first stick a frame and then add a canvas, or first place a picture and then decorate it with a frame. Focus on your own habits and convenience.
When you can and cannot use moldings
In most cases, molding is perfect for wall or ceiling decoration. Its main functions:
- Hiding surface irregularities;
- Decoration of the junctions of walls and ceilings;
- Smoothing the surface;
- Room decoration;
- Identification of functional areas;
- Visual change in the size of the room.
Vertical molding makes ceilings appear higher, while horizontal stripes effectively expand the space. If the room is large enough, then you can use wide stripes with bright images. Such an interior will look very elegant and even aristocratic; creativity and art will be felt in it. But still, this option is not suitable in all cases - in small rooms the space will be overloaded.
Bedroom with photo wallpaper Source 100oboi.ru
It is not advisable to glue molding over wallpaper. In such a situation, it is difficult to predict its durability, and the risk of ruining the design with glue also increases. In addition, subsequent painting of the product may be necessary. If there is still such a need, then it is better to choose lightweight materials - for example, polystyrene foam or polystyrene.
Decorating a room with molding
A frame for photo wallpaper on the wall is one of the most interesting design solutions for home decoration. A few years ago, only dull and inexpressive paintings could be found on sale, but nowadays the situation has changed dramatically. The construction market offers a large number of bright options for every taste, so each user can choose the most suitable product.
Photo wallpapers can become an expressive accent and add originality to your home. The modern manufacturing method assumes the wear resistance and durability of this material. For a painting to look beautiful on the wall and attract everyone’s attention, it is not enough just to stick it on. It is also necessary to take care of the appropriate decor for the image and frame it in a suitable frame.
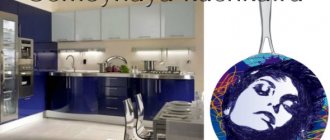
Kitchen with photo wallpaper Source design-homes.ru
Selection of performance technique
Most often, designers design a picture in two main ways:
- The easiest way is to frame the entire image at once;
- A more interesting method involves creating a driptych or triptych - sticking several sections of a painting in a certain shape and sequence.
Each method has its own advantages and is suitable for decorating a specific type of interior.
White wall with photo wallpaper Source newwalls.as-creation.com
Selection of technology
When choosing a frame for photo wallpaper, you need to decide on the further use of the picture. You can order printing of image details that fit a specific frame or cut out elements from a large canvas. Next you need to do the following:
- The first stage of work consists of cutting and preparing the necessary parts from the whole canvas.
- Marking the location of the future placement of paintings and deciding on the method of their arrangement.
- Installation of frames on the prepared surface. This action depends on the purchased material - it can be gluing the frame, puttying and painting the stucco, or decorating any other suitable base.
- At the last stage, the details of the photo wallpaper are glued inside pre-fixed frames.
Expanding space with photo wallpaper Source design-homes.ru
Color selection
Interesting solutions for color design of frames:
- Contrasting combination of white planks and dark wall. For better effect, transitions to the ceiling, window and door openings, furniture contours and other noticeable interior details are finished in the same way. In this way you can visually expand the space and add light to it.
- White or light planks on pastel walls. This solution looks good in large rooms, such as a living room. The shade is suitable for decorating walls, paintings and mirrors, as a result the room looks more sophisticated and sophisticated.
- Multi-colored planks are often used for children's rooms and hallways; they can also be used to create a bright accent or highlight certain items. For the same purpose, choose contrasting strips or several shades darker than the main shade.
Living room with photo wallpaper Source krovli-zabori.ru
A specific color scheme is chosen based on the overall tone of the interior and the tasks facing the designer.
Coffee on photo wallpaper Source kit4en.ru
Color combination options
The color and pattern of the wallpaper painting is usually different from the background of the walls. It can be contrasting - for example, pink wallpaper with a printed pattern against the background of burgundy walls or a painting in mint shades against the background of a green wall.
A very bold option would be a combination of colors that are opposite to each other. For example, a painting in yellow tones can be placed on a purple background.
- But most often they select shades of the same color. In this case, the picture turns out to be a tone darker or lighter than the main background.
- Complementary colors, that is, shades that are close to each other on the color wheel, also look beautiful. So blue will go well with turquoise, mint, and pink. Pink, terracotta, creamy or lemon will suit beige.
Any painting will look good on a neutral background of gray, white or brown. Another option for using a color scheme is a plain frame on a background with a pattern.
Main types of frame materials
There is a huge variety of solutions, each of which has advantages and disadvantages. Let's look at the main varieties.
Flowers on photo wallpaper Source modernplace.ru
Wood
This is one of the oldest decorative options; it has been used to decorate the interior for many centuries. Traditional material is perfect for classic design trends; it can be decorated in various ways and painted. Before painting, the wood is treated with an antiseptic and varnished. The strips are fixed with self-tapping screws or an adhesive base.
Wooden frame Source pinterest.com
Advantages of the material:
- Easy processing;
- Durability and reliability;
- Possibility of painting and fixing with glue;
- Long service life if treated correctly;
- You can create openings for cables and other purposes.
Disadvantages of the product:
- Poor resistance to moisture;
- Expensive;
- Heavy weight of planks.
Gypsum
Gypsum stucco molding is also a popular solution for room decor. You can install it yourself using gypsum or alabaster mixture.
Plaster frames Source stroyfora.ru
Pros of gypsum:
- Large selection of shades, shapes and patterns;
- Durability.
Among the disadvantages:
- High price;
- Heavy weight;
- Fragility;
- Complexity and high cost of installation.
Polyurethane
The main advantage of polyurethane is its flexibility. For this reason, the material can be used to decorate surfaces of various shapes. Other advantages of this option include:
- Smoothness and lightness;
- Possibility of painting and varnishing;
- Easy to use, can be glued to wallpaper and various other materials;
- Durability, which allows the use of polyurethane frames for about 30 years;
- Affordable price;
- Similarity to plaster products;
- Easy to care for.
Polyurethane frames Source gazeta-pravo.ru
Polystyrene
Frames for photo wallpapers can also be made from another plastic material - polystyrene. It is generally similar to the previous one and has the following advantages:
- Easy to make cuts due to the smoothness and evenness of the material. This characteristic allows the product to be used for decorating complex shapes of surfaces and objects.
- Polystyrene is easy to paint in the desired shade.
- Simplicity and ease of care, moisture resistance and the ability to easily wash the material.
- Light weight and affordable price.
Frames made of polystyrene Source mr-build.ru
Despite all the advantages described, polystyrene also has a drawback - a grainy surface.
Styrofoam
Foam plastic decor attracts users with its cheapness and availability, but at the same time it cannot be called a quality product. Buyers choose it because of the following properties:
- A light weight;
- Easy installation;
- Flexibility;
- Affordable price.
Among the disadvantages are:
- Fragility and lack of strength;
- Insufficient clarity of the pattern and unexpressed surface relief;
- Unresistant to many paints and varnishes;
- Does not tolerate exposure to solvents and some types of cleaning products.
Foam frames Source postroika.biz
Metal
This material is not very often used for wall decoration; it is usually used for places where one finish transitions into another - on thresholds, steps, in corners and areas where elements join. At the same time, the metal performs not only a decorative function, but also protects surface joints from mechanical loads. You can fix the metal frames with glue or self-tapping screws. The trim should be placed over the outer edge of the material.
Metal frames Source baget-sharm.com.ua
Other materials
The traditional choice for many homes is still plaster, which is fixed with alabaster mortar. This technology came to us from the last century and is still successfully used by craftsmen in construction. It is quite difficult to fix stucco molding yourself, since it is very fragile and requires careful handling. Most often, such work is performed by trained professionals. Also, gypsum decor is difficult to repair - falling off material threatens rapid destruction of the created frame and requires the purchase of a new product.
Wooden moldings are very rigid and also require a professional approach during installation work. But they are quite versatile and can be used in almost any room. For fixation, thin nails and special wood glue are used to strengthen the fastening.
Polyurethane frames have become increasingly popular recently due to their light weight, easy mounting, environmental friendliness and safety in use. The products are fixed to the surface with acrylic glue. Using polyurethane is simple and convenient, since the material easily transfers coloring to any desired shade.
Which moldings to choose?
When searching for decorative elements, we are often guided by the appearance and price of the jewelry. It is advisable to choose a solution that is not only aesthetic, but also durable.
Wood, MDF
Chipped pieces or dents on the moldings will not decorate the interior. The best choice is reliable wood products, MDF, they are durable and will not be damaged by an accidental impact. Wooden decor will not lose its beauty for a long time.
A wide selection of wall decorations will allow everyone to find the ideal model. The offer includes moldings with LED strip lighting, which will become an additional decoration of the interior.
Expanded polystyrene
Due to its low price and a number of other qualities, the most popular material is polystyrene foam. The main advantages of expanded polystyrene:
- a light weight;
- moisture resistance;
- ease of processing;
- ease of installation.
To attach decor made of foamed polystyrene, it is necessary to use a special glue that is characterized by high adhesion strength to the surface and does not destroy the thin decorative elements of the material.
Foam moldings take the following forms:
- cornices,
- sockets,
- panels,
- skirting boards,
- decorative stripes with geometric, floral motifs,
- decor with original stucco molding and artistic patterns.
The finished elements are mounted on untreated or unpainted plaster, or on an unpainted gypsum wall surface.
Gypsum
Gypsum moldings are painted with emulsions and oil paints; their surface must first be primed. Products made of polystyrene foam are coated only with emulsion paint - with a brush or spray.
How to install molding
There are special construction rules for fixing baguettes and other home decoration elements. They should be followed so that the final result is a correct and beautiful decoration using a frame or molding. To glue structures, you need to use special compounds; you can also use liquid nails. Before installation, it is recommended to keep the planks for a day inside the room in which they will be installed. This is necessary to adapt the material to the existing microclimate of the room.
Hallway walls with photo wallpaper Source otdelka-expert.ru
Installation must be carried out in the following sequence of work:
- Thorough plastering and priming of the wall panel;
- Applying markings in areas of subsequent fixation of elements;
- Treatment of parts with mounting adhesive solution;
- The elements are secured starting from the corners;
- Checking the symmetry of the frames and the strength of fixation of the parts;
- You can then leave the surface for the glue to dry. This will take about 6 hours.
- Puttying cracks and cracks between the plank and the wall or ceiling;
- Clean off excess putty using sandpaper.
At the intersection of different materials
If tiles or wall panels are only installed on part of the wall, the transition from tiles/plastic to a flat wall does not look very presentable. To make this transition more attractive, special border tiles are used, but they are too expensive, much more expensive than regular ones. It is no less interesting to decorate this joint with modeling. The decorative strip is mounted so as to cover the joint.
The width and thickness are selected for the specific interior and the thickness of the materials being connected. Since we are usually talking about a bathroom, toilet or kitchen, it is more advisable to use materials that are easy to clean and are not afraid of high humidity. The optimal choice for tile joints is polyurethane. Therefore, it can be painted the same color as the wall or tile.
If you are making a transition between plastic panels and a painted/bleached wall, you can use a plastic skirting board. Wooden panels or MDF panels, walls are best joined using a wooden cornice.
This same technique works very well when you need to combine two colors or two textures. Moldings are used to separate and coordinate joints. This can be an accent wall, which is very fashionable now.
But an accent wall doesn't have to be a different color or pattern from start to finish. In the event that a canvas or material of a different color occupies only part of the wall, moldings will be useful to us. They add the finishing touch to this finishing element.
Frames for creating style
Molding in the interior is used for various tasks - creating a decorative surface, framing pictures, complementing an existing composition, dividing a room into functional zones or, on the contrary, combining the space into a single whole. Frames also effectively change the height of the ceiling, visually expanding or narrowing the room. It all depends on the purpose of their use and the choice of the appropriate type. Among the most important tasks of molding is the creation and addition of a certain style in the interior:
- Baroque. It is difficult to imagine this style of style without numerous skirting boards and baguettes, frames with rich stucco molding and gilded corners. Floral ornaments and relief carvings are harmoniously combined with panels of wallpaper and decorative plaster. All these elements are framed with light light strips.
Baroque direction Source stylingroom.ru
- Provence. This style is characterized by simple, straight lines, there are no elaborate shapes, you can see a relief molding at the junction with the ceiling and floor. There are no unnecessary elements here, the walls are free of stucco and other details. Light shades predominate as the general background; white, as well as pastel gray and cream tones are most suitable.
Direction Provence Source walldeco.ua
- Scandinavian style. In this direction, the walls are not decorated with moldings, only occasionally they use frames near window and door openings, and also mark the transition zone to the floor and ceiling. The shades are light, white and beige tones predominate, which do not stand out against the background of the general colors of the room.
Interior in Scandinavian style Source walldeco.ua
Mediterranean. In such interiors, you can use various design options using moldings - decorations for cornices, ceiling moldings, highlighting windows, doors and arches with decorative details with stucco. Curved shapes and lines predominate, and there are often many small carved elements. The brightest accent of the interior is usually a large painting depicting the seashore, a garden, or an exit to a balcony or porch. For such an element, photo wallpaper in a beautiful carved frame is used. Columns in antique style will complement the design of the room.
Interior in Mediterranean style Source decoretto.ru
- English. The most important thing here is to decorate the fireplace correctly; this can be done with the help of decorative decorations. Planks separate the joints of the wallpaper, and also place a cornice along the entire perimeter of the ceiling. The fireplace is decorated with the same elements. At the same time, the details should have a simple geometric relief and calm pastel shades.
- Classical. Some apartments in old buildings are designed in this style. They are distinguished by high semicircular window openings, arches, columns and various options for moldings. All interior elements are decorated, and the ceiling is also separated using baguettes. The classic allows for the decoration of walls with wooden panels, so here you can use various carved decorations in all sorts of variations.
Implementation of design ideas
Thoughtful wall decoration will add charm and individuality to the interior. Wallpaper framed with moldings solve many design problems, they:
- improve the proportions of the room;
- allow you to shade the textured wall covering;
- help zone the room;
- become a visual accent of the space.
Decorative strips will help to effectively differentiate between different finishing textures, such as paint and wallpaper. At the same time, the trendy combination of materials will become an organic design element.
Spectacular wallpaper in a frame is a stylish decorative element that replaces the usual paintings. The main thing is to choose the right frame, pattern, and texture of the internal filling. For example, silk relief wallpaper in a wooden frame with intricate inlays will act as a kind of art object in the space, pleasing the eye with aesthetic expressiveness. And floral canvases in a minimalist frame will add variety to the dullness of a monochromatic wall covering.
How to make a frame from wallpaper with your own hands
If there is any unused wallpaper left after the renovation, do not rush to throw it away. This detail can also be used if you include imagination and a little creativity.
Wallpaper history
In the first millennium BC, the first analogues of modern wallpaper appeared in the territory inhabited by the ancient Assyrians. For a long time, such products were black and white, and only in the 11th century AD technologies appeared that made it possible to make them color.
Paper wallpaper was first made by the ancient Chinese, who kept the method of its production a secret. It is only known that the material for them was rice paper. In the 6th century AD, Japan came up with its own technology for making wallpaper. It reached European states only in the 8th century.
Despite the novelty of the invention, the quality and durability of woven wallpaper was far superior to its paper counterpart. In addition, they had a high cost, as they were decorated manually. After some time, the Englishman Tsaner invented a method of making wallpaper using silk threads. Already in the 14th century, a wooden stamp appeared, which began to apply patterns to the surface of the product.
Additional options for using leftover wallpaper
Before considering the actual creation of frames, it is worth dwelling a little on alternatives to this use of material. For example, you can come up with various interior details or transform pieces of furniture. Some ideas for application:
- Pasting the back surfaces of shelving, hanging shelves or open cabinets. A solution with a pattern in the form of a decorative lattice looks great. This way it is easy to change the appearance of furniture with minimal effort, in addition, it is a very cheap and easy to implement option. If you want to add bright accents, you can use several different colors or types of paper, this design will be much more expressive.
- If desired, you can decorate the outer surfaces of furniture and interior items. In this case, all that remains is to ensure that the design is combined with the overall style of the room. To give an original look to a dressing table or coffee table, wallpaper is laid on the surface and covered with glass. This makes it easy to change the design of the furniture.
- Create interesting accents on your walls with framed wallpaper. Here there is room for imagination - to decorate the surface with frames of different sizes, but of the same tone, or to use different color compositions for maximum expressiveness of the decor. For those who love creativity, you can try to design the frame yourself. To do this, use a baguette, which can be purchased at any hardware store.
- If you cover cardboard or plywood with paper wallpaper, you will get an original handmade panel. There may be several of them from different types of paper, or products of the same color can be made. If one of the walls in the room is covered with wallpaper, an unusual accent made of the same coating will look beautiful on the opposite surface.
Interior in English style Source archidom.ru
Variety of wall decor - spectacular options
An original decoration of the space is wallpaper in a frame. Selected taking into account the overall ensemble, they set the style and tone of the design and support the interior concept. A wallpaper panel builds a harmonious visual range, providing expressiveness to the space. It can dominate the room, attracting the eye, or merge with the overall design of the room, emphasizing the integrity of the interior.
Artistic vision, design calculations, colorful photos of modern interiors will allow you to effectively fit framed wallpaper into your living space. Thought out to the smallest detail, they will look harmonious in any room - in a stylish living room, a respectable office, a cozy bedroom, a spacious hall.
Attention! When decorating a space with molding decor, it is important to adhere to the unity of style: harmony with the overall concept and strict alignment of lines will allow you to enjoy the elegant detail of the interior.
Making Photo Frames
There are a huge number of options for making frames, and you can even come up with your own, guided by your imagination. Let's look at a few original ideas for example.
Frame made of tubes
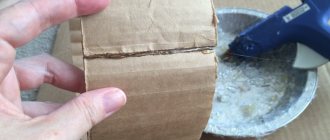
This is a very simple method, but the result is always stylish and interesting. Technique:
- Paper strips with a width of 2 cm are cut out, their size depends on the desired size of the future frame.
- Then tubes of equal thickness are made from the strips and glued together with office glue.
- After the glue has dried, the next stage of manufacturing begins. The tubes are placed side by side and cut on each side at an angle of 45 degrees. The edges must be made very carefully so as not to spoil the appearance of the workpiece.
- Then the entire structure is glued and reinforced with a piece of cardboard.
- The final stage may be decoration with sparkles and other decorative details.
To keep products in their original shape and prevent damage from moisture, cover them with paint and varnish. The paper must first be thoroughly primed with an acrylic-based solution.
Volumetric frame
Using this method, you can make an original frame using scissors and a small piece of paper. To do this, follow this procedure:
- Take a piece of paper and draw four lines on each side, slightly indented from the edge. Then the lines need to be pressed a little, but this must be done carefully so as not to accidentally damage the material. Keep in mind that the size of the future frame depends on the size of the sheet.
- Then, where the lines intersect, the sheet needs to be cut. After trimming, notches are marked on the outer parts, which are also cut out.
- The last step is to fold the frame and enjoy the worthy result of the work done. This product will look great in any interior.
Classic frame
A fairly simple manufacturing method consists of making a frame onto which wallpaper is subsequently glued. The work is very simple and the process does not present any difficulties:
- The frame is cut out of thick cardboard, then wallpaper is glued on top.
- A cardboard wall is installed at the back, then the product is glued and the work is completed.
- You can add decoration and coloring, for example, gilding will look great.
Among the advantages of such products is their low weight. This property allows you to attach frames without nails, using only double-sided tape.
Interesting examples of photo wallpaper lighting
First option
A small fragment of the photographic canvas, which serves as a painting, can be beautifully highlighted by illuminating the top edge or sides with an LED strip.
Second option
For photo wallpapers located in a niche, it is also advisable to organize local lighting.
For example, you can attach a luminous strip or flexible neon to the ends of a niche, or install spotlight LEDs or built-in LED lamps in the upper part of the opening.
Photo source
Bedroom option
Does your bedroom design include a strip of photo wallpaper behind the head of the bed? It is advisable to create symmetrical lighting on both sides of the canvas. Use 2 identical sconces or floor lamps that match the style of the painting.
Option for the living room
In the living room, you can complement the zoning effect with the help of local overhead light above the photo zone. In a high-tech interior, additional decorative lighting is also appropriate.
Photo source
By the way, rays of light directed from top to bottom can make the landscape on the wallpaper deeper and more realistic.
Furniture and accessories
A wall with a small fragment of panoramic photo wallpaper itself becomes an accent of the interior. Therefore, you should not place additional paintings or photo frames on it. It is also better to make the space near this wall as free as possible.
Plus, it is advisable to use only such sets and indoor plants that “fit” into the depicted landscape and do not contradict the picture.
Let's give examples.
- If you use photographic canvases with a jungle or a tropical beach, you can match them with linen textiles, wooden or wicker furniture in the colonial style and a small fern.
Photo source
- The urban picture will be combined with laconic furnishings and furniture with simple shapes.
Photo source
- And against the background of flower fields and gardens, furniture with curves, in the Art Nouveau tradition, and forged antique lamps always look harmonious.
Photo source
- And one more idea. If you use photo wallpaper that imitates a window or shelf, “revive” the picture... Using a real shelf with a flower or a floor lamp.
Photo source
Features of interior design work with moldings
When planning to do interior decorating work with your own hands, take into account the important features and nuances of this process in order to ultimately obtain a completely satisfactory result. This will not only get rid of common mistakes, but also give the room originality, and also extend the life of the products.
Interior in a classic style Source walldeco.ua
Wallpaper sticker
The color of the molding must be chosen not only based on the shade of the wallpaper on the wall, but also depending on the overall design of the room. As a result, the entire interior should look like one whole, without unnecessary irritating elements.
In a spacious room, light shades of wallpaper will match the same light shades of planks. This combination will be very appropriate and harmonious.
If the interior contains dark shades of furniture or other objects, they can be emphasized by a contrasting combination of light wallpaper and dark planks.
Wallpapering
After all the finishing work is completed, it’s time to glue the wallpaper. 24 hours after the plank has been glued, it is painted in the required shade and left to dry. Then they grout and remove all excess. And only in the next step can you glue the wallpaper directly. The work is done very carefully to get into the joint with the frame. It is imperative to ensure that the edge of the canvas is smooth and does not go beyond the bar. Otherwise, the appearance of the product will be damaged.
Wall decorations
First of all, we, of course, assume that there should be ready-made ideas for decorating walls with the remains of wallpaper, and, undoubtedly, this is the case. You can use the remnants of wallpaper both to create unusual panels and paintings, and to decorate the entire wall with remnants of wallpaper using the patchwork method of pasting .
Paintings from leftovers
One of the simplest, brightest and most unusual ways to decorate a room is paintings created from the remains of paintings . They are easy to make, they look stylish and immediately make the interior look more thoughtful, complete and with a designer touch.
To create such a picture with your own hands, you will need the wallpaper itself (vinyl, non-woven, and even bamboo are suitable) and a suitable frame for it. Whether it will be with or without glass depends on your desire.
With the help of leftovers, you can inexpensively and quickly decorate a rented room in which you do not plan to make repairs, or if you do not have the funds for high-quality repairs, but want beauty and zest in the interior.
In both cases, you can create paintings from the remnants and scraps of wallpaper after renovation and hang them on the wall - it will no longer be bare, it will sparkle with new colors, and removing such a work of art is much easier than removing wallpaper from the walls.
Even the most beautiful painting will look bad if it does not fit into the interior.
Original panel
Another option for wall decoration is a panel. A panel is a decorative element that serves to permanently fill a section of a wall.
When we talk about a wall panel, we mean that part of the wall surface that is framed and filled with painting, mosaic or, in our case, the remains of wallpaper. The main difference between a panel and a painting is that to create a panel we cover the walls themselves, and in the case of a painting, we simply frame the wallpaper .
To make a panel with your own hands from leftover wallpaper on the wall, you will need wallpaper scraps with a contrasting pattern, design and color, molding, border or frame . You must decide where you want to see the panels and what shape the inserts will be, carefully cut them out from the remains of the wallpaper and stick them on the wall. The edges should be framed.
Patchwork technique - now on walls
Another way to decorate walls from leftover wallpaper is to create accent elements in the form of patches . Most of all, this technique resembles patchwork, only small scraps of wallpaper are used instead of textiles.
The complexity of this method is that you will need to very carefully think through the options for placing the flaps, cut them carefully and accurately, and just as carefully stick them on the wall .
In this case, all the flaps should be approximately the same density and, preferably, from the same materials , otherwise the chance that the seams will come apart will significantly increase and the entire wall will look sloppy.
Decorative elements for children's rooms
One of the best options for using leftover wallpaper in the interior is to decorate a child’s room with it. Due to the fact that brightness, creativity and diversity are appropriate in this room, you can come up with a variety of appliqué options for decoration.
You can cut out birds, animals, trees, or even an entire map of the world from bright leftover wallpaper - everything will look organic in the nursery.
Furniture update
If you are quite happy with the design of your walls and you don’t want to change it, but are looking for a place to use leftover wallpaper, then updating your furniture would be an excellent solution to this problem.
This simple, but very original method can breathe new life into old furniture , help it fit into the interior of the room and simply become an unusual, bright accent in the design.
Below we will try to introduce you to several more of the most popular options for what you can make from leftover wallpaper with your own hands.
Decorating the headboard of the bed
Increasingly, modern designers give preference to hand-made furniture design. A few simple manipulations - and you will get a bed that will match the main design of the room a hundred times better than a ready-made one bought in a store.
A bed with a high headboard is an integral element of a bedroom in a classic and English style, but buying a ready-made one is too expensive. If you have an old bed with a high headboard, you can decorate this part with wallpaper, and if there is no headboard, create a visual illusion of it , as in the photo above.
Decorating open shelves
If you are interested in what to make from leftover wallpaper to make the design look beautiful and unusual, it makes sense to try creating a stylish decor for open shelves .
Beautifully selected wallpaper will help complete the design, the shelves will not look so bare, and the walls will acquire a special accent. Typically, to achieve this result, the wall behind the shelves is covered and the visual illusion of a cabinet is created.
Pasting the interior surfaces of furniture
This method of decoration is probably well known to those who have ever been to a village and are familiar with the style of the past, often called rustic. As we see, our grandmothers were also interested in the question of how to hang up the remaining wallpaper so that it would not go to waste.
In fact, this custom came to Russia from Europe, where it is used to this day to create that same rustic style.
Pasting external surfaces and furniture facades
Pasting furniture is a very popular design technique, as it simultaneously helps to use leftover wallpaper in the interior to good effect and update old furniture . And if you also add fresh painting, new handles and hinges, then you will be completely amazed at the degree of transformation of the chest of drawers, cabinet or bookcase.
Before pasting, you will need to remove all uneven surfaces of the furniture, fill the cracks and degrease the wood. After pasting, the furniture is varnished so that it does not wear out.
It is usually customary to wallpaper cabinets, stools, chairs and tables , although there are no special restrictions. Among the styles, the most common ideas from remnant wallpaper are found in rustic, old England, classic, modern and shabby chic.
Other decorative elements
There are many different options for using leftover wallpaper, and unusual crafts are not the least popular.
It’s not at all difficult to create crafts with your own hands from leftover wallpaper; the main thing is to know what to strive for and have good taste. You can quickly and easily create the following elements:
- frames : frames covered with wallpaper will become a simple but stylish accent in any interior;
- boxes : it’s very easy to make beautiful boxes with your own hands from leftover wallpaper. These will look elegant in a closet, and in a prominent place they will become a good accent element;
- lampshades : a lampshade covered with suitable wallpaper will definitely match the new design of the room;
- Blinds : You can even use thick wallpaper as paper blinds on your windows. You just need to fold the canvas into a beautiful accordion and insert a cord on the sides.
As you can see, there are a huge variety of ways to hang wallpaper from leftovers, create unique decorative elements from them with your own hands, and even update furniture. Desire, perseverance and careful selection of colors and patterns will help you in these tasks.
But remember that the enemies that are always lurking - haste and excessive diversity - can easily ruin everything, so try not to make mistakes when working on the interior of your dreams.
In some interiors you can find a division of wall zones, one of which is painted with decorative paint, and the other is covered with wallpaper. Inserts, decorated pictures, as well as homemade panels can be framed with molding, thanks to which they will be separated from the total wall area and become more attractive. Mostly designers use moldings in styles such as baroque and classic.
How to make a frame from ceiling plinth
To complete this work you will need:
- ceiling plinth made of polystyrene foam;
- universal adhesive base;
- acrylic wood putty;
- well sharpened knife;
- protractor;
- acrylic based paints;
- corrugated cardboard or packaging from household appliances.
The required picture is cut out of paper and glued to the ceiling slab. The latter should exceed the size of the picture by about 1 cm on each side.
Next, work is carried out on the production of frames from corrugated cardboard or ceiling plinth. First, a template for the future product is cut out. A rectangular shape is made from corrugated cardboard, and a hole is made in the center for a photograph or picture. The size of the frame depends on the size of the desired image that will subsequently be contained in it. Then an identical rectangle with a slightly larger window is cut out from the workpiece. Then the elements are glued to each other. The result is a ready-made place for inserting a picture. If you plan to use glass or a stretcher, you will need to make a couple more of the same rectangles with a wider window to glue them to the other side of the frame. The number of products depends on the thickness of the embedded image.
When the base is ready, they begin to decorate the frame with ceiling plinth. Each edge of the baguette is cut at an angle of 45 degrees. Mark the corners and cutting lines on the paper using a protractor, then lay down the strip and make marks on it. Then the 4 elements are cut off using a sharp knife. Next, the baguette is glued to the cardboard blank from the outside. The cracks in the corners are sealed with putty and paint. The work done must be left for some time until the glue completely dries.
Kitchen interior with photo wallpaper Source design-homes.ru
Then you need to putty the areas where the baguette meets the cardboard, as well as the joints at the corners and the back side of the frame. This solution will help strengthen the product and hide all uneven finishes. The ends of the frame are puttied several times, dried, and then each layer is sanded one by one using sandpaper.
The dried putty begins to be painted. It is best to use acrylic compounds or water-based emulsion. To get a milky tone, you can add a small amount of ocher to white paint. For a dark shade, black paint is mixed with red and dark brown. Then the finished product should be treated with water-based varnish.
Lastly, fasten the product. For this purpose, you can use thick twine, from which you cut from 10 to 14 cm. Then take a dense but thin piece of cardboard and cut out a rectangle with sides 5 by 7 cm. The rope is applied to the back side of the frame. After this, glue is applied and the cardboard is glued, which is pressed with a weight until it dries completely. Now the frame for photo wallpaper on the wall is ready, all that remains is to fix it on the mount and enjoy the result of the work done.