Invisible darning
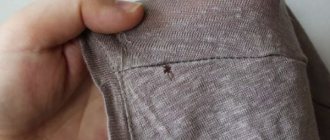
On any clothing, but especially on knitwear, a tiny hole can appear out of nowhere and ruin the whole look. Most often they are discovered after washing. The thing is good, but you can no longer wear it, what should you do?
To prevent the hook from increasing in size, we will try to sew it up so that it is not visible. If you start working with simple threads, you can pull the material together and this place will catch your eye.
Let's not rush.
- Take the thinnest needle, the one used by bead embroiderers.
- Find tights that match the color of your T-shirt or are neutral.
Stages of work:
- Pull the thread out of the tights.
- Thread the needle using a threader. Don't tie a knot!
- We work from the front side of the product. Carefully collect all the loops with a needle. We catch them from below and from above, one loop at a time, then make a stitch without pulling the fabric.
- After finishing the darning, bring the needle to the wrong side.
- Secure the thread with a couple of stitches, then cut it off.
- Let's straighten the fabric and iron the repair area from the inside out. The nylon thread will melt slightly under the influence of high temperature, thereby closing the hole.
Five simple options
There are no identical tears, damage to clothing, or holes, and there are many options for how to beautifully sew them up with embroidery. It is better for beginning craftswomen to use simple ones first.
Fantasy approach
If the location of the hole allows, you can not cover it with a patch or embroidery, but turn it into a decorative element. We give it the correct round shape, we process the edges manually with a buttonhole or overcast stitch (over the edge).
When processing the edges, we place the stitches as close to each other as possible so that the fabric does not unravel under the load when wearing the item. You can reinforce them with adhesive-based interlining or thin braid.
After the hole is processed, we add decor around it - we embroider flowers, stars, geometric shapes.
Bright rectangles
You can beautifully sew up a hole in jeans using a technique that imitates patchwork sewing.
Draw a rectangle or square on the fabric around the damaged area. You can draw with chalk or a dried bar of soap with sharp edges, or a thin felt-tip pen to match the fabric. Within the framework of the resulting figure, we lay a base-mesh, preferably diagonally. Then we lay another layer of thread across the stitches already made, bringing the needle alternately from above and from below, sometimes catching the fabric of the item.
A scattering of sparkling beads
On a T-shirt or knitted sweater or skirt, you can beautifully sew up a hole with beads. Such embroidery does not necessarily have to have a clearly defined shape. Let go of your imagination and create.
First, select a base - beads of different shapes, but of similar shades, so that the picture does not hurt the eye. The color should also match the color of the fabric on which it will be sewn. A sharp contrast will not only not smooth out the defect, but may even emphasize it.
Small colored elements
Do you have experience with cross stitch or satin stitch? Great! For those who are trying their hand at darning or decorating items from their wardrobe, this is an excellent opportunity to beautifully sew up several small holes that are often left by moths.
“Scatter” small cheerful spots all over your dress, leggings, turtleneck or even children’s tights. They can be monochrome or several shades. The main thing is that they echo each other.
Japanese technique "sashiko"
Translated from Japanese into Russian, the word “sashiko” means “small injections.” And we will act precisely on this principle. We will create the pattern and embroidery at the hole site or around it using small hand stitches.
When using this darning technique, a hole or tear must be closed or reinforced with a piece of material. It can be the same color as the fabric, or a contrasting shade, with a pattern or pattern.
We apply the patch from the inside out, fix it with a running stitch, without tightening the thread, or with sewing pins. Around the hole we lay several lines with a small stitch at the same distance from each other. Parallel lines can be replaced with crosses or ornaments.
After finishing the work, remove the running seam that secures the patch.
Repairing things without a needle
It's sad when you find a small hole in your T-shirt. The T-shirt can be thrown away, or better yet, repaired. We still have time to throw it away!
- Spread the product on a smooth surface. From the “web”, cut out 2 squares of the same size, but larger than the hole on the clothing.
- Trim the corners.
- Place them together with the smooth shiny sides facing out, placing them “inside” the T-shirt under the hole.
- Use your fingers to connect the edges of the hole.
- Iron with an iron at medium heat. Ironing time is approximately 30 seconds.
- After the work is completed, the item can be worn again.
This method is not suitable for silk or wool items.
There won’t be a trace left on a knitted T-shirt if you do the following:
- Turn the product inside out.
- Bring the edges of the hole together.
- Place fabric gluing tape on it and interlining on top.
- Place a small piece of white fabric on top of all this so that the structure does not move.
- Spray the fabric with a spray bottle. Then place the heated iron in place of the patch and hold for 10 seconds.
- Remove the fabric and turn the product inside out.
Preparation
Before you start sewing up a hole in a T-shirt, there are a few important things to consider:
- size of damage;
- degree of fraying of edges;
- type of fabric.
The next step is to determine what types of threads and needles are suitable for the job.
Ideally, use threads of the same color as the torn T-shirt. In some cases, bright threads will look impressive, the shade of which harmonizes or contrasts with the main color of the product. Sometimes it is advisable to use threads pulled from nylon tights or stockings. The thickness of the needle depends on the density of the fabric. Most T-shirts use the finest sewing needles. In addition to threads and needles, you will need an iron and a threader.
How to repair a sock
This problem is familiar to every housewife.
Stages of work:
- After threading the needle, tie a knot. From the front side, pass the needle inside out to leave a knot there.
- When sewing up a hook, grab all the loops from one edge and the other.
- When finished, pull the thread so that it is hidden in the seam without being pulled out. Pull the seam slightly to the sides to straighten the thread. Pass the needle inside out and secure the thread.
What it is
Glue webs are strings of glue. Bonding of fabric surfaces occurs by heating the fabric, as a result of which the glue threads, melting, penetrate into the structure of the fabric and glue it together. They act as secret machines, which are designed for hidden fastening of fabric, but only the adhesive option is cheaper, since it does not require additional equipment.
Cobweb for fabric is produced in rolls. One such roll is enough for long-term use at home.
Repair of thick knitwear
The demonstrated method is suitable for any item made of thick knitwear, including woolen socks.
Operating procedure:
- Turn the item inside out. Place small stitches on the needle across the direction of the threads in the product. Move up and down, stitching all the way to the end of the hole.
- Use the same stitches along the direction of the threads, intertwining them with the stitches already laid, grabbing a little of the material itself.
- Secure the thread with small stitches and then cut it off.
Neat patch on elbows
You can restore damaged areas or old items with the help of a neat patch. This way the product will acquire an original appearance.
You can sew a neat patch on the elbows in the following way:
- you need to prepare everything you need;
- mark on the product where the patch will be applied;
- cut out the patches and sew them on.
Important! Once all the work is completed, the product needs to be steamed using an iron.
Neat patch on elbows
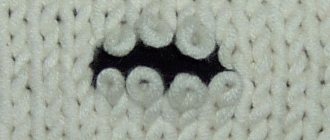
How to raise the eyelets at the seam
Stages of work:
- Using a crochet hook, pick up the loops.
- Gather with a safety pin.
- Close them with a hook, pulling one loop through the other.
- Secure the last one with thread.
- Sew up the hole with the same thread.
If a hole appears like in the picture below, then take tone-on-tone threads.
- Pick up the loops with a crochet hook.
- Assemble the loops according to the pattern shown in the picture. For clarity, a thread of a contrasting color was taken.
- Having collected the runaway loops, bring the thread to the wrong side, pass it between the loops, as in the photo. Remove all scraps inside out.
Three ways of darning
This method is suitable for repairs in inconspicuous places.
Darning pattern in the classic way:
Before starting work, run a thread around the hole to prevent the fabric from stretching. After work it will need to be pulled out.
You can mend it unnoticed in this way:
Stretch auxiliary threads, then lay them with a thread that matches the color of this product.
For knitwear, the following repairs are suitable:
First, the thread is laid along the threads of the fabric, and then the darning itself is done.
To beautifully repair any item, try these options.
Instead of a hole, a decorative decoration appears. First, ordinary darning is done, and then a kind of embroidery is done.
The next option is to glue adhesive material from the inside, then do embroidery on it. Or you can make a patch on the “web”, glue it, then do embroidery on it.
These options are suitable for the most experienced dressmakers.
Heart patch
Embroidery of this shape will decorate any thing. And it’s quite simple to make, and darning will take minimal time. In addition, even beginning craftswomen will get a beautiful heart without “training.”
Before sewing up the hole, you need to mark an even circle and a heart around it. You can do this either with your own hands or using a pre-prepared stencil.
Description of actions step by step:
- We make the first stitch from top to bottom strictly in the middle of the heart;
- we bring the needle and thread from the wrong side to the front side on the left approximately in the middle of the figure;
- “return” down to the center and from the wrong side we make a stitch on the right, again to the middle of the stencil;
- We begin to embroider according to this principle, placing each stitch higher than the previous one so that the threads lie close to each other.
As an option - a patch in the shape of a ladybug. We make it using almost the same principle as the heart. We draw a figure on the fabric and sew it with even, tight stitches. The difference in the technique is that we embroider each part of the “cow” using satin stitch, the stitches do not intersect with each other. We use two colors – red and black. The back will be red. We decorate the spots on it, nose and paws with black.
How to mend jeans
If your pants are leaky, the easiest option is to make an appliqué.
For men - made of leather or denim material, and for women - the flight of imagination is not limited.
You can also watch a video on how to mend a small hole:
In parting: now all things will be saved, because there are many ways to sew up a small hole in any clothing.
Read further:
How to carefully and discreetly sew a jacket by hand and on a sewing machine
How to sew jeans between your legs discreetly and accurately, by hand and by machine
How to beautifully and accurately sew jeans at the knee by hand and on a machine
How to arrange a small kitchen yourself
How to use old tights: what you can make useful and beautiful with your own hands
What is a wish fulfillment card and how to make it work
Some useful tips
It is worth listening to the advice of experienced housewives:
- Be sure to turn the item inside out when you plan to sew it up. The front side of the item must be made perfectly, with invisible seams and knots.
- A seam ripper will be a great help when removing unnecessary stitches.
- Store needles correctly. They should be stuck into a pad or paper.
- Try to work on your own mistakes, because the first attempt may not always be successful.
- The thread should always be matched.
- Be sure to finish the work with the correct stitches, because if you leave the thread and do not fix it in any way at the end, the seam will simply fall apart.
If you are very worried and afraid to sew up the item yourself, then it is better to contact a tailor shop that will readily solve all problems with torn clothing.
Sooner or later, there is a need for knowledge on how to mend a hole in a fabric without being noticed. There are many different techniques that are applicable to fabrics of a certain type, texture and texture.


