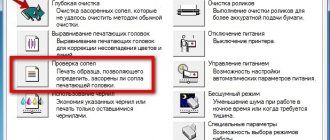
When print quality drops, the first thing you can do to fix the printer is to clean the print head. This can be done via a computer using software.
Sometimes, cleaning the head manually cannot be avoided, but hp printers, like many others, provide an excellent opportunity to clean the printer without disassembling it.
Cleaning the HP printer head
The print head is the most important component of any inkjet device. It consists of many nozzles, chambers and various circuit boards that spray ink onto the paper. Of course, such a complex mechanism can sometimes malfunction, and this is most often due to clogging of areas. Fortunately, cleaning the head is not difficult. Any user can produce it independently.
Method 1: Windows Cleanup Tool
When creating the software component of any printer, special maintenance tools are almost always developed for it. They allow the owner of the equipment to easily carry out certain procedures, for example, checking the nozzles or cartridge. The service also includes a head cleaning function. Below we will tell you how to launch it, but first you will need to connect the device to your PC, turn it on and make sure it works correctly.
Next you need to do the following:
- From the Start menu, go to Control Panel.
Find your equipment in the list, right-click on it and select “Printing Settings”.
If for some reason the device does not appear in the list, we recommend that you refer to the article at the following link. In it you will find detailed instructions on how to fix the problem.
Read the warnings and instructions in the displayed window, then click on “Run”.
Wait for the cleaning to complete. During it, do not run any other processes - this recommendation will appear in the warning that opens.
Depending on the model of printers and MFPs, the menu type may look different. The most common option is when the tab is called “Service”, and in it there is a “Print Head Cleaning” tool. If you find one, feel free to launch it.
Differences also apply to instructions and warnings. Before starting cleaning, be sure to read the text that should appear in the window that opens.
This completes the cleaning process. You can now run a test print to ensure the desired result is achieved. This is done like this:
- From the Devices and Printers menu, right-click on your printer and select Printer Properties.
In the “General” tab, find the “Test Print” button.
Soldier
Group: Members Posts: 5 User #: 10652 Registration: 18-February 17
Soldier
Group: Members Posts: 5 User #: 10652 Registration: 18-February 17
As a result, I have 2 black cartridges - original (hp) and non-original (mega). Both contain ink (if you shake it, you can hear it gurgling, but the non-original is transparent, you can see it there). The printer also shows an average black level.
I have two heads - my own one and the one I bought on Aliexpress for 1500 rubles. I washed my own one for a long time (soaked it for several days). At some point there was a result, but after half a page the printing ended. I washed and blew again - to no avail. Although distilled water flows quickly through the mesh into the nozzle.
I decided that maybe my head had died, so I ordered another one from China.
I installed it - and there was no effect! No black color and that's it!
No traces of black at all.
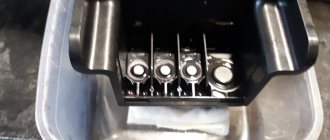
When I remove the head, I put a drop on the mesh - it doesn’t go away at first. If you wait, or knock on the head, the water begins to flow confidently. There is a black spot on the rag under the head. You put it in the printer - there is no black. You try to drop water on the mesh - it doesn’t come through!
It's like there's air inside the head. With what it can be connected?
Soldier
Group: Members Posts: 5 User #: 10652 Registration: 18-February 17
An ordinary household vacuum cleaner? I'm kind of worried about ink getting into the vacuum cleaner. Should I then wash the inside of the hose? It's not clear how. Can this be done through a rag or gauze?
Quick ways to clean and rinse printer nozzles (nozzles) from Epson, HP, Canon and others
Most often, cleaning procedures are carried out by owners of Epson, HP, and Canon equipment. This manual contains several options for cleaning the printer head. All steps are described in detail and contain explanations for the most inexperienced.
Cleaning the printer print head is required for any model of inkjet machine when the quality of its operation begins to deteriorate over time. Cleaning involves a kind of direct physical washing of the nozzles, the nozzles through which ink flows onto sheets of paper. Their clogging leads to poor printing and wear on the printer itself. You can wash the head, like any other unit of the device, with special liquids that can be easily purchased at any computer store.
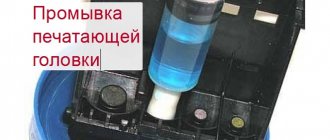
Cleaning with a special liquid
It is, of course, safest to entrust cleaning of the print head to specialists. But this does not mean that you cannot try to carry out this procedure yourself in order to save time and money.
So, to clean the print head of an HP printer, you will need the following items:
- a plastic container with a flat bottom that you won’t mind throwing away (disposable plates or food containers);
- a thick, highly absorbent rag or gauze;
- a specialized printer cleaning kit (it can be purchased both in electronics stores on the Internet and by searching in offline stores) with varying degrees of action: for old dirt - aggressive, for cleaner heads - regular.
We recommend: What determines the service life of a gas boiler and is it possible to extend it?
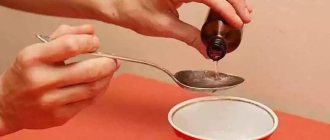
The cleaning process itself, however, does not depend on the degree of contamination of the print head. It all starts with the service liquid being poured into a plastic container prepared in advance, and then this container is set aside. A piece of rag or gauze comes into play - it is moistened with water, and with this piece the bottom area of the print head is wiped. The next piece is moistened with a special liquid, and then it is used to wipe the entire print head along the contour of the nozzles. If necessary, a piece of gauze can be changed by dipping a new one in the liquid in the same way.
Attention!
You need to be careful and try not to touch the nozzles themselves with a cloth. Their contact with contaminated liquid can lead to clogging.
Head cleaning can last only as long as it takes to completely clean each object - it all depends on the initial condition. In any case, after cleaning the head with gauze, the sealing rubber bands of the inkwell are removed from it. Simply rinse them with warm running water and then return them to their place. After this, the most difficult and most important action begins: directly cleaning the print head, but from the inside. In addition to the head, by the way, the printer nozzles are also cleaned. To do this, gauze or a rag is placed under it, and the service fluid is heated to approximately 55 degrees Celsius. Then, using a special syringe, the heated liquid is dripped onto the ink pickup fittings until ink remains on the gauze located under the head. If necessary, replace the gauze, and when the cloth remains clean, cleaning the HP printer is complete. It's not that scary, right?
Signs you need cleaning
Any printing equipment requires timely maintenance to avoid malfunctions, operational problems or complete failure. Carrying out preventive measures is a sign of good form in modern realities. If in a large office the services of specialized companies are used for such purposes, then at home everything can be done independently.
The printer itself will “inform” its owner about the need for cleaning due to the poor quality of printed text or photographs. The first signs may be:
- If, when printing a test sheet for checking the nozzles (head nozzles), gaps, white lines, incorrect color reproduction are visible, while one of them may be completely absent, then there is a high probability that a blockage has occurred. This problem occurs from time to time when printing equipment is used intensively.
- The printer head deals with liquid ink, which due to its physical properties can dry out. If you don't use your device for a long time, this is guaranteed to happen. For different models, the drying time is different - from several days to a month.
If you decide to use consumables from another manufacturer, then before refilling it is necessary to completely flush the ink containers, delivery channels inside the device and the head itself.
Error codes on the control panel
Page 120
- Image
- Text
Error codes on the control panel
If the icon value is Number of Copies
on the printer screen alternately changes from the letter “E” to
corresponding number, this indicates a malfunction in the printer. The letter "E" speaks of
presence of an error, and the number indicates its number. For example, if the icon value is Number of Copies
alternately changes from the letter “E” to the number “4”, this means that a paper jam has occurred.
Descriptions of error codes and corresponding steps to resolve them are provided in the part about icons
Number of copies
section
Control panel lights and on-screen icon status on page 9
.
114 Chapter 8 Solving the Problem
ENWW
Comments
Select → I found the instructions for my printer here! #manualza
- Click →
Instructions for the Chinese-made New Year's garland: - Use only indoors or outdoors.
Manualza!manualza.ru
Still not with us?
Software cleaning
The simplest and most accessible way to clean the head on any personal computer is special software. It is supplied by the equipment manufacturer and installed on the PC when connecting and setting up a printing device. It is recommended to use the software method before starting more complex manual physical influence.
To use this program and perform cleaning, follow the instructions:
- Open the “Devices and Printers” tab through the “Start” button and “Control Panel”.
- Find your printing device in the list.
- From the context menu, select Printer Properties.
- On the tabs at the top of the window that opens, find “Maintenance” or “Service”, depending on the manufacturer and model, the names may be different.
- Click on the "Print Head Cleaning" button or the "Deep Cleaning" option. You can carry out the procedure several times.
- Print a nozzle check sheet or any color picture to see the result.
If after 3-4 times of cleaning the print quality remains at the same level, then the only solution to the problem will be manual mechanical washing of the print head.
On the Device Services tab, click Cartridge Alignment...
Page 113
- Image
- Text
4.
On the Device Services
Click
Align Cartridges
.
The printer prints a page to verify that the alignment is correct.
5.
On-screen instructions guide you on how to position the alignment check page
print heads with the print side facing down on the scanner glass. After that, click the button
Scan
to scan the page.
The product will align the printheads. Printer alignment sheet
the heads can be discarded.
ENWW
Printing problems 107
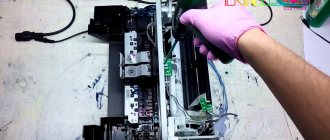
Manual cleaning
First you need to choose a place to carry out work. An ordinary room table is best suited, but it is recommended to cover it with paper or old newspaper in several layers to avoid contamination. Also prepare:
- Rubber household gloves to protect hands.
- A syringe with a needle can be easily purchased at a pharmacy.
- A small flat vessel that you won’t mind throwing away later.
- Cotton swabs or lint-free wipes.
- Small diameter plastic tubes.
How to clean
The ideal option is to use products from one manufacturer. In this case, consumables and flushing fluid. If you can’t do this, then there’s nothing wrong with it. Any certified cleaning cleaner will not cause damage or negative changes in the operation of the printing device. But, depending on the type of dyes used, you need to buy the appropriate products.
If water-soluble paint is used, then the best option for removing it from surfaces would be:
- Special water from which all chemical salts have been removed.
- Distilled water, which is easy to buy at a car store.
- A self-prepared solution of distilled water and ten percent ammonia. The proportion is determined by the condition of the contaminated parts.
Pigment ink has a completely different chemical composition and requires different washing fluids:
- Isopropyl alcohol.
- Special substances for dissolving pigment dyes.
When choosing a cleaner, pay attention to WWM products, namely products W01, CL-10, CL-04, CL-06, CL-08. As a budget option, you can consider using window cleaning products. The most famous Mister Muscle. At home, it is often used successfully.
Cleaning Other Important Components
Many modern models of inkjet printers from Epson, Canon, HP and other companies use built-in print head cleaning systems and ink drying protectors for nozzles and nozzles. We are talking about a knife and a mouthguard. The knife in an inkjet printer is a special part that automatically mechanically removes excess ink from the surface. This allows you to increase the service life and postpone the washing process for some time. The mouth guard absorbs moisture, is located under the head, and when not working, the nozzles are located in it, which prevents them from drying out quickly. Over time, these parts themselves become contaminated and cease to fully perform their job. Also require cleaning.
The knife can be gently wiped with a lint-free cloth moistened with liquid. The situation with the mouthguard is a little more complicated - it requires complete rinsing. Brief instructions for your actions:
- Disconnect the printer from power.
- Open the front cover.
- Remove anything that is blocking access to the knife and mouth guard.
- Wipe the knife.
- Draw a little cleaner into the syringe.
- Slowly insert it into the mouth guard.
- Leave it for a while.
- Draw out the product using a syringe.
- Carry out the procedure until the evacuated cleaner stops being stained with paints from the tray.
Cleaning methods
Flushing
- Place the print head in the prepared container.
- Select a syringe with a size that will allow you to easily and tightly fit it onto the head fittings.
- Fill up with cleaning solution.
- Release the air from the syringe.
- Place it on the fitting.
- Slowly start skipping.
- The liquid should flow into the container.
- As soon as the color of the cleaner stops changing, you can finish washing.
- Carry out the procedure with each fitting.
- Wipe all elements and allow time to dry.
If you notice that the liquid flows poorly or is not absorbed at all, then you need to move on to a more aggressive method, which is described below.
Maceration
- Leave the head in the same container.
- Fill the syringe with cleaner.
- Put on the needle.
- Place a few drops onto the fitting.
- Carry out the procedure for several hours.
- For severe stains, you can leave it overnight.
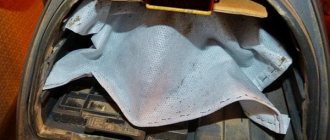
- Prepare plastic tubes that are easy to put on and fill them with cleaning agent as shown in the picture.
Broach
If all else fails, try the forced pulling method.
- Pour cleaning agent into the bottom of the container.
- Release from the syringe everything that remains there after the last procedures.
- Place it tightly onto the fitting.
- Smoothly try to draw the cleaner through the head into the syringe.
Ultrasonic bath
Recently, an ultrasonic bath has become a popular method for cleaning the print head of a printer. It requires special equipment and some skills to perform the procedure. Judging by the reviews and opinions of experts, it is impossible to make a clear positive choice towards this option. The risk of permanently losing an expensive element of a printing device is very high. A bath can be used if none of the methods helps.
Head disassembly
This option for eliminating print defects caused by clogged nozzles and nozzles is not recommended to be done at home without experience. The likelihood of damage to small structural elements is very likely. This type of work should be delegated to experienced specialists at office equipment service centers in your city. It is advisable to choose a certified company or an official representative of the device brand.
Cleaning the mouthguard and knife
The cap and knife are the places where accumulated dust will immediately depress the system and lead to defective printing, since air bubbles will immediately rush there.
First you need to unlock the carriage - the container for cartridges. For example, to clean the Epson print head, this can be easily done through the software, and then simply turn off the printer.
Attention! All washing actions must be carried out in a device that is disconnected from the power supply!
Then use a syringe to pour the cleaner into the mouth guard and leave the liquid there for 10 minutes. Afterwards the cleaner needs to be drained.
The rubber knife can be wiped with a napkin or bandage also soaked in a special solution. How do you know that you have washed everything completely? The cleaner stops staining.
Note! In some devices, the rubber blade is located inside the housing, and not immediately behind the mouthguard. First look at the instructions for the device, where the locations of the parts are explained.
First option for cleaning the head
Next, remove the print head and use a bandage with cleaner to remove dirt at the bottom of the part. If there is a lot of dirt, then repeat the process until the blockage is cleared.
After this, you need to remove the cartridge from the print head and carefully use a syringe to blow through the special holes - fittings for collecting ink.
You need to rinse the fitting very carefully, not allowing the cleaner to get on the head; if this happens, you need to quickly wipe it with a napkin or remove drops with a second syringe. And then the printer will need to be left for a day until the moisture has completely evaporated.
After cleaning, wipe everything dry and install the cartridge in the carriage.
Option two – for “serious” cases
It is also possible to revive the printer head in case of more complex soiling; in this case, the disassembly process is the same, only you will have to wash the fittings not by blowing them out, but by using a cleaner to dig through the entire grid around and the holes themselves. In this case, a bandage is placed under the head, which will collect excess fluid.
You need to drip slowly, over 1.5 - 2 hours, but this method will most effectively remove dirt. If, nevertheless, the holes of the fittings do not give in, then you can use heavier artillery - cut out pieces from plastic tubes, attach them to the head and pour cleaner into them from above. Under the pressure of the solvent, dried paint will sooner or later, usually a day, disappear.
Important! It is easy to determine which of the fittings is more contaminated - the cleaner does not flow well into that particular tube, and it is more difficult to fill it to the required level.
This cleaning procedure can be repeated once a week.
The third option is forced traction of the cleaner
For very advanced cases, there is a hard flushing algorithm: the plan is exactly the same as in the previous paragraph, only after connecting the tube to the fitting, you will also need to connect a syringe filled to the top with cleaner. Place a small plastic container under the head and press the syringe firmly onto the tube, releasing liquid through the tube. And then do the opposite operation: moisten the bandage with a cleaner and draw out a special solution through the head with a syringe.
If this method does not help, then it is best to entrust your device to a specialist, since after “forced” washing the head must be completely disassembled. During this operation, a non-professional can easily damage the nozzles or the head board, after which they will have to completely replace this part. Thus, cleaning the print head is a rather complex and painstaking process, in which it is important to be careful and, most importantly, to prevent moisture from getting on the contacts.
Prevention
At the same time, it would not be amiss to carry out extraordinary cleaning, preventive maintenance and inspection of the printer itself. This will ensure that all other parts are in good working order and protect the equipment from serious damage. Check for dust, dirt, jammed paper, or foreign objects inside the device. Remove them if necessary.
When using continuous ink supply systems, you should check the ink pumping hoses from the containers to the head for clogging, air, kinks, and mechanical damage. An important point will be that there is sufficient paint above the average level, which will prevent air from being sucked into the system.
Regular program cleaning will help avoid the need for physical washing over a long period of use of the printing device.
MFP hp 3525 does not print in black after installing CISS
Hi everybody! I bought a CISS-HP655 CISS with cartridges and chips. I did everything according to the instructions, installed it, tried to print, everything printed perfectly, about 10 photos on A4 and 70 pages of text. Then the printer stood for about 30 minutes and the black cartridge leaked and then it stopped printing. After reading the forum, I washed my head with a special RSL OSB liquid, when I dripped black on my head, I had the feeling that there was a blockage, since the liquid did not pass inside, everything was fine with the colored ones. After a while, I put liquid into the black head under a little pressure, it went, everything was fine, I put the head in the printer, installed everything, tried to run a test page, it printed a couple of lines in black and that’s it, it stopped again. I tried cleaning the head through the printer itself, but it didn’t help. Ink – IncTec H7064-100MB, H7064-100MC, H7064-100MM, H7064-100MY. What could it be? Thanks in advance.
Added after 4 minutes
I put the original ink back - same thing.
- Wait for the test sheet to print and check it for defects. If any are found, repeat the cleaning procedure.
Above we talked about the built-in maintenance tools. If you are interested in this topic and would like to further adjust the parameters of your device, read the article at the link below. There is a detailed guide on how to properly calibrate the printer.
Method 2: MFP OSD Menu
For owners of multifunctional devices that are equipped with a control screen, there are additional instructions that do not require connecting the equipment to a PC. All actions are performed through the built-in service functions.
- Move through the list by clicking on the left or right arrow.
Find and tap on the “Settings” menu.
Open the Maintenance window.
Select the Head Cleaning procedure.
Start the process by clicking on the indicated button.
Once complete, you will be prompted to perform a test print. Confirm this action, check the sheet and repeat cleaning if necessary.
If all colors on the finished paper are displayed correctly, there are no streaks, but horizontal stripes appear, the reason may not be due to contamination of the head. There are several other factors that influence this. Read more about them in our other material.
So we figured out how to clean the print head of a printer and multifunctional device at home. As you can see, even an inexperienced user can cope with this task. However, if even repeated cleanings do not bring any positive results, we advise you to contact a service center for help.
Thank the author and share the article on social networks.
How to clean an hp printer head: software and manual options
The more we buy technology for our own comfort, the more skills we need to use and maintain all these technical devices.
If you have an hp printer or MFP, you need to know how to clean an hp printer head. When print quality drops, the first thing you can do to fix the printer is to clean the print head. This can be done via a computer using software.
Sometimes, cleaning the head manually cannot be avoided, but hp printers, like many others, provide an excellent opportunity to clean the printer without disassembling it.
Cleaning the continuous ink system cartridges
Some owners, in order to save money and not buy cartridges, purchase a special device consisting of four permanent cartridges that cannot be replaced and a small ink tank. It is imperative to clean this mechanism so that the printer nozzles do not dry out. In order to clean the CISS (this is the abbreviated name for this device, its full name is in the subtitle), you need to purchase a cleaning liquid and rinse all the tubes, tanks and cartridges with it. You need to empty the tank of ink, rinse the holes with water, and then flush out the service fluid in the same way as ink when refilling it. By the way, cartridges for HP printers are expensive, and therefore the demand for CISS for these printers is very high.
So, cleaning an HP printer is a task that only at first glance seems difficult. If you approach it with due responsibility, diligence and accuracy, everything will work out, and the task of cleaning the HP printer will be solved with ease. The main thing is not to forget that any equipment requires care: everything in our homes works only to make our lives easier, and all we can do is help the equipment last as long as possible. Good luck!
Software head cleaning
The HP Solution Center program, which is installed from the included disk or downloaded from the official website, provides this feature. The Taiwanese manufacturer has made sure that the printer head is easy to clean.
You just need to run the program with the printer turned on. In the program menu, you need to go to the “Printer Control Panel”, where you can start cleaning the cartridge. If the printer has been idle for a sufficient amount of time, you can repeat the procedure several times until the print test no longer produces errors.
Windows also contains a similar utility, which can be found in the printer control panel by going to the printing settings. This is the first thing you need to think about when repairing your printer. This is how all HP models are cleaned, for example, the 3535 without disassembling it.
Unfortunately, such cleaning will often not be enough, because the print head nozzles cannot be cleaned in this way. In this case, you will have to clean the head and other parts of the printer manually.
HP printers are divided into inkjet and laser. The printing principle, as well as cleaning methods, differ for these printers.
Copy problems
Page 115
- Image
- Text
Copy problems
Troubleshooting
copying
Using the HP Troubleshooting Wizard Online
Follow the step-by-step instructions if the printer does not copy or produces low output.
print quality.
NOTE.
HP Online Troubleshooting Wizard may not be available on all devices
languages.
Tips for Copying and Scanning Success on page 59
ENWW
Copy problems 109
How to clean the inkjet printer head manually?
Inkjet printers, such as deskjet 2130, deskjet 3525, deskjet 5525, quickly lose printing ability when idle, but it can be restored by washing the print head.
Hewlett Packard cartridges are monoblock, which means they are not so difficult to clean, but they also quickly become clogged with ink. Flushing liquids are often used, which are used during soaking and are pumped with a syringe through the foam rubber.
The HP printer is designed to allow both of these methods. For black printers from this company, pigment ink is used, which means that the washing must be appropriate. HP color cartridges are not pigment-based, which means they already need a different wash.
Flushing
You need to make sure that the sponge is saturated with ink to the bottom of the cartridge. If this does not happen, the cartridge will not print. This is the main difficulty due to which non-professionals fail to clean the nozzles. After this, you can run the nozzle bleeding operation in HP Toolbox. This should make the print quality again.
If this does not help, you can rinse the cartridge with hot water. No need to wash the entire cartridge! Just hold it near a hot water tap for a couple of seconds. You need to wet the side where the nozzles are located, that is, the place where printing is directly carried out. Then the cartridge needs to be dried with non-hot air from a hair dryer. Immediately after this, insert the cartridge back and run the nozzle cleaning program several more times.
Scanning problems
Page 116
- Image
- Text
Scanning problems
HP Print and Scan Doctor
for printing diagnostics and
scanning
HP Print and Scan Doctor software for printing and scanning diagnostics is
a tool that diagnoses the problem and automatically fixes it
problem.
NOTE.
This utility can only be used on Windows OS.
Troubleshooting
with scanning
Using the HP Troubleshooting Wizard Online
Follow the step-by-step instructions if scanning fails or if
it is of low quality.
NOTE.
HP Print and Scan Doctor software for printing and scanning diagnostics and wizards
HP online troubleshooting may not be available in all languages.
Tips for Copying and Scanning Success on page 59
110 Chapter 8 Solving the Problem
ENWW
Cleaning your HP laser printer
A laser printer is different from a dot matrix and an inkjet printer. The action is based on a photosensitive drum with powder toner. Electric charge and high temperature transfers the image to paper. A laser printer can also produce defects when printing and can also be cleaned.
The first thing you need to do is unplug the printer and let it cool down. The toner cartridge can then be removed and gently cleaned with a brush or wipes. The cartridge can also be vacuumed. After which you can put the printer back together and do a test print. You cannot clean the drum yourself, as it contains fragile parts. It's better to leave this to the professionals.
Advice! Do not run the printer head cleaning function too often! Do this only when clearly necessary. Otherwise, you'll just waste ink and shorten the life of the print head.
Prevention is always better than repair
To avoid problems with the printer nozzles, it is better to use it for its intended purpose at least twice a week. This way the paint will not have time to dry and the life of the print head will be longer.
Never operate the printer in extreme weather conditions. In hot weather, it can overheat when printing, and in cold weather, ink and lubricants can become hard, which can damage the entire device.
Dust around the printer is also not harmless, and it is better to keep it clean.
High-quality ink is an important condition for the functioning of nozzles. Only original ink from the manufacturer guarantees high-quality printing and long service life of the printer. By buying cheap analogues, you will have to solve problems with the printer yourself.
hp 3525 black color constantly clogs
Soldier
Group: Members Posts: 5 User #: 10652 Registration: 18-February 17
HP 3525 MFP has been in use for 2 years for home printing, using only original cartridges. After the black cartridge ran out, it sat for 2 weeks and when installing a new one, it did not print in black. Other colors are ok.
I cleaned the head and removed it with distilled water and glass cleaner. Water flowed normally through all nozzles. After installing the head in place, half a page was printed in black, then it was cut off.
I took the head off and soaked it for a week. Water flows perfectly through all nozzles. I installed the head, printed 2 pages in black and stopped again. When printing in black and white, it produces blank sheets. I drip distilled water onto the filter mesh - it doesn’t get absorbed.
I don't understand what's wrong. Cartridge 655 black new original from Komus Could it be a fake? Maybe the air lock is formed due to some kind of malfunction in the head?
Expert
Group: Members Posts: 9458 User No.: 3904 Registration: 14-September 10
ExpertGroup: Members Posts: 9458 User No.: 3904 Registration: 14-September 10
ExpertGroup: Members Posts: 9458 User No.: 3904 Registration: 14-September 10
ExpertGroup: Members Posts: 9458 User No.: 3904 Registration: 14-September 10
29.05.2015, 01:51 HP Deskjet 3525 does not print after refilling After buying original cartridges several times, I decided to try refilling them.HP Deskjet ink advantage 3525 does not print in black even after changing the print head Friends! A month ago, the hp 3525 printer stopped printing in black. I bought a new cartridge, no.
MFP HP 3525 is covered . Hello everyone. About a month ago, the MFP began to knock when turned on, when cleaning, and when printing. Sound.
Lexmark x2550 MFP does not print after refilling Lexmark x2550 MFP does not print after refilling (it says that the cartridges are empty) help solve the problem.
The hp deskjet 3525 multifunction printer is very bad Hello! Big problems with MFP. And I can’t even count how many solutions I found on the Internet.
Added after 3 hours 14 minutes
It no longer leaks, but it doesn’t print in black.
30.05.2015, 12:36430.05.2015, 12:36| 01.06.2015, 14:43 | 5 |
| 01.06.2015, 21:48 [TS] | 6 |
| 03.06.2015, 22:08 [TS] | 7 |
| 04.06.2015, 00:08 | 8 |
| After installing the rings, you need to do two things - rinse the head and squeeze out the air - this is done gently in several passes in turn (as long as there are dried nozzles, the air will be forced out poorly and vice versa - when there is air in the head, the cleaning liquid does not penetrate well). And do all this quickly, before the black channel is completely dry. The most effective head washing on Canon/HP (with cartridges similar to yours) is done like this https://mnogochernil.ru/newsroom/%D0%. 0%B0-canon-hp/ Punching is something like this: “We send a very dark image for printing (several sheets), insert a syringe into the air hole of the donor container, and pressing the air (carefully, a couple of milliliters every 10-15 seconds (this is the maximum speed), preferably as slowly as possible, especially at the beginning) increase the pressure exactly in this channel. When we see that the ink has begun to drip onto the paper (smudges will begin to appear), we stop pumping air and carefully remove the syringe (do not forget that the container is under pressure at that moment!). After printing a couple more sheets, the smudges should disappear. We carry out cleaning and print a nozzle check.” | |
| HP 5510, after installing the CISS, the error “replace the cartridge” I bought the CISS with cartridges + chips, read it, installed it, got dirty, everything seems to be as it should be, but. HP 3525 does not print a document from Word or other text editors The printer does not print a document from Word or other text editors. The leaf comes in immediately. After installing the HD 3450 the screen turned black. Hi all. Here's the thing, I bought a Radeon HD 3450 video card and installed it in my computer after. Article rating: (votes: 1 , average rating: 1.00 out of 5) Save to: How to clean the hp 3525 printer head Link to main publication |