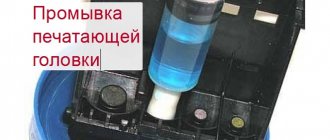
The print head (PH) is an element of inkjet printers only. Directly involved in applying ink to a sheet of paper. The head has nozzles (nozzles) - small holes through which paint is sprayed onto the media. If you don't use the printer for a long time, the ink tends to dry out. Printing defects can also occur if printing is too intense or if the device’s operating instructions are not followed. In both cases, the print head needs to be flushed.
The part can be built-in or autonomous (separate). In the first case, the head cannot be separated from the ink container. In the second case, the container can be removed and cleaned separately without affecting the cartridge. Cleaning the head will be different for each situation. The type of head used is determined by the design of the printer or multifunction device. HP printers often use a cartridge with built-in nozzles. But Epson equips its printers mainly with autonomous parts that can be separated.
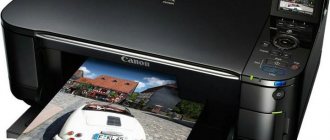
Restoring normal operation of the printer can be done at home. Any printer can be revived: HP, Canon, Epson and other inkjet devices. You won’t be able to rinse the head with your own hands only in the case of a very advanced situation. Then you will have to buy a new head or a whole cartridge.
When cleaning is needed
You don't need to clean the head every time you want. At the very least, you should not use manual cleaning methods unless necessary.
There are clear signs when nozzle cleaning is required:
- if the printing device has been idle for a long time, after printing several sheets the quality has noticeably deteriorated and does not return to its original state;
- if you are sure that there was still ink in the cartridge at the time of the last print, but now the printer produces completely white sheets;
- when the inkjet machine heavily stains the sheets, smears them with spots, skips lines, prints palely, colors are distorted or unclear;
- Cleaning is also necessary after the next refill of the cartridge.
Even if the printer prints a regular text document normally, this does not mean that there are no problems. You can verify normal printing or detect problems by performing a nozzle test. Each device has a test sheet printing feature. You can download full-fledged test sheets from the Internet and check the printing of all colors, gradients, characters of different sizes.
For example, Canon printers have a Nozzle Check option that will print a test pattern to evaluate quality. The function is located in the device’s print settings on the “Maintenance” tab.
Epson printers have a similar option. Also located in the settings window, but on the “Service” tab, and is called “Nozzle check”.
When should you clean it?
Regular cleaning of equipment extends its service life. No matter how expensive and high-quality office equipment is, it needs periodic “airing” of its parts.
Printer maintenance should be performed at least once a year.
But there are several factors that should alert you and immediately begin a technical inspection:
- Extraneous sounds that are not typical for the printer should alert you. This means that some part is clogged, displaced, or is wearing out.
- Deterioration in print quality. The printer is designed to print high-quality text and images. Any discrepancy between the result obtained and the production capacity of the device will be a reason to begin prevention.
- There should be no ink stains on the printed sheets. If the printer “spits” ink pigment, start cleaning the equipment.
- Pay attention to any deviation from the norm in the operation of the equipment. This will help you respond quickly and even prevent serious damage.
Is it worth cleaning it yourself?
Equipment can be repaired and cleaned at home. It is enough to understand the device of printers and have all the necessary tools at hand. The master's constant assistants will be cotton swabs, soft brushes with natural bristles, paper napkins or towels.
If you don’t know how to clean the printer, then entrust this task to a specialist.
If possible, you will even need a technical vacuum cleaner to collect dust, toner and paint in hard-to-reach places.
Causes of cartridge blockages
- The printer has been inactive for a long time. It is necessary to do a test print at least once every 1-2 weeks. This will prevent liquid ink from stagnating in the cartridge and nozzles, which will prevent other elements of the printer from drying out and getting dirty.
- The cartridge uses non-original counterfeit ink. Or the remaining old paints are mixed with new ones that are different. Even compatible ink from another manufacturer can cause problems with the head. If you need to refill the ink tank with consumables from another company, it is recommended to completely rinse the cartridge so that no traces of old ink remain.
Severe blockage
If the head does not allow liquid to pass through at all, then the blockage is severe. But you can get rid of it too.
- As in the previous instructions, place the part on a napkin.
- Cut it into small pieces. About 5–7 centimeters.
- Place them on the paint intake pipes.
- Pour washing liquid into them.
- Refill and change wipes periodically.
Take the IV tube.
There are also extreme methods. For example, you can insert a syringe without a needle into the nozzle and squeeze out the liquid. Or fill the cartridges with washing liquid instead of ink. But it's risky.
Cleaning methods
To clean the print head, there are three categories of methods:
- through software on a computer;
- cleaning through the printer control panel on the body;
- manual resuscitation.
First, it is recommended to clean it programmatically.
If you manually clean it yourself, there is a high risk of damaging the part. You will need to purchase a new head, which can cost more than half the cost of the entire printer.
Replacing a Canon print head
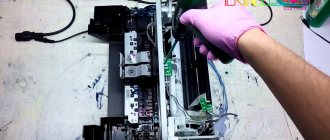
Open the cover while the printer is turned on to allow the carriage to move out of the parking space. Turn off the printer. Remove the cartridges. The print head is clearly visible, but it is too early to remove it.
In different printer models, the latch holding the PG looks different, although the principle of operation is the same in almost all models. On the right side there is a lever, or the frame has a certain shape. You need to lift it up.
The MG5440 model has a slightly different principle. The latch here is a bar with the image of ink colors, which does not rise up: you need to pull it towards you until it clicks. Now the PG is free, tilt it forward and carefully remove it from the printer. Cleaning canon printer nozzles Make sure that the PG of your printer has no burns near the nozzles, the nozzles are intact, and flushing
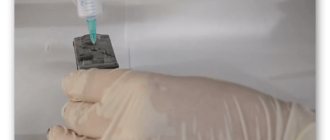
Burnouts in the nozzle area make sense. If so, prepare: 1. rinsing liquid; 2. gauze, napkins or bandage; 3. syringe; 4. a low plastic container where the GHG will fit; 5. tube from a medical IV. Cover the table with newspapers and place a piece of bandage, folded several times, soaked in the washing liquid, under the PG. Using another piece of cloth, also soaked in the cleaner, gently blot the intake grates.
Remove the rubber seals, wash them, and thoroughly wipe the head body around the intake holes. Drying of ink in these places can lead to depressurization of the system. As a result, air may be sucked in, the Canon print head will begin to work incorrectly, and ink will flow intermittently. It is a good idea to periodically clean the O-rings for preventive purposes, even when there are no problems with the seal.
How to clean nozzles programmatically
All drivers must be installed. Sometimes you need not just a driver, but a proprietary program to control the equipment.
Software flush uses more ink than regular printing. The procedure involves cleaning the insides of the part with your own ink under pressure. Passing ink normalizes the internal space (air pockets are removed) and removes excess accumulated ink.
The instructions below may not help you specifically. The algorithm, location and names of the required cleaning options can be located in different menus and settings items. It all depends on the printer manufacturer, year and release, model and software version.
But in general, the cleaning principle should be clear.
How to clean a Canon printer:
- Go to Windows Devices and Printers. To do this, open the Control Panel, then select the “Hardware and Sound” section, then open the desired section. Or press “Windows + R” on your keyboard and execute the “control printers” command.
- Find the icon for the printer whose print head needs to be cleaned. Right-click on the icon. Depending on the model of your printing equipment, go to the “Printer Properties” or “Print Settings” section.
- Go to the Maintenance tab and use the Cleaning, Deep Cleaning, and Ink Cleaning options.
- Select which color ink tanks you want to clean. If you don't know which ones need to be cleaned, use the nozzle check function.
How to clean your Epson printer:
- Open the section for all connected equipment to your computer or laptop (see points 1 and 2 of the previous instructions).
- Then in the properties or settings window, launch the “Print head cleaning” option. If standard cleaning does not produce results, repeat the procedure, only this time activate the “Enhanced cleaning” option.
For Epson and some Canon models, service can be performed using the PrintHelp program.
For other brands of office equipment, you may need to install and run the official program. Only proprietary software often contains functions for managing and maintaining equipment, including cleaning. Therefore, always install drivers from the disk that came with the printer. Or download software from official websites. It is recommended to always install the full driver package, which is especially important if you have an MFP (multifunction device, 3 in 1 printer).
For example, for a fairly old but popular model of the HP Deskjet 2050 MFP, you should launch the full-featured software and find the functions in the “Maintenance” menu.
Features of devices from different companies
Each printer manufacturer has its own characteristics and hides production “secrets”.
Prevention won't take long!
- HP. The printer is practically not subject to manual disassembly and cleaning of parts. It is trusted to professionals. To remove the cartridge, you need to perform several manipulations: remove the cover, separate the toner compartment.
- Epson. To remove the cartridge, you need to open the front panel and remove the cover. The diaper is secured with several screws. The equipment is difficult to disassemble, especially for beginners.
- Canon. You can easily understand the device of printers. The cartridge can be removed by unfastening the top cover latches.
Each printer requires a different cleaning approach.
Manual cleaning
If cleaning via a computer does not produce significant results, you will have to resort to working with your hands.
What you need to clean the nozzles
- Gloves to avoid getting your hands dirty.
- Syringe with a needle.
- A container where the head and cleaning fluid will be placed. A rubberized jar lid works well. You can take a saucer or any container with sides.
- Lint-free napkins or paper towels. If you don’t mind, take full-fledged lint-free rags.
- Small diameter tubes, for example, from droppers.
- Scissors.
- An eraser for removing old stains that cannot be cleaned with solutions.
What liquid to use
It is recommended to use cleaning fluid from the same company that produced the printer and cartridge. Ideally, find out the model of the printer, or better yet, the cartridge, and look for the cleaning agent by name.
Otherwise, the most suitable composition will be any original cleaner. It must match the ink you are using. Additionally, make sure that the model of your cartridge is written in the list of cartridges to be cleaned.
Cleaning with flushing liquids in containers that are all in Chinese characters is strongly not recommended.
To clean the print head working with water-soluble inks, the following can be used:
- water with zero salt content (W01);
- distilled water (regular tap water is not suitable);
- self-made composition (ammonium is added to distilled water, the proportions are determined depending on the size of the blockage).
If the printer prints with pigment ink, then the printer head is cleaned with a specially designed solvent or isopropyl-based alcohol.
Products from WWM have proven themselves well in the cleaners market.
- W01 – water without salt impurities, copes well with clogged nozzles;
- CL-04 – the product copes with water-soluble inks, the composition is intended for working with the external parts of the printing unit;
- CL-06 - similar to the previous composition, but is used to remove dyes with pigment;
- CL-08 – liquid is indicated for washing and soaking;
- CL-10 – the solution has an enhanced effect.
Many “specialists” practice using household cleaning products. For example, the word “Mr. Muscle” is popular. If you need to wash the ink with water, you need green or pink “Mr. Muscle”. And to clean the inkjet printer head, which passed pigment ink through itself, you need a blue or orange household solution. Many people recommend the blue liquid.
Heating the liquid to +40 °C allows you to increase the cleaning efficiency.
Before using any homemade or household products, it is recommended to experiment with a separate amount of ink.
- Take the dye you are using and the intended cleaner.
- Apply cleaner to the ink in a separate container.
- Leave it on for a few hours and then evaluate the result. There should be no precipitation, no transformation of the mass into a thicker or even jelly-like one. The ink should become more liquid, that is, dissolve. If clots form, they should be loose.
Printers from Epson, Hewlett-Packard and Canon, depending on the model name, contain different parts. There are heads that are attached to the carriage and can be removed. Some models have a cartridge with a non-removable head. Both situations require a different approach. First, let's look at how to clean the built-in head on devices with inkjet printing technology.
How to clean the removable head
You can use two methods:
- dismantle the head, i.e. completely remove it from the printer;
- clean without removing the PG, taking out only the cartridges.
Both options work, but the method of removing the head is more effective. This will allow you to visually monitor the condition of the plate with nozzles and control the washing process.
How to remove the head
- The top cover of the device rises.
- If the equipment is multifunctional, then you may need to disconnect the scanner unit, which will complicate the disassembly procedure a little.
- All cartridges are received.
- The cable that connects to the contact pad is disconnected.
- By removing the latches, the contact pad is pulled out.
- The large cable is disconnected from the head.
- The screws that secure the head inside the carriage are unscrewed.
- With a gentle movement, the head is pulled out.
Immediately place the PG in the container so as not to stain the clean surface. Now you can wash the part using one of the suggested methods below.
Flushing through fittings
First of all, it is recommended to get rid of any remaining ink that is in the head channels. Place a tube of suitable diameter onto the tip of the syringe. Place the second end on each fitting one by one and gently move the piston towards you, pump out the remaining substance.
When you remove the tube, be careful not to spill ink back onto the head. To do this, the tube can be pressed firmly with your fingers.
Washing instructions:
- Fill a separate clean syringe with cleaner (cleaner).
- Connect the tube to the fitting.
- Using smooth, light pressure on the piston, begin to flush the channel along with the filter, which is located under the fitting.
- As a result, a “water” colored wall should come out under pressure from the back of the head. It is necessary to rinse until the wall is complete without gaps, and the color of the emerging liquid becomes clear. You need to do it over a container of sufficient size.
- Place the head inside the printer and reassemble in the reverse order of disassembly. Before printing documents, do cleaning through the driver (see above). Then print a sample sheet through the nozzle check option.
Cleaning should be done without long breaks. Otherwise, there is a risk of the cleaner drying out on the filter or in the channel, which will greatly aggravate the situation.
Therefore, after completing all the actions, it is better to immediately insert the head back, connect it, and put it into operation.
Broach
The method helps with severe blockages. It is recommended for use as the first stage of cleaning to remove ingrained plugs and proceed to standard, gentler cleaning.
- Add 1-2 mm of cleaner to a saucer or other container with a flat bottom.
- Place the head directly into the cleaner with the nozzle plate facing down.
- Place the tube from the syringe onto the fitting.
- Systematically begin to pull the piston in the opposite direction. The flow of cleaner into the tube will indicate that the nozzles are being cleaned.
The cleaning should be completed either by washing (described above), or by leaving the head with the nozzles down for the whole day in the cleaner. When the nozzles are cleaned, the printer is restored to its original state and a 2-time cleaning in Windows is required.
Maceration
You need to periodically drip cleaner onto each fitting using a syringe. In a natural way, the cleaner will soak the channel and the dirty filter. It takes more than one hour to clean, but it is better to devote most of the day to the process.
In order not to constantly monitor and repeat the digging of the fittings, you can put tubes on them. Liquid is poured inside. The print head is left alone for the whole day if the print is very bad, and for several hours when the contamination is insignificant.
Video
Flushing and cleaning without disassembling the head
It is not necessary to remove the part from the carriage. But this is less effective and increases the risk of dirtying the inside of the printer. For severe problems, flushing may not provide any improvement, but it will remove weak blockages.
Before all actions, you must first move the carriage out of the parking lot. To do this, turn on the device with the button on the case. Wait for the carriage to start moving and when it is approximately centered, unplug the power cable from the outlet.
Next, fold a lint-free napkin or paper towel several times.
Place the napkin in the parking area.
Carefully push the carriage into the parking lot so that the napkin is underneath it and does not crumple.
Next, clean all the fittings one by one. Using a syringe through a tube or rubber adapter, carefully inject the rinsing solution.
If the liquid does not come out, it is possible that a plug has formed inside. In this case, you can put the tubes on the channels and leave them for the whole day to try to soak them. Or try to destroy the plug with minimal movements of the syringe piston back and forth.
Washing should be done for all flowers. After each wash, you need to move the carriage and change the napkin.
A satisfactory result will be considered if after washing the napkin is clean or close to this condition.
At the end, the napkin is removed and the cartridges are inserted. Additionally, you should rinse the printing machine nozzles two or three times using the program.
How to wash the head built into the cartridge design
You can verify that washing is necessary by analyzing the print. Take toilet paper or a napkin. Remove the cartridge from the carriage and place the nozzles against the selected material.
- If the print is clear, then the dye passes through the nozzles well and no washing is required. An exception is if, despite the high-quality print, there are defects on the paper.
- If the trace is blurry, unclear, practically or completely absent, although there is paint inside the container, then it should be washed.
When testing a color cartridge, three clear marks of red, yellow and blue should be visible on the napkin.
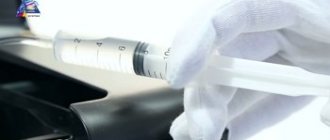
First try to soak the nozzles in a gentle way. Turn the cartridge over so the nozzles are facing up. Using a syringe, apply a few drops along the entire hole.
Wait up to 10 minutes, dry the surface well, and check the print again. If it helps, return the ink tank to the carriage and do a software nozzle test.
The next step is soaking in a container with cleaning liquid.
- Take a regular lid for screwing on jars.
- Take a few millimeters of cleaner.
- Place the cartridge with the nozzles down.
- Do not touch the container for about one and a half to two hours.
- Afterwards, wipe the cartridge dry and check the print on a napkin or paper.
If the result is still not satisfactory, ink is pumped through the nozzles with excess pressure.
- You will need a syringe with a shortened needle. Make the last one about 1.5 cm long.
- Find a small piece of rubber. It should be put on the needle and moved to the beginning. The rubber band will act as a sealing gasket.
- Fill the medical syringe with air.
- Insert the needle into the hole in the cartridge. Located on the back side of the head. Press the syringe firmly so that the previously put on rubber band fits as tightly as possible and closes the hole.
- Start pressing on the piston. Ink should flow out of the nozzles.
See the video for more details.
Removing severe head clog
If flushing the print head is unsuccessful, then you should use a more effective cleaning method. It will take a lot of time and effort to complete all the steps provided.
Step-by-step algorithm:
- The medical tube for droppers is cut into several parts. The length of each of them should be about 6 cm.
- Tubes are inserted into all holes.
- Pour in cleaning agent.
- If the blockage does not allow liquid to penetrate inside, then repeat similar steps several more times.
- As soon as the plug is partially broken, the head is left for 2 days.
- Check the cleaning agent level every 2 hours. If necessary, top it up.
- After 2 days, the liquid mixed with ink is drawn out with a syringe.
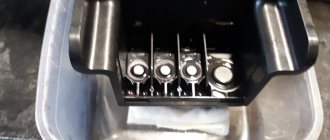
There is another way to get rid of severe blockage. To carry out the work, you will additionally need a plastic container and several napkins. Having prepared these items, perform the following steps:
- Place 2 napkins at the bottom of the plastic container.
- A small amount of the selected detergent is poured onto them.
- The part to be cleaned is placed on top.
- It is pressed to the bottom of the container.
- Use a syringe to draw out the liquid.
- Repeat the operation 5 times, constantly adding a little cleaning agent.
Prevention
Simple steps will help protect your printer from problems and maintain its functionality:
- even if there is no need to print anything, it is necessary to print out a colored sheet at least once every week and a half;
- do not keep the cartridges empty after using up the ink; prolonged idle time in an empty state will lead to irreparable consequences;
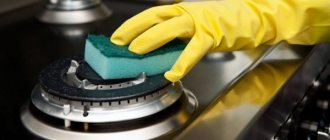
- do regular wet cleaning, especially in the areas where the printing device is located;
- do not leave the cover that covers the cartridge open, this increases the risk of dust getting on the printing parts;
- If ink is supplied to the head not from the cartridge, but through the CISS (continuous ink supply system), then monitoring the system condition and maintenance is required. Make sure that there are no air pockets in the hoses through which the ink flows. And the amount of paint in each CISS container should be at least half of the total volume.
Carriage Calibration
If after the first turn on and test printing, curved lines are printed on the sheets, you will have to calibrate the carriage. To do this, perform the following actions:
- Fill the cartridge with ink.
- Place 3-4 clean sheets of paper in the tray.
- Turn on the device and connect to the PC.
- From the Start menu, select Printers.
- Right-click on the device and go to “Properties”.
- Go to “Special Settings” and click on the “Alignment” option.
- The device will print a test text and automatically calibrate everything.
Steaming
Suppose the ink in your printer is dry, what should you do? The high-temperature steaming method will help you with this. The cartridge must not be empty. Otherwise, it must be at least partially replenished.
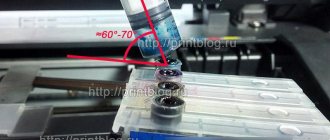
Turn on the kettle, wait for the water to boil, open the lid and hold the cartridge for 30 seconds with the nozzles down. Then remove and clean the attachments with a soft cloth.
We will repeat the procedure as many times as necessary.
If this does not help, there is a more radical method - immersion in boiling water. To do this, pour freshly boiled distilled water into the bowl so that you get a layer of about 1 cm, and place the cartridge there with the nozzles facing down. Leave for 20-30 seconds. Repeat if necessary.
In this way, it was possible to revive even cartridges that had dried up a hundred years ago.
Extreme methods
This effectively ended how likely the print head was to survive. If the goal is not achieved, many other much riskier methods can be used:
- Squeeze out the liquid with a filled syringe without an air cushion. The pressure on the injectors will increase significantly, which will lead to their damage. Do not press your head against the fabric, but lift it slightly. Gently press down on the piston as before, the pressure is much higher due to the lack of air cushion.
- Hold the steam generator nozzles over the steam for several minutes and push through the rinse aid, heated to 40-50 degrees.
- Place the head on the surface of the hot water for a few minutes, without submerging it more than a millimeter, and draw the liquid through the nozzles.
Red print head (photo taken from www.chernila.com) (Click to enlarge)
- Use a more aggressive product: mix 9% vinegar and distilled water in a ratio of 1:9. This composition cleans well, but has a destructive effect on internal parts, and after use it must be rinsed with an alkaline solution to neutralize the acidic environment. Do not use this method unless you are prepared for print head failure within two to three months.
If any of these extreme methods succeeded in achieving your desired goal, do not rush to return the PG to the printer. After such extremes, be sure to dry it with a hairdryer. Don't overheat your head - take breaks for twenty minutes. If you doubt that everything has dried well enough, leave it next to the battery for two days and drop a little flushing fluid into each airlock before installing.
Printing with cleaning fluid
The method helps to reset the non-removable head built into the cartridge. Detergent is poured in place of the dye and cleaning begins. If, when printing on a color printer, defects in only one color appear in the image, the cleaner should be poured only into the problem compartment. After cleaning, the device cannot be used for two hours. During this time, the cleaning liquid will have time to dissolve the dye that has dried in the nozzles.
After 2 hours, open any graphics editor and fill the page with the color that you had problems with before cleaning. It's best to use Photoshop because it allows you to use the CMYK color scheme when filling the sheet. The resulting fill is printed on a standard sheet, and first you need to set the maximum print density. Residues of the cleaner mixed with the paint will leave marks on the paper. If horizontal white streaks appear during printing, the print head has not been cleaned sufficiently. When the filling becomes homogeneous, remove the block in the head.
After washing, the cartridge is refilled with ink, the nozzles are programmed to be cleaned, and the color sheet is printed again.
Printer Pre-Check
Printer maintenance begins with preparing and checking all components. Initially, a visual inspection is carried out to assess the upcoming work; dust, particles of dried ink, and particles of paper often accumulate in the printer.
You can manually wash all types of cartridges, except for models with filler. Such elements can only be cleaned using specialized devices - a centrifuge or a vacuum apparatus.
Then the CISS is checked for broken paint supply hoses and tightness of the connections between the gateway and the cartridge. If there are air bubbles in the gateway, first of all the CISS is debugged and balanced. Donor containers or cartridges must be filled; if necessary, refill the printer and print a nozzle check test page.
Checking paint hoses
Not long ago, such a service device as an ultrasonic bath was actively discussed on the Internet. The usefulness of the device has not been proven for certain (and it does not matter whether it is medical equipment or a device for gentle cleaning of small parts). If you consult with specialists, the opinions are not clear, but most often they are negative. Facts of successful use of an ultrasonic bath among craftsmen are difficult to detect, but observations indicate a negative impact on the printer’s print head (failure within 24 hours or upon first use).
Using an ultrasonic bath
Photodrums play the following role.
They are first charged with an electrostatic field so as to repel toner powder particles. Then, using light, part of the surface of the photodrum is illuminated. In this case, the illuminated surface is charged with the opposite sign and now, on the contrary, attracts toner particles to itself, where they stick. The drum is rolled over a sheet of paper and simultaneously discharged. Therefore, toner remains on a sheet of paper in some places, but not in others (after all, the toner does not stick to the drum everywhere). The sheet of paper will then go through a special high-temperature oven where the toner is baked onto the areas of the paper where it hits. This is how an image is obtained on paper, the same one that the light illuminated on the photodrum. In laser printers, the role of light is performed by a special laser beam. He draws a mirror image of the sheet on the drum. In copiers, the role of light sources is performed by special LEDs, which also illuminate a mirror image of the printed sheet on the drum.