Types of faults
Today, the most common malfunctions of Ariston washing machines, both front-loading and top-loading, are:
- Blockages in the water drainage system.
- Defective pump or water intake valve.
- Failure of the heating element.
- Bearing wear.
- Control board error.
Other breakdowns also occur, but they occur much less frequently. Typically, the washing machine indicates a malfunction by displaying a special code on the screen or by flashing indicators in a certain sequence. To understand exactly which node inside the device requires attention, you need to open the user manual and see how the error codes are deciphered.
Error codes (F01-F18)
Ariston machines with a self-diagnosis function indicate a malfunction with a sound signal and display an error code on the display. This makes it easier to find the defect and reduces repair time. The following codes are displayed:
- F01 – malfunction of the motor or control unit;
- F02 – failure of the rotation sensor or motor;
- F03 – temperature sensor defect;
- F04 – water level sensor malfunction;
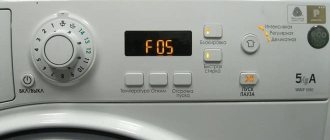
- F05 – clogged drain hose or drain filter;
- F06 – door lock malfunction, control unit error;
- F07 – the heating element does not heat up;
- F08 – malfunction of the heating element or electrical wiring;
- F09 – control unit failure;
- F10 – defect in the inlet hose;
- F11 – failure of the pump or level sensor;
- F12 – control module malfunction;
- F13 – drying temperature sensor defect;
- F14 – drying heating element burned out;
- F15 – damage to the wiring of the drying heating element;
- F16 – door not closing tightly;
- F17 – door deformation, no power to the electric door lock;
- F18 – control unit failure.
Pump removal and repair
If after washing the machine tries to drain the water, the pump hums and works, but the water does not drain, this indicates a blockage in its path. This malfunction appears at the end of the program, when the equipment should drain and start rinsing, but freezes because the water does not drain or the drain is very slow.
Blockages appear in the following places:
- Drain filter.
- The pipe connecting the filter and the tank.
- Water pump.
- Drain hose.
Usually the clog appears in the filter. This happens much less frequently in the pipe (it has a large diameter), in the pump (an auxiliary filter is installed in front of it), and also in the hose (only if it is installed incorrectly).
Repairs should begin in easily accessible places. First you need to open the base panel, unscrew the filter, remove accumulated debris and install the part in its original place. Next, you need to lay the Ariston washing machine on its side, loosen the clamps, remove and clean the drain pipe. After this, you need to inspect the pump. Some dirt particles may pass through the filter and clog it thoroughly. The part should be disassembled, cleaned thoroughly, and if it is damaged, replace it with a new one. The procedure for disassembling, cleaning and replacing the pump is as follows:
- Disconnect the washing machine from the network and communications, remove the back cover.
- Place the equipment on its left side so that the pump is on top.
- Unscrew the fasteners holding the pump.
- Disconnect the pipes going to the unit and drain the water. Disconnect the wiring.
- Replace the faulty part with a new one.
- Connect the pump and assemble the washing machine.
The last thing you need to do is inspect and clean the drain hose with a plumbing cable. It gets clogged extremely rarely.
Water inlet valve malfunction
If the filling valve of an Ariston washing machine is broken, it does not shut off the water, and it flows into the tank itself, even if the equipment is unplugged from the outlet. This malfunction can be determined by the murmur of water, which is heard when the machine is turned off. To repair the part, you must disconnect the washing machine from the network and water supply and remove the top cover.
The water inlet valve is installed at the top, in the place where the inlet hose connects to the washing machine. First, you should inspect the gaskets for integrity, and then take a multimeter, switch to resistance measurement mode and install the probes on the sensor contacts. If it is working properly, the display will show a value ranging from 30 to 50 ohms. A broken valve cannot be repaired, so the part must be replaced. The process is very simple, just disconnect the wires, unscrew the faulty element and replace it with a new one.
Broken heating element
Due to the fact that hard water is poured into the washing machine, scale forms on the heating element, as a result of which the part breaks. In case of such a breakdown, the wash is performed in cold water or the program does not start at all. To diagnose and perform repairs yourself, you must:
- Disconnect the Ariston washing machine from the network and communications, remove the back cover.
- The heating element is located below. You need to take a multimeter, switch to resistance measurement mode and install the probes on the contacts of the part. If the device is working properly, the display will show 25-30 ohms. A value of 1 ohm is reported for an open circuit, and a value of zero for a short circuit.
- To disconnect a faulty heating element, you need to unscrew the fastening bolt, disconnect the wires and, by shaking, pull the part out of the seat.
- Install the new heating element in reverse order and assemble the washing machine.
Bearings are worn out
If, during washing, the owner of the equipment hears an increasing hum, which turns into a loud knock during the spin cycle, this most likely indicates the failure of the bearings. To verify this, open the hatch and manually turn the drum. If the bearings are deformed, a strong play will be clearly felt.
This malfunction occurs as a result of prolonged use. The seal that covers the seat and bearing dries out over time and cracks form on it. Moisture penetrates through them, washes out the lubricant, and as a result, the bearing rubs and deforms during operation.
Troubleshooting this type of fault is much more difficult than replacing a heating element or pump. To do this, the owner of an Ariston washing machine will need to completely disassemble his device and remove the tank and drum from the housing.
Further repairs depend on the type of tank. Usually on washing machines of this manufacturer it is non-separable, so you will need to cut it into two halves along the seam. You should first select the bolts with which the parts of the tank will be connected during assembly and drill holes of the appropriate diameter along the seam.
Next, the faulty bearings are knocked out and new ones are installed in their place. The seals also need to be replaced.
After repair, the Ariston washing machine is assembled in the reverse order. The tank halves at the joints must be lubricated with silicone sealant to avoid leaks.
Replacing bearings is a very complex and difficult process, therefore, if you are not confident in the successful completion of the repair work, you should contact specialists.
Repair features
Due to differences in design, repairs vary between models.
Ariston Margarita 2000
The Margarita 2000 car has a stainless steel tank. The bearings are installed in a removable crosspiece mounted on the rear wall of the tank - it does not need to be removed to repair the bearing assembly. Repair sequence:
- Tighten the transport bolts.
- Remove the hatch on the rear wall of the device.
- Unscrew the fastening nut and remove the pulley using two screwdrivers.
- Remove the top cover and remove the counterweight.
- Place the machine on the front panel, having first removed the door.
- Unscrew the fasteners of the removable crosspiece of the tank.
- Using gentle blows, remove the cross from the shaft.
- Remove the oil seal and bearings from the crosspiece. Replace, lubricate and reinstall.
- Place the crosspiece on the shaft and carefully hit the bearings with a rubber mallet.
- Secure the crosspiece and pulley, put on the belt.
- Place the machine vertically and check the smooth rotation of the shaft.
- Install the front door, top cover and rear hatch.
Do-it-yourself repair of the Ariston Margarita 2000 washing machine is completed.
AVSL 100
The AVSL 100 model has a malfunction that is not found in other Ariston machines. When the washing mode starts, all the indicators light up, but the wash does not start, water does not fill, and the drum does not spin. The device is not equipped with a self-diagnosis function, so the malfunction cannot be determined by the error code.
Users have determined that the malfunction occurs due to wear on the motor brushes. To replace the brushes, you need to remove the electric motor, which is not difficult. To do this, you need to remove the top cover and back panel. Disconnect the wires, unscrew the bolts holding the motor and remove it. Replace the brushes, install the electric motor in place, and reassemble the housing in the reverse order.
AVTF 104
The peculiarity of replacing the drive belt in the Ariston AVTF 104 model is associated with the design feature of vertical machines. Access to the pulley and drive belt is through the side wall, rather than through the back, as with front-loading models. Sequencing:
- Remove the lower decorative apron, unscrew the 2 bolts securing the side cover.
- From the rear side, unscrew the 7 bolts securing the right side wall.
- Using caution, remove the side panel - it is attached to the top with plastic hooks.
- Remove the belt that has become unusable.
- Buy a belt with the same number of grooves. Model 1213 H8.
- Place a new belt on the motor shaft, pull it halfway around the drum pulley, insert a screwdriver under the belt and, turning the pulley counterclockwise, put the belt on the rim.
- Check belt tension. It should not sag or fly off. To increase tension, move the belt 1 or 2 grooves of the motor shaft closer to the edge.
- Reassemble in reverse order.
Control board fault
The control unit most often fails due to voltage surges. To protect the washing machine from such faults, you need to connect it through a voltage stabilizer or at least a surge protector. It is very difficult to repair the control board on your own; all the user can do is order a new part and replace the faulty one with it. The repair procedure is as follows:
- Disconnect equipment from the network.
- Remove the top cover and remove the detergent container.
- Unscrew the fasteners holding the front panel.
- Release the clamps, disconnect the wiring, and remove the board.
- Install the new part and reassemble in reverse order.
Other faults
There are other types of breakdowns for Ariston Hotpoint washing machines. They appear much less frequently than those listed above, but are nevertheless characteristic of the equipment of this manufacturer.
In some cases, the user finds that the washing machine does not turn on. The cause of the breakdown should first be looked for outside the device - check for the presence of light, make sure that the machines are not knocked out, and also inspect the sockets and extension cords and make sure that they are in working order. If no problems are found, you should look for a fault in the control unit of the Ariston washing machine.
If the door of the washing machine does not close, there may be several reasons - misalignment, wear of the locking tongue, failure of the UBL. It is necessary to tighten the hinges, inspect and change the latch, unscrew the fasteners and pull out the hatch locking device, carry out diagnostics and, if necessary, replace with a new lock.
Another common malfunction for Ariston Margarita washing machines or another series is a motor breakdown. Brushes usually fail. To repair, you need to lay the equipment on its side and remove the engine. After this, you will need to replace the brushes, clean the commutator and the space between it and the lamellas. After carrying out the work, it is necessary, without putting on the belt, to start the spin cycle at initial speed. If the motor is working correctly, you need to stop the program, put on the belt and run a test wash without loading laundry.
Sometimes knocking and humming noises when the washing machine is operating are caused not by worn bearings, but by improper installation of the product. It is necessary to install the equipment level using adjustable feet, and also place shock-absorbing stands under them. They significantly reduce vibration and make washing quieter. If the car is still loud, you need to check the condition of the drive belt and shock absorbers.
Common breakdowns
All possible malfunctions of the washing machine can be divided into several groups:
- Doesn't turn on.
- Doesn't drain water.
- There is no spin.
- Does not open.
- No heating.
- Leaking.
- Doesn't take up water.
- Makes extraneous noise.
There may be several reasons for each of the listed malfunctions. For example, the lack of water in the tank can be due to either a broken inlet valve or a simple clog in the inlet hose.
Before you start repairing the Hotpoint-Ariston washing machine yourself, you need to determine the probable causes of the problems and possible methods for eliminating them.
Doesn't turn on
Possible reasons why the washing machine does not work when turned on:
- the socket or power cord is faulty;
- The control module is damaged.
It’s easy to check the serviceability of the outlet - just plug in another, working device. Damage to the cord can often be seen visually, by testing the cable with a multimeter to be sure. If there is no resistance between the “start” and “end”, the cord should be replaced with a new one.
Only a specialist can troubleshoot the Ariston Hotpoint module. The cause of failure may be a sharp surge in voltage in the network. Reflashing or replacing a module is an expensive procedure.
In some cases, after being plugged in, the machine signals that it is ready to work (the indicators light up), but after selecting a program, the washing does not start. There may be several reasons for this:
- The inlet hose is clogged or the valve is faulty. The appliance cannot start due to lack of water.
- The electric motor burned out. Most likely, in this case, the machine will fill with water, but the washing process will not advance further. As a rule, a breakdown is accompanied by extraneous noise.
Removing a blockage at the inlet is quite simple. To do this, you need to remove the inlet hose, wash it under pressure, and clean the inlet filter mesh with a brush.
Replacing a faulty valve proceeds according to the following scheme:
- The inlet hose is unscrewed.
- The top cover is removed (the 2 bolts on the back wall that hold it are unscrewed).
- The clamps connecting the pipes and the valve are unfastened, and the terminals are removed.
- The valve is pulled out from its seat and washed. After washing, its contacts should be ringed, checking the resistance. If it is missing, the problem is not a blockage, the part has failed and needs to be replaced with a new one.
After installing the new valve, the assembly is assembled in the reverse order and a test run is carried out.
The machine does not drain water
The most common cause of this problem is a clogged drain system. The breakdown may also be due to a failure of the pump or control unit (the drain command is not given).
The process of removing clogs begins with cleaning the filter. The procedure can be represented as follows:
- The filter cover, hidden behind the front panel at the bottom of the facade, opens slightly.
- A flat dish is placed under it to collect the flowing water.
- When the washing solution has completely drained, the filter is completely removed and washed.
If the blockage is severe, not only the filter can become clogged, but also the pump and even the drain hose. If cleaning does not lead to the desired result, it is necessary to check the serviceability of the pump.
Before you begin repairing the Ariston washing machine yourself, you need to dismantle the part in the following sequence:
- Unplug the power cord from the outlet, disconnect the drain and inlet hoses.
- Lay the car on its side and remove the bottom protection.
- Disconnect the terminals, unscrew the clamps on the pipes.
- Unscrew the screws holding the pump (1 or 4 depending on the model).
What you should be wary of:
- the impeller is pushed forward;
- strong backlash;
- a large amount of scale in the filter seat.
To make sure the part is in good condition, you need to check the resistance of the motor windings. If it is absent (the norm is 140–180 Ohms), the pump is faulty and the winding may break. You can check the engine by connecting it to the network. If the pump is working properly, the impeller will begin to rotate.
No spin
There are three main reasons for this malfunction:
- The motor failed and the drum stopped rotating.
- The tachometer, which regulates the speed of rotation of the rotor, is faulty. The engine runs at minimum speed and the spin cycle does not meet the specified parameters.
- The belt is broken.
- Problems with the electronic module.
- The water does not drain and the machine cannot start spinning.
It is very easy to check the last point - just drain the water through the filter or drainage tube and start the spin program.
To check the operation of the engine and the integrity of the belt, you need to remove the back cover of the device by unscrewing the fastening screws. A broken belt can be seen visually, but the motor will have to be examined in more detail.
To check the serviceability of the engine, it is necessary to measure the resistance on adjacent lamellas. It should be the same, within 0.2 Ohm. Sometimes wear on the slats can be seen visually. The part cannot be repaired - the engine must be replaced.
If the problem is not in the motor, you need to check the serviceability of the tachometer. The sensor is located on the shaft immediately behind the engine. It can be inspected and ringed without removing it from its seat.
The device is considered operational if the resistance it produces is about 60 ohms. In this case, you can check its contacts and how well it is secured to the shaft.
The door won't open
There may be several reasons why the hatch was blocked:
- There is still water in the tank and the machine cannot open the door to avoid flooding.
- The door handle mechanism is broken.
- The hatch locking device is faulty.
- Problems with the control module.
Before you begin the repair, you need to open the door by inserting a thin ruler under the hatch and squeezing the tongue or using an emergency cable (it can be found under the filter cover).
A faulty handle does not respond to pressure; if it breaks, it must be replaced with a similar one. The locking device located on the front panel must be removed by first unscrewing the bolts holding it and pulling off the cuff. The part rings and changes in the absence of resistance.
No heating
If the machine washes in cold water, most likely the heating element has become unusable. Replacing it is quite easy.
Troubleshooting proceeds according to the following scheme:
- Remove the front panel.
- Find the heating element at the bottom of the tank and test its contacts with a multimeter.
- If there is no resistance, replace the part with a similar one.
The cause of the breakdown may be accumulated lime or mechanical wear of the heating element.
Leaking
You can determine the location of the leak by observing the washing machine during the washing process. If water appears while filling, the inlet hose is probably damaged. If during reset - drain hose or pipes.
Water that accumulates under the bottom during washing may indicate a leaky tank. If it flows down the front wall from the side of the hatch, it’s all a matter of a leaking cuff.
To restore the tightness of the joints, it is necessary to replace the leaky part with a new one, tightening the joints.
Doesn't take up water
The main reasons why the machine does not take in water:
- clogged inlet hose;
- Fill valve malfunction;
- problems with the control module;
- The pressure switch is faulty - without water it gives a signal that the tank is full.
All of the listed parts except the faulty module can be diagnosed and replaced at home.
The machine makes strange noise
The probable cause of the grinding noise is wear of bearings, shock absorbers, suspension springs, as well as foreign objects getting inside the drum.
Replacing bearings in Ariston vertical washing machines follows the following algorithm:
- The device is disconnected from the electrical network and water supply.
- Unscrew the screws from the back and front that hold the side panel and remove the panel.
- Remove the pulley after first unscrewing the bolt holding it.
- Having reached the hub, unscrew the screws and remove it from the seat.
- Carefully knock out the bearing and seal.
- An oil seal is installed in the hub, the bearing is pressed in, the place where the oil seal comes into contact with the shaft is cleaned and lubricated.
- The hub is installed back, the car is assembled in the reverse order.
The bearing on the other side of the washing machine is changed according to the same principle, only without removing the pulley.
The bearing in front-loading Ariston washing machines changes according to a standard algorithm, like any other machine of this type.
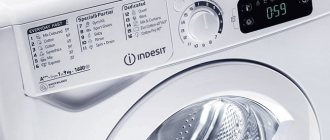
How to determine a malfunction on washing machines without a display
New Ariston washing machines with a self-diagnosis system display fault codes on the screen, after which they can be deciphered using the user manual. In older series without a screen, for example, Ariston 2000, the same information is displayed using indicators. The lights flash at a certain frequency; you need to count the number of flashes in a series, and then refer to the instructions, which list all possible types of errors.
If the washing machine is not equipped with a self-diagnosis system, you can determine the malfunction by its characteristic symptoms, and then carry out repair work on your own. Otherwise, you should contact the service center. Professionals have a special diagnostic key that is inserted into a connector on the system board and uses it to read information about the state of the equipment.
Ariston and Hotpoint-Ariston fault codes, their meaning
Washing machines Ariston, Hotpoint Ariston, Aqualtis, Margarita and other models are equipped with a self-diagnosis function. The system displays a fault code, decoding which the user can understand the cause of the breakdown.
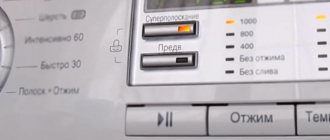
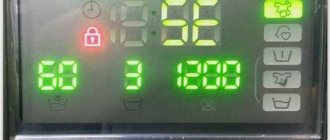
The CM with a scoreboard or display will highlight the error code on the screen. Those models that do not have a display (such as “Margarita 2000”) will display an error by flashing the indicators.
How to recognize a code without a display? For example, the indicators will display error F02 like this: the light blinks 2 times, pauses, then displays the code again 2 times. The number of flashes depends on the fault code.
We list the error codes for Ariston SM: F01, F02, F03, F04, F05, F06, F07, F08, F09, F10, F11, F12, F13, F14, F15, F17, F18.
| Code and its meaning | Flashing lights on the control panel | Solution | ||||
| LED1 | LED2 | LED3 | KN1 | KN2 | ||
| F01: A short has occurred in the engine control circuit. | blinks | — | — | — | — | 1. Remove excess moisture from the controller contacts. 2. Replace the controller or motor. |
| F02: The signal about the motor operation does not reach the electronic controller from the tachogenerator. | — | blinks | — | — | — | 1. Check the connections between the motor and the controller for tightness. 2. Check the rotor for locking moment. 3. Measure the resistance of the tachometer winding with a tester. 4. Replace the controller or motor. |
| F03: Temperature sensor failure, heating element relay stuck. | blinks | blinks | — | — | — | 1. Inspect the connections of the temperature sensor to the control unit. 2. Check the sensor with a tester. If it breaks, it needs replacement. |
| F04: Malfunction of the pressure switch (water level sensor). | — | — | blinks | — | — | 1. Make sure the contacts between the sensor and the module are tight. 2. If there is a problem, the pressure switch or controller must be replaced. |
| F05: Problem with the drain pump. | blinks | — | blinks | — | — | 1. Check the quality of connections between the module and the pump. 2. Check the pump and pressure switch with a tester. 3. Remove any blockages. 4. Change the pump or water level sensor. |
| F06: Error in the buttons on the control panel. | — | blinks | blinks | — | — | 1. Inspect the wiring connecting the controller to the buttons. 2. Check the functionality of the buttons on the panel. 3. Replace the panel or control module. |
| F07: The heating element is not immersed in water. | blinks | blinks | blinks | — | — | 1. Make sure the connections between the pressure switch and the module are tight. 2. Check the level sensor and heater. 3. Replace the sensor or heating element. |
| F08: Malfunction of the pressure switch, problems with the heating element relay. | — | — | — | blinks | — | 1. Inspect the water level sensor. 2. Quality control of the wiring between the heater and the control unit. 3. Replacement of the pressure switch, block. |
| F09: Volatile memory error (failure). | blinks | — | — | blinks | — | 1. Flashing the microcircuit. 2. Replacement of the controller. |
| F10: There is no signal from the water level sensor. | — | blinks | — | blinks | — | 1. Check the wiring between the sensor and the control unit. 2. Checking the sensor and block. Replacing a broken part. |
| F11: No signal from the drain pump. | blinks | blinks | — | blinks | — | 1. Checking the pump and the quality of its connection to the controller. 2. Make sure the pressure switch is working properly. 3. Replacement of the faulty element. |
| F12: Communication between the controller and the display module is lost. | — | — | — | blinks | — | 1. Make sure the connections have not come loose. 2. Replace the faulty element. |
| F13: Open circuit or malfunction of the drying temperature sensor circuit (for the AVD and AVL lines). | — | — | — | blinks | blinks (in addition, the KH4 indicator blinks) | 1. Inspect the connections of the temperature sensor to the control unit. 2. Make sure the temperature sensor is working properly. 3. Replace the broken part. |
| F14: The drying heating element does not turn on (for the AVD and AVL lines). | — | — | — | blinks | blinks (additionally KH3 blinks) | 1. Check the connections, as well as the heating element and controller. |
| F15: Drying relay failure (for AVD and AVL lines). | blinks | blinks (KH3, KH4 additionally flash) | 1. Control of CN1 connectors. 2. Check and replace the level sensor. | |||
| F17: The hatch door is not closed. | blinks | — | — | — | blinks | 1. Check the voltage in the network, the door handle, the UBL device. |
| F18: Problems with the microprocessor. | — | blinks | — | — | blinks | 1. Reinstalling the controller. |