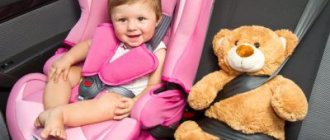
Congratulations on your purchase of Happy Baby Passenger V2!
Please read the instructions before assembly and operation. Important! Keep the instructions for future use.
Instructions for the Happy Baby Passenger V2 car seat
Incorrect installation and use of the restraint system can be hazardous to the child's health.
Attention!
- This child restraint is a “universal” one. It is approved under Regulation No. 44 as amended by the 04 series of amendments for general use in vehicles and can be fitted to most, but not all vehicle seats.
- Correct installation of this device is possible if the vehicle manufacturer has indicated in the vehicle manual that it can accommodate a “universal” child restraint for a given age group.
- This children's device is classified as a "universal" device based on more stringent conditions than previous designs that do not have this designation.
- If in doubt, consult either the child restraint manufacturer or the retailer.
Warning!
Do not install in the direction of travel until the child weighs 9 kg
- This car seat can be installed rear-facing or forward-facing, depending on the weight of the child.
- For children weighing from 0 to 13 kg (group 0+), the car seat is installed rear-facing.
- For children in the weight category from 9 to 18 kg (group 1) and in the weight category from 15 to 25 kg (group 2), the car seat is installed in the direction of travel.
- In order to ensure maximum safety for the child, it is recommended that the restraint system be installed in the rear seat of the car.
- Do not leave your child alone in the restraint without adult supervision.
- Do not install a rear-facing child restraint seat with an operational front airbag. This could result in serious injury or death.
- All straps used to secure the restraint device to the vehicle must be kept taut.
- Do not allow slack or twisting in the straps used to hold the child.
- Make sure that all lap belts are fastened so that the pelvic area is securely supported.
- The lap straps should be positioned as low as possible so that they hold the torso firmly at pelvic level.
- In an emergency, the child can be removed from the restraint by pressing a button located in the center of the seat belts. Try to explain to your child that you cannot play with seat belts.
- The seat belt buckle for an adult passenger must be below the child restraint guide and not rest against it. A different seat belt buckle position for adults is incorrect. If the user has any doubts in this regard, it is recommended to contact the manufacturer.
- Do not use any other load-bearing contact points other than those described in the instructions and marked on the child restraint.
- It is recommended that the rigid parts and plastic elements of the child restraint system be positioned and installed in such a way that during normal operation of the vehicle they cannot get under the mobile seat or into the vehicle door.
- When using a restraint system, make sure that neither the restraint nor the seat belt interferes with closing/opening the door.
- If the restraint is installed on a seat with a reclining rear backrest, ensure that the backrest is securely locked in the upright position.
- The child restraint should not be used without a cover. Only replace the cover with one recommended for use by the manufacturer, as the cover is an integral part of the safety system.
- The interior of the vehicle may become very hot when exposed to direct sunlight; it is recommended that the restraint device be covered when not in use. This prevents the child restraint components from overheating, which could burn the child's skin.
- Luggage and other heavy objects must be securely secured in the vehicle, as they pose a potential danger to passengers.
- If the restraint is not in use, it is recommended that it be transported with the vehicle's seat belts fastened.
- If you are traveling with passengers occupying the front and rear seats of the car, heavier passengers should sit in the front and lighter passengers in the back.
- Avoid contact of the holding device with caustic substances and acids.
- Do not lean the restraint device against unstable vertical surfaces to avoid falling.
- Do not lubricate the moving parts of the restraint in any way.
- Do not use a child restraint in the home. It is not intended for home use and should only be used in a vehicle.
- It is not recommended to use used restraints as you cannot know its history and therefore there is no guarantee of its quality.
- Before making any adjustments to the restraint system or its straps, remove the child from the seat.
- Store the child restraint in a safe place when not in use. Do not place heavy objects on it. Avoid contact with aggressive substances such as battery acid. Avoid placing heavy objects on top of it.
- If damaged in a car accident, the child restraint system is no longer suitable for use and must be replaced.
- It is strongly discouraged to make any changes or additions to the device without the consent of the Type Approval Authority.
Failure to fully follow the installation instructions supplied by the restraint manufacturer can be dangerous.
Due to the existence of different models of child restraints, our instructions contain general illustrations and photographs, so the design, colors and materials of the product you purchase may differ from those shown in the instructions. We reserve the right to change product specifications without notice, which is due to the continuous process of improving consumer properties and product quality.
Mounting a booster on the back seat of a car
Every car has several potential safety zones where it is recommended to install child car seats. They were discovered during crash tests and are reflected in child accident statistics.
Among them is the rear seat behind the driver's seat. In this case, the likelihood of injury is minimized, especially in frontal collisions. The driver turns the steering wheel in such a way as to prevent an impact from his side.
Positioning the seat behind the driver's seat reduces the likelihood of injury.
It is also possible to place a booster in the central part of the rear seat. In this case, regardless of the direction the steering wheel is turned in an accident, the impact falls on the rear, which does not affect the small passenger in any way.
It is prohibited to transport children with the booster seat placed in front. When the airbags are turned off, the risk of injury becomes maximum, and even simple movement on a flat asphalt surface will cause great discomfort to the passenger.
Loosening the belts
To loosen the seat belts, press the adjustment button on the front of the car seat with one hand and grab the shoulder straps with the other hand and pull them towards you until you loosen the belt as much as necessary.
To unfasten the seat belts, press the red button on the buckle.
4.1 Tightening the belts
To tighten the seat belts, pull the adjustment belt toward you until the required tightening force is achieved.
Attention! Adjust the seat belts so that they fit snugly without constricting your child's body.
ISOFix system
The Isofix system is an American system for securely attaching a car seat directly to the body. This provides maximum protection for the baby.
Isofix mount in car
Installation instructions are simple: just connect the appropriate locks on the chair with the steel hinges of the car seat. For additional protection, a tie strap is used, since the brackets only secure the frame at the bottom.
Sources
- https://mycary.ru/how/tips/detskoe-kreslo-ustanovka-avto.html
- https://nahybride.ru/salon/ustanovka-avtokresla-v-mashinu
- https://o-krohe.ru/avtokreslo/kak-krepit/
- https://AvtoKart.ru/diagnostika-i-remont/ustanovka-detskogo-avtokresla.html
- https://AvtoTachki.com/kak-ustanovit-detskoe-kreslo/
- https://autodvig.com/diagnostics/kak-krepit-detskoe-kreslo-17683/
- https://1gai.ru/baza-znaniy/sovety/516906-kak-ustanovit-detskoe-kreslo.html
- https://carnovato.ru/kak-ustanovit-detskoe-kreslo/
- https://pricep-vlg.ru/instruktsii/kak-ustanovit-detskoe-kreslo/
- https://AutoLions.ru/sovety/kak-krepit-avtokreslo.html
- https://www.akusherstvo.ru/guide/kak-pravilno-ustanovit-avtokreslo/
- https://HyperAuto.ru/articles/poleznaya-informaciya/pravilnaya-ustanovka-detskogo-kresla/
Height of shoulder straps.
Always ensure that the shoulder harness is at the correct height for your child. The shoulder straps should be positioned in the holes at or slightly above the height of the child's shoulders.
To change the height of the shoulder straps, follow these steps:
- Loosen the belt tension before adjusting the headrest.
- Pull the handle on the back of the car seat to freely adjust the height of the straps.
- Choose a position that is appropriate for your child's shoulder height.
- Move the handle to this position and release, making sure that it is firmly seated in the appropriate slot.
How to stretch a boot top at home
Shoes are a sensitive topic for most people. Even if we leave aside its unimaginable high cost, another depressing factor remains unchanged: the limited number of patterns on which it is sewn.
There are very few people whose legs fully correspond to the average standards. And it is especially problematic to buy suitable boots with high tops. Even if they fit the size of the foot and in the lower third of the top, it is not a fact that they will fasten all the way.
You can try on dozens of pairs and still not find one that suits your feet. It is not surprising that the search for ways to stretch the boot top at home is so popular: you need to walk in something! And men like full calves, but not shoemakers.
note
So ladies have to look for a way out of the situation so as not to be left barefoot in winter - very few people still like felt boots.
When asked whether it is possible to stretch the boot top, we will immediately answer: yes! However, you should not count on the fact that you can make a real bell out of a pencil boot. The material used to make shoes is not highly elastic. Trying to stretch it further will only lead to the seam coming apart. When estimating your chances of success, you need to be guided by two considerations.
- If the zipper on the boot comes together, albeit with difficulty and on a stretched leg, you can easily take the pair you like: it will stretch to the desired fullness. There is a little more doubt if the lightning did not reach the top by a centimeter and a half. But if it is only fastened halfway, put it aside. Your experiments will fail.
- Immediately give up the idea of shoes made of leatherette, since it is unrealistic to stretch the top of a boot at home using it. The material is more likely to crack or deform than to agree to change slightly.
And get ready for quite lengthy shoemaking procedures: the process will not be quick.
This is the simplest method of how to stretch a boot top at home. However, it only applies to a limited range of shoes. The leather on boots should not be thin - this is it. The material should not be varnished - that's two. The method is not suitable for huskies - that's three. If all conditions are met, we proceed according to the following algorithm.
- The boot is unfastened and placed on the ironing board as evenly as possible.
- The flannel is well wetted and wrung out so that water does not drip, but the rag is wet, not damp.
- The iron is heated to medium temperature, and the boot is steamed through the fabric.
- When the skin becomes soft and moist, the bootleg is pulled to the sides in the right place. The desired dimensions are measured in advance. You can even just make marks on the board to which you need to reach the boot.
No jerks, just uniformity and persistence! If the boot starts to dry out and tan ahead of time, steaming is repeated. When the goal is achieved, the zipper is zipped, paper is stuffed tightly inside (to prevent shrinkage), and the shoes are left away from the batteries until completely dry.
For more delicate materials, another way has been invented to stretch winter boots at the top. It is not suitable for leatherette and rubber. The bottom of the boot, which will not stretch, is stuffed with newspapers so that it does not become deformed.
A thick polyethylene bag is placed at the top, into which water is poured. Its volume should correspond to the current thickness of the boot. The air is released from the bag, but it is tied so that there is free space inside. The boot hides in the freezer overnight.
The water will expand and stretch the boot. If it turns out that the volume is still insufficient, the process is repeated. The technique is especially good if you need to stretch suede boots: no external influence, which usually leaves stains on the material.
Just make sure the freezer is clean. Better yet, to be sure, cover it with clean, dry cloth.
The exact opposite option of how to stretch a boot top at home: now we will use increased temperature. The method can be called a softened version of the very first one. Suitable for any natural materials, but heavier for the owner of boots.
Stubborn shoes are pulled onto your feet with difficulty and creaking. Moreover, you need to wear thick socks underneath, which will hold back the shrinkage a little later. In places where the boot does not fit well, it is diligently, for at least half an hour, warmed up with a hair dryer turned on at maximum.
Important
Afterwards, the owner of the shoes must walk in them until the boots cool down. It is advisable to actively move while doing this, this will help the boot to take the shape as close as possible to your leg.
If your leather or suede boots are not fastened all the way the first time, after cooling, the zipper is brought all the way and the manipulations are repeated.
The following technique can also help in the case of stretching artificial leather shoes. You will need vodka (pure, without any additives like birch buds or quail eggs) or medical alcohol. The latter will need to be diluted to 70 percent strength. In a more concentrated form, alcohol can damage natural materials.
Some masters use vinegar essence. However, in addition to a sharp and persistent odor, it can discolor the surface. Suede is especially vulnerable in this regard - even its structure can be damaged. The required areas are generously sprayed or coated generously with the solution. It is advisable that it does not fall on non-stretchable areas.
Alcohol evaporates very quickly, so it is better to carry out the procedure with boots already on, with the participation of a sympathetic family member. And, again, thick socks should be worn underneath. To consolidate the effect, you need to walk in shoes for half an hour (more is better, but not necessary, since the alcohol will have time to evaporate during this time).
If necessary, you can repeat the process tomorrow.
We left them for last for several reasons. Firstly, they will extract more funds from the budget. Secondly, you need to take their composition extremely seriously and read the instructions carefully: they may have a narrowly targeted effect and will not suit your shoe material.
Thirdly, most of them are toxic, and can only be used on the balcony (which is not good for you or your boots). Finally, they need to be tested first in an inconspicuous area as they can cause discoloration and warping.
If you decide to resort to this method of how to stretch the top of leather boots, it will be enough to buy a suitable spray and follow the manufacturer’s instructions.
It’s one thing if you’re just buying boots - you can refuse to purchase them even before going to the checkout if you can’t fasten them.
Advice
However, what if your calves have gained weight (for example, due to pregnancy), and your boots are new, expensive and beloved? If none of the suggested recipes for how to stretch a boot top at home helped, go to a shoemaker.
Long tops can be cut, an elastic wedge can be inserted, and cuffs can be made. Choose an option that suits your tastes and money and don’t give up on comfortable boots!
Source: https://worknet-3.ru/obuv/kak-rastyanut-golenishhe-sapoga-v-domashnix-usloviyax
Removing the seat belts
- Loosen the seat belt tension.
- Remove the shoulder straps and shoulder pad straps from the connecting brackets as shown in the illustration.
- Pull the shoulder straps out of the corresponding holes in the backrest and then out of the holes located on the bottom of the car seat.
- Recline the car seat to the maximum angle (position 4). At the front, under the seat, you will see a metal buckle that prevents the center strap from jumping out.
- Pass the buckle sideways through the holes as shown in the picture to remove the straps.
Where to attach a car seat in a car for a child?
Features of securing a car seat primarily depend on the age of the baby.
- Group 0 and 0+ is also a car seat ; it is mounted in front, against the direction of the car. The fastening system is Isofix, or stationary car belts. In this case, the airbag must be switched off.
Correct fastening
- For other groups, the correct installation point is the rear seat.
There are 3 options for installing a car seat: behind the driver's seat, behind the passenger seat, in the middle.
- The third option is a universal method, used up to the age of three. is surrounded on all sides , which in the event of an accident will take the impact and protect the baby. In addition, adults can be located next to the baby, even on both sides, which will allow them to observe him, entertain him and pay attention - at this age it is still difficult for a child to remain alone with himself for a long time.
- When the seat is located on the passenger side, the child is also in a fairly safe zone ; he is in danger only if he is hit on the right side, which does not happen so often. Suitable for groups 1 and 2. An adult can also sit nearby, but at this age children do not require so much attention; they will willingly occupy themselves with a toy, tablet, or phone. It is convenient to seat a baby in a seat on the sidewalk side, but an adult, who will sit next to him in the back, has to go around the car and sit down from the roadway.
- The option of attaching a seat behind the driver's seat is relevant for older people, groups 2 and 3. Such children are already able to climb onto the seat on their own; adults only need to check that the belts are fastened. Parents calmly sit in front - at this age, children do not require the presence of an adult nearby, but prefer to do without him.
Advantages of the car seat installation location
Installing a group 0+ child restraint
Attention! For children weighing from 0 to 13 kg (group 0+), the car seat is installed rear-facing. Do not install a rear-facing child restraint on a seat with an operational front airbag. This could result in serious injury or death. For group 0+, the child restraint may only be installed in tilt position 4. Any other tilt is prohibited.
- Set the car seat to recline position 4 by pressing the adjustment lever.
- Place the child restraint on the rear-facing vehicle seat, close to the backrest, as shown in the illustration.
- Pass the diagonal belt through guide 4 and secure it to the nearest belt clamp as shown in the illustration. Pass the waist belt through guide 5.
- Fasten your car's seat belt to the buckle.
Attention! The seat belt buckle for an adult passenger must be below the child restraint guide and not rest against it. Any other seat belt buckle position for adults is incorrect. If the user is in any doubt in this regard, it is recommended that the child restraint manufacturer be contacted.
- Place the child in the restraint. Check the height of the headrest and shoulder straps to ensure they are appropriate for your child's height. Make sure the seat belts are not twisted and are taut.
Need for cleaning
A thrifty owner is unlikely to have doubts about whether there is an urgent need to regularly maintain cleanliness in the car. This must be done without fail. Therefore, those owners who try to be neat in everything regularly wash their car seats. You should not refuse to carry out this hygienic procedure, otherwise very soon the car will literally drown in the mud. And this can subsequently lead to a number of unpleasant situations:
- The appearance of a persistent unpleasant odor in the car.
- Stains from food and drinks on carpets and seats. They will appear especially often among those owners who travel with children.
- The appearance of persistent odor or contamination in the case of transportation of specific goods.
- The appearance of dust in the cabin, capable of filling all the cracks in it. As you move, due to the influence of the air flow from the air conditioner or from an open window, all the dust will be spread throughout the cabin, which can ultimately cause allergies.
All of these problems clearly demonstrate why it is so important to clean your car interior regularly. This procedure will make car trips more enjoyable and allow not only the driver, but also his passengers to breathe clean air.
You should not neglect cleaning the chair, as well as the floor and ceiling, especially since there is nothing complicated about it. In any store you can purchase special products that can significantly facilitate this simple procedure.
Installing a Group 1 Child Restraint
Attention! For children weighing from 9 to 18 kg (group 1), the car seat is installed in the direction of travel. For group 1, the child restraint may only be used in recline positions 1, 2 or 3.
- Place the child restraint on the car seat and select the desired recline position. Make sure the back of the car seat fits snugly against the back of the car seat.
- Pass the vehicle's diagonal seat belt through the belt anchor closest to it and the lap belt through guide 3, as shown in the illustration.
- Fasten your car's seat belt to the buckle. Make sure the belt is securely fastened by pulling it upward.
- Place the child in the restraint.
Attention! Check the height of the headrest and shoulder straps to ensure they are appropriate for your child's height. Make sure the seat belts are not twisted and are taut.
To change the angle of the car seat, you need to release the diagonal belt from the locking clip and only then adjust the angle. After selecting the required position, you must repeat the operations of securing the car seat with the car’s seat belts. All operations are performed without the child in the restraint.
How to disassemble a car seat to make it easier to reassemble later?
You need to remove the cover from the child car seat carefully and slowly, without sudden movements. Before removal, you need to carefully look at how the key elements of the product are connected to each other. The seat belts must be removed from bottom to top. After this, you can start removing the covers.
The seat belts are disconnected first. To perform the process correctly, you need to press a special button at the junction of the belts. There is no need to pull them by force or tear them out of the cell without pressing a button - this can damage the structure. After removing the belts, you need to detach the upholstery and liner.
If you quickly and inattentively disassemble the chair, you may encounter the complexity of its subsequent assembly. Often parents forget in what order they disconnected all the elements, and there are no step-by-step instructions from the manufacturer. In this regard, it is recommended that when disassembling elements, record the order on a piece of paper. Just write down the name of the element, numbering the order.
If this is your first time disassembling the car seat, you can take pictures of the process to simplify further assembly. You can also record all the actions on a video camera.
Installing a Group 2 Child Restraint
Attention! For children weighing from 15 to 25 kg (group 2), the car seat is installed in the direction of travel. The car seat's own seat belts must be removed before use. For group II, the child restraint may only be used in recline position 1, 2 or 3.
- Place the child restraint on the car seat and select the desired recline position. Make sure the back of the car seat fits snugly against the back of the car seat.
- Place the child in a child restraint.
- Fasten the seat belt to the buckle by pulling the diagonal belt through the nearest guide 2 and the lap belt through guides 1 on both sides of the car seat.
Attention! Check the height of the headrest and shoulder straps to ensure they are appropriate for your child's height. Make sure the seat belts are not twisted and are taut.
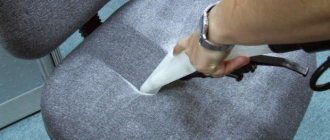
The need to wash the product
Cleaning a child's car seat should be carried out on a regular basis, because a dirty object in the car interior not only looks sloppy, but also accumulates a huge number of pathogens. The fact that the car seat is intended for a child says a lot: there will be crumbs, stains from spilled drinks, and sand from the baby’s clothes. All this together forms an excellent environment for the proliferation of bacteria, which can serve as carriers of dangerous diseases. This is why regular cleaning of car seats is necessary.
Care and maintenance
Removing the car seat cover
- Remove the padding and the car seat's own harness, including the leg divider.
- The cover can now be removed. To put on the cover, repeat all removal steps in reverse order.
Attention! The child restraint should not be used without a cover. Do not replace the child restraint cover with one not approved by the manufacturer.
- Wash the cover only by hand at a temperature not exceeding 30°C
- Do not use caustic or aggressive detergents
- Do not bleach
- Don't push
- Don't iron
- It is recommended to dry in the shade
- Wipe plastic parts with a damp cloth and soap.
Actions before cleaning
Before assembling a child seat for a car after washing, you need to familiarize yourself with the design features and remove the cover without damaging individual small parts and fasteners.
During operation, a large amount of dust accumulates on the surface of soft parts and belts and other contaminants appear. This can cause an allergic reaction in the baby.
Removing the case and straps is quite simple, but returning all the components to their places is not always possible. Therefore, some parents refuse to wash and are content with only superficial wet cleaning. However, such treatment is not enough to eliminate severe contamination and maintain the health of the little user at the proper level.
Before washing, you should carefully study the instructions, which provide clear instructions and describe the procedure for:
- with disassembling the device;
- removing the cover;
- belts
Some manufacturers do not care about the presence of this description, and therefore parents should write down or take step-by-step photographs before the first wash to remember the sequence of attaching individual parts. It is important to return all components to their previous position in strict sequence, otherwise there will be no reliable fixation of the small passenger in the seat for transporting him.