Rolls from paper towels or toilet paper rolls can be used to create unusual and useful crafts. To work with cardboard tubes, you need to choose the right tools, as well as consider several step-by-step instructions describing various ideas.
Crafts from toilet paper rolls
Little Mermaids
You will need: 2 toilet rolls, colored paper, scissors, paints, glue, markers and glitter.
Master Class
- Paint the bushings a tan beige color.
- Draw a face for the little mermaids.
- Cut out of colored paper: strips for hair, blanks for a bra, a skirt, a starfish to decorate the head and a mermaid tail, as shown in the image.
- Curl the hair strips using a felt-tip pen.
- Glue the cut pieces to the bushings.
- Decorate the mermaid's tail with glitter.
Mermaids made from bushings are ready!
Animal dolls
Some crafts can serve not only an entertaining function, but also, in some way, an educational one. For example, if your little one has just begun to learn about the animal world, then together with him you can make animals from toilet rolls.
Thanks to this, your baby will not only learn the names of animals, but will also begin to develop his creative abilities, and will also spend time with you. Create lions, hedgehogs, cats. In general, anyone you want. Detailed instructions for creating them exist on any art servers.
Organizer for rubber bands
You will need: a sleeve, fabric, a glue gun, a plastic cap with the diameter of the sleeve, 4 push pins.
Master Class
- Cover the sleeve with fabric, leaving one circle open.
- Cut out a circle of fabric and glue it onto the plastic lid.
- Insert 4 push pins as legs to make the organizer stable.
The organizer for rubber bands from the sleeve is ready!
DIY.ORGANIZER with UNICORN.Do-it-yourself ideas from sleeves/How to make organizer.Hand made.
Soften cane sugar with a damp towel
food-hacks
Cane brown sugar becomes rock hard over time. An old life hack is to put a piece of apple or bread in a container with sugar for a couple of days so that the moisture contained in the food is transferred to the pieces of sugar.
But if you don’t want to wait, you can cover the container with sugar with a damp paper towel and put it in the microwave for 20–30 seconds. The sugar will become softer.
Hare binoculars
You will need: 2 bushings, cotton wool, glue, thick mega-fluffy chenille wire, pink pompom.
Master Class
- Glue the 2 bushings together.
- Roll out many cotton balls of approximately the same size.
- Glue cotton balls onto the sleeves.
- Form the bunny's ears out of fluffy wire, then glue them on.
- Glue a pink pom pom between the sleeves as a spout.
The hare binoculars made from bushings are ready! I recommend watching this video!
DIY crafts: PHONE HOLDER from toilet paper rolls – Innova Crafts
Teenage Mutant Ninja Turtles
You will need: 2 bushings (for one turtle), scissors, glue, clothespins, black marker, green and yellow paints, painting sponge, colored paper, decorative eyes.
Master Class
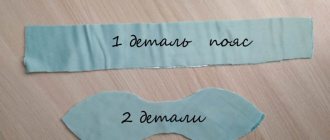
- Cut strips of colored paper and make a belt as shown in the image.
- Cut out a strip of colored paper that will later become a blindfold.
- Cut off part of the sleeve, shortening it slightly, then cut off the corners and shape it into a shell.
- Paint the front side of the shell yellow and the back side green.
- Draw abs cubes with a black marker on the yellow side and diamond shapes on the green side.
- Vertically cut off part of the sleeve, glue the edges to make the sleeve narrower, then secure with clothespins until completely dry.
- Remove the clothespins and paint them green.
- Apply glue to the inside of the shell and glue the narrow sleeve.
- Cut out a blindfold from colored paper and glue it on, securing it with a clothespin.
- Glue the belt.
- Make and attach the head as shown in the image.
- Glue on the turtle's eyes.
- Make a whole team of Ninja Turtles the same way.
Ninja Turtles made from bushings are ready!
Various buildings
Bushings are also an excellent material for “constructing” houses, castles and even entire cities. The most spectacular building, of course, will be the castle.
You can easily find photos of such a craft made from bushings on the Internet. And so, you just need to build several pyramids of different lengths and give them some kind of ancient design, even brick will do.
Next, draw or cut out windows somewhere, make teeth on the edges somewhere, and attach flags in some places. Everything depends purely on your imagination and capabilities.
Llamas
You will need: bushings, colored cardboard, scissors, glue, paints, brush, black marker or felt-tip pen.
Master Class
- Paint the bushing with red paint and wait until it dries.
- Paint the rug with white paint and leave to dry.
- Draw the body and legs of the llama on red cardstock, then cut them out. For the toy to be stable, the legs must be in a U shape.
- Draw eyes and other small details with a black marker as shown in the image.
- Make a cut on the body of the llama and glue it to the sleeve.
- Glue the tabs to the bottom of the sleeve.
- Make llamas of different colors in the same way.
The bushing llamas are ready!
Musical instruments
You can build your own musical instruments, or, more precisely, musical equipment: a microphone or create “the sound of rain.”
It’s easy to make a microphone, first – take and pull out an egg, dry it and cover it with dark varnish and, thanks to glue, attach it to the sleeve.
To create noise (which will resemble rain), you need to close the passage in the sleeve and pour in any cereal - rice, buckwheat, small pasta and close the other hole. Now everything is ready.
- Liquid wallpaper. What do they need?
- Nickel-cadmium batteries. What do you need to know about them?
- Bathroom tiles. What is it like?
Unicorn
You will need: a sleeve, colored paper, scissors, glue, glitter and colored cardboard, rainbow colored yarn, black marker, pink lipstick or pink pencil.
Master Class
- Cover the sleeve with colored paper.
- Wrap different colors of yarn around 3-4 fingers, then cut and shape into a mane and tail.
- Glue the mane and tail to the sleeve.
- Cut a triangle out of glitter cardstock and glue it on as a horn.
- Make ears from triangles of different colors and sizes, as shown in the photo.
- Glue the ears next to the horn.
- Draw eyes and eyelashes with a black marker.
- Draw on the cheeks with pink fondant.
The unicorn from the sleeve is ready!
How to make a unicorn organizer | DIY Organizer from a Sleeve
Tools for making crafts from paper towel rolls
The table lists the tools and materials needed to create crafts from cardboard tubes, as well as their purpose.
| Purpose | Names of tools and materials |
| Cutting cardboard tubes | Scissors, stationery knife |
| Punching holes | Awl, hole punch |
| Gluing parts together | PVA glue, tape |
| Fixing jewelry | Glue "Moment", hot glue in a gun, glue stick |
The list of tools may vary depending on the idea of the craft.
Cardboard tubes can be painted in different colors. It is advisable to choose paints that will not stain your hands after drying, for example, acrylic. They can also be covered with colored paper, scrapbooking sheets and painted with felt-tip pens or pencils.
Any materials are suitable as decorations. These can be rhinestones, sparkles, beads. You can use foil, satin ribbons, lace, thread trimmings, and so on. The step-by-step instructions presented in the article will list additional materials and tools that may be required for the job.
Dog puppet
You will need: 3 bushings, a simple pencil, scissors, soft wire, rope, decorative eyes, colored paper, glue gun, wine cork, 2 wooden sticks, paints, a brush, a piece of foam.
Master Class
- Paint the 3 bushings brown and leave to dry.
- Draw 10 small circles and 2 larger circles on construction paper, then cut them out.
- Take the bushing and make 4 holes for the paws.
- Glue 10 circles onto the sleeve.
- Prepare 2 pieces of rope and thread them through the paw holes as shown in the image.
- Make 2 more holes opposite the paws and thread the rope.
- Take the second sleeve, cut off the third piece and set it aside.
- Make the dog's head: Take a large piece of the cut sleeve and make 2 holes in the top opposite each other.
- Measure the distance where the head will be, tie a knot and attach the head by threading a rope.
- Wrap 2 wooden sticks with soft wire and connect them together to form a cross.
- Glue the cross to the ropes.
- Glue 2 blue circles and decorative eyes on top of them.
- Cut ears from the third sleeve and glue them on.
- Glue on a small piece of foam for the nose.
- Screw in the small piece of sleeve that you cut off earlier and glue it in as a tongue.
- Cut the wine cork into 4 parts, make a hole in the center, paint it black and wait for it to dry.
- Attach cork blanks as paws by threading ropes through the holes and securing with knots.
The puppet made from bushings is ready!
Princess Outfit
How to distinguish a real Princess from an ordinary girl? Of course, according to the crown! We take a roller, cut out the edges with jagged edges, paint it with gold paint, decorate it with “precious” stones and attach an elastic band so that the crown does not accidentally fall off during the ball. You can complete your Princess look with gorgeous bracelets made from paper towel rolls.
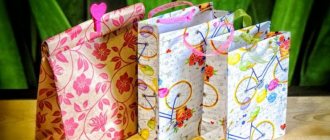
They say theater begins with a hanger. And the gift comes from the packaging. Especially if the gift is very small.
Rainbow
You will need: a sleeve, white paper, corrugated paper in rainbow colors, scissors, glue, hole punch, rope, blue paint, brush, black marker, pink pencil.
Master Class
- Paint the bushing blue and leave to dry.
- Punch 2 holes opposite each other with a hole punch.
- Thread the string through the hole and tie a knot.
- Cut out a cloud from white paper.
- Draw eyes, eyelashes and a mouth on the cloud with a black marker.
- Highlight the cheeks of the cloud with a pink pencil.
- Glue the cloud to the sleeve.
- Cut the corrugated paper into strips.
- Glue rainbow stripes to the inside of the sleeve.
The rainbow from the sleeve is ready!
Store greens in a damp towel
vegetariantimes.com
Herbs, unlike lettuce, do not rot, but dry out too quickly. And if fresh herbs can change the taste of a dish in the desired direction, then dried twigs do not give such an effect.
If you're unsure when using mint, dill, or thyme, wrap the sprigs in a damp paper towel and refrigerate. This will extend the shelf life of the greens by several days. If you briefly soak your greens in a bowl of water before packing, you can also expect long-lasting freshness.
Sweet monsters
You will need: bushings, paints, sponges or brushes, regular and curly scissors, glue gun, black marker, decorative eyes, multi-colored tape, soft wire, bags of candy, ribbons.
Master Class
- Use your imagination and decide on the type of monsters.
- Take the bushings and cut out the mouth holes and the shaped edge of the head.
- Paint the bushings bright colors and leave to dry.
- Glue soft wire and decorative eyes.
- Decorate the monsters with strips of tape.
- Place a bag of candy inside each sleeve and tie with a ribbon.
Candy monsters made from bushings are ready! I recommend watching the video: how to make a miniature watermelon box)
DIY Miniature Water Melon Gift Box | Toilet Paper Roll Craft Ideas for Kids on Box Yourself
Wrap lettuce leaves in a dry towel
eating-made-easy.com
What could be worse than watching a recently purchased salad turn yellow and wilted, or worse, turn black and rot before it can be eaten? With a paper towel, you won't have to worry about how to keep the leaves fresh.
Wrap the salad in a dry paper towel and place in a bag. The towel will absorb excess moisture, which causes the leaves to spoil prematurely.
Bee
You will need: sleeve, colored paper, scissors, glue, black marker, self-adhesive eyes.
Master Class
- Cover the sleeve with yellow paper.
- Cut strips of black paper, then glue them on.
- Cut out the wings from blue paper, then glue them on.
- Attach self-adhesive eyes and draw a mouth with a marker.
- Glue 2 black stripes to the top of the sleeve.
The bee from the sleeve is ready!
Air toys made of cardboard
You need to take the sleeve and glue it over it, or better yet, paint it with colored pencils; if it is a fish, it will look like scales, and the tail will sway in the wind, you can make it out of fabric, you need to cut it into strips.
Be sure to tie the toy to a stick and take it for a walk with your child so that he can run with it against the wind.
Octopus
You will need: sleeve, orange paper, felt-tip pen, glue, scissors, self-adhesive eyes.
Master Class
- Cut 8 strips of the same size from orange paper.
- Twist them using a felt-tip pen.
- Cover the sleeve with orange paper.
- Glue the twisted strips inside the sleeve around the circumference.
- Glue the eyes and draw a smile on the octopus.
The octopus from the sleeve is ready!
Superheroes
This one is more suitable for boys. They can create their own heroes from cardboard. Here's what we need: cardboard tubes (taken from toilet paper), colorful paper, straws (for juice), they will make wonderful swords, and most of all we need the baby's interest.
We recommend: Crafts from plastic bottles - 105 photos of options for using unnecessary bottles
Organizer for office supplies
You will need: bushings, plastic board, colored paper, scissors, glue, rhinestones.
Master Class
- Place the sleeves on the plastic board the way you want the organizer to look.
- Cut the length of some bushings.
- Cover the bushings with colored paper.
- Decorate each sleeve to your taste by gluing rhinestones.
- Glue the sleeves to a plastic board to form an organizer.
- Fill your organizer with office supplies.
The stationery organizer made from a sleeve is ready! I recommend watching this video!
DIY. Budget DIY office stationery organizer. Desktop organization.
Heroes of fairy tales made from cardboard tubes
Take out the toilet paper roll, because this is the basis of one of the crafts. Everything that needs to be completed: arms, legs, ears, eyes - this can be easily done with multi-colored paper, fabric or even felt-tip pens.
Christmas tree
You will need: toilet paper or paper towel rolls, scissors, glue gun, paint, sponge, decorative elements - shiny ribbon, rhinestones, sequins...
Master Class
- Cut the bushings as shown in Image 1.
- Paint 4 blanks with green paint and the bottom part with brown. Then leave to dry.
- Glue the blanks together to form a Christmas tree.
- Cut the ribbon into pieces and glue them in a zigzag pattern to the tree.
- Glue sequins and rhinestones.
The Christmas tree made from bushings is ready!
Packaging for USB cables and charging
You can also use paper sleeves to conveniently store phone chargers and cords. Using additional fittings (Velcro for fastening), you can make a closing ring with volume regulation.
Note!
- How to make a rose from paper - the best ideas for DIY crafts + master classes on creating a rose from paper (160 photos)
- Craft letter - TOP 120 photo reviews of craft letter. Simple diagrams + step-by-step DIY instructions
Crafts made from nut shells: the best step-by-step master classes on creating DIY crafts with photo examples of finished works
Snowmen
You will need: bushings, felt, glue gun, paints, sponge, decorative eyes, soft wire, buttons, glitter, orange tic-tac, glitter balls.
Master Class
- Paint the bushings with white paint and leave to dry.
- Glue on 3 buttons, eyes and an orange tic-tac for the nose.
- Cut a strip of felt and glue it as a scarf.
- Form a U from soft wire and glue glitter balls as headphones.
- Apply glitter precisely to create a smile.
- Make each snowman unique.
Snowmen made from bushings are ready!
5 DIY IDEAS FROM A SLEEVE. BEST DIY New Year's crafts. What to give for the New Year 2022.
Elements for table setting
You've probably noticed that in expensive restaurants they use not just napkins for table setting, but place them in a special ring-holder for each guest separately. You can make such a beautiful element with your own hands. To do this, cut the roller in half and decorate it with burlap, lace, and decorative flowers.
Firecracker
You will need: bushes, balloons, Christmas tree rain, scissors, wrapping paper, glue, glitter, stickers.
Master Class
- Tie a knot in the ball and cut off the tip.
- Pull the cut portion of the ball tightly onto the sleeve.
- Cover the sleeve with packing paper.
- Decorate the cracker with stickers.
- Cut the Christmas tree rain into confetti and pour 3 tablespoons into the cracker.
- To activate the firecracker: point the empty muzzle upward and pull back the tail of the ball.
The New Year's cracker is ready!
Use a damp paper towel when microwaving
wikihow.com
When you're reheating food or microwaving vegetables, a damp paper towel will help get great results.
A microwave oven acts on the water molecules found in food and thus cooks the food. The water turns into steam, and if this happens too quickly or the food takes a long time to cook, then the microwaved food begins to resemble rubber in consistency.
To prevent this from happening, place a damp paper towel in the food container or wrap it around the cooking vegetables. A great lunch is guaranteed.
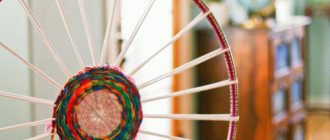
Binoculars
You will need: yellow cellophane, scissors, tape, black paint, brush, green and black paper, glue, rubber band, wine cork, string or elastic band.
Master Class
- Cut out 2 circles of yellow cellophane and tape them to the circumference of the sleeves as binocular lenses.
- Paint the circumference of the wine cork with black paint and cover it with green paper.
- Cover the bushings with green paper and glue the black stripes as shown in the image.
- Glue the bushings together and secure with a rubber band. After a while, remove the rubber band.
- Glue the taped cork between the bushings.
- Prepare an elastic band or rope of the required length, make a hole in the side of the bushings and secure the elastic band.
The binoculars are ready! I recommend watching the first 4 minutes of the video, in it you will see great life hacks with bushings!
40 SIMPLE AND GENIUS RECYCLING IDEAS
Advantages of material selection
The advantages of working with toilet bushings include the following criteria:
- Availability of consumables.
- Ease of working on creating crafts.
- Large selection of various crafts and useful little things.
- No financial costs.
- Working on crafts is a fun activity for children and their parents, which allows them to develop memory, thinking and plot perception.
Cardboard and paper from which the sleeves are made are an excellent basis for subsequent decoration and decoration.