The grill icon on the oven is found on many modern gas stoves. How can I find it and what is this function for? Thanks to a good oven, you can prepare delicious food while preserving its beneficial properties.
But this high-tech type of household appliance has quite a few different operating modes. Aristons and Zanussi, Electroluxes and Samsungs have additional icons. They will point to one function or another.
More than 16 modes - premium
In Gorenje Plus ovens, slow SLOWbake and step-by-step cooking StepbyStep are added to the above-mentioned programs. Models with the HomeChef GP979B and GP979X touch module have preset automatic and professional modes. In the first case, the desired recipe is selected using the display (there are more than 80 of them in the device’s memory); if the user wants to change the cooking parameters, the system will switch to professional mode. The most successful options can be saved using the “My Recipes” function.
What is a grill
All ovens operate on the same principle : hot air circulates inside a closed chamber, under the influence of which food is cooked. This process is called convection.
The grill in the oven is an additional heating element. It is usually located at the top of the device and serves to create a higher temperature. Grilled dishes have a crispy crust, while remaining tender and juicy inside.
Reference. The grill function is available on gas and electric ovens.
At the bottom of the gas oven there is a burner for quickly heating the chamber, and at the top there is a grill . Older gas stoves do not have a convection mode, so the oven door has to be opened to create a slight draft. Modern models, in addition to the built-in fan, are equipped with an additional device - a spit. This device allows you to fry food evenly on all sides.
In electric ovens, two types of heaters are used to create a grill effect : electric with an electric coil and infrared with a halogen lamp.
Each type of oven has its advantages. Gas is usually cheaper. Electric heats up more evenly, dishes burn less often, and the temperature is more accurately regulated. Therefore, to equip the kitchen, many housewives choose a combined device - a gas stove with an electric oven. Infrared heaters are considered the safest and most economical - they warm up and cool down faster.
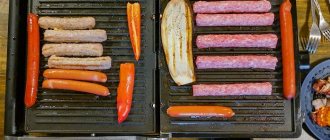
As for the choice of products, there are no restrictions : everything that is grilled outdoors can be put in the home oven.
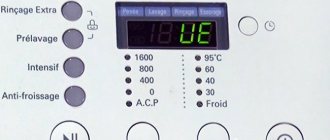
Description of modes and functions of Gorenje ovens
Classic heating (top + bottom)
Temperature - 200°C. The top and bottom heating elements emit heat evenly. Traditional conditions for baking, meat stew. Cooking is only possible on one level.
Heating from above
Temperature - 150°C. For finishing, additional baking of the dish.
Heating from below
Temperature - 160°C. For extra baking on the bottom.
Grill
Temperature - 240°C. The infraheater, that is, the central element of a large grill, is working. For frying small portions of meat, sausages, sandwiches, toast.
Large grill
Temperature - 240°C. Overhead and infraheater included. The heat from above is distributed over the entire surface of the baking sheet/grid. For small cuts of meat, steaks, schnitzels, sausages, sandwiches and toast.
Grill + fan operation
Temperature - 170°C. The upper heating element, infraheater and fan are activated. For grilling large pieces of meat and poultry, it produces a delicious, crispy crust. You can only fry on one level.
Bottom heating + ventilation heating
Temperature - 160-200°C. The bottom, ring heater around the fan and the fan operate simultaneously. Ideal for pizza, as well as juicy pastries, fruit cakes made from yeast or shortcrust pastry and curd cakes.
360° Ventilation Heating
Temperature - 150-190°C. Ring heating element and fan included. For cooking meat and small baked goods on several levels (2 and 3).
Eco cooking
Temperature - 170-210°C. A ring heater and a fan are used. A constant circulation of hot air is created around the dish. Energy consumption is optimized during cooking. Used for cooking meat and baking.
Bottom heating + fan operation
Temperature - 180°C. Bottom heater and fan. For preparing low-rising baked goods and preserving vegetables and fruits. Use the first or second level of guides.
Defrosting
Only the fan works. For gradual thawing of food (meat, fish, cakes, pies, pastries, bread, buns, deep-frozen fruit).
Classic heating + fan operation
The lower and upper heating elements and the fan are turned on at the same time. For preparing any baked goods, defrosting food, drying vegetables and fruits. The best results are achieved when using one level. For two-level cooking, use the 2nd and 4th levels from the bottom.
Steam cleaning AquaClean
Only the bottom heating element works. Pour water into a deep baking tray and place in the oven for 20-30 minutes.
AutoRoast (automatic cooking of meat)
Temperature - 160-210°C. The upper heating element, the infraheater and the ring around the fan operate simultaneously. When cooking meat, the grill is placed on the 3rd level, and a baking tray is placed on the 2nd to collect fat. For frying in a baking sheet or grill pan, the second level of guides is used.
Pyrolytic cleaning
Temperature - up to 460°C. All heating elements work. The door is locked while the program is running. All dirt on the walls of the oven and on the baking sheets burns.
Fast oven heating
It heats up to 200°C in just 6 minutes. This mode is not intended for cooking. Once the required parameters are reached, the function is disabled.
Heating dishes
Temperature - 30-80°C. For warming plates, cups, serving dishes, rising dough, heating, making yoghurt.
StayWarm temperature maintenance
Temperature - 30-95°C. Duration - up to three hours.
Canning
A special program allows you to simplify the process of preserving vegetables for the winter. Glass jars with glass lids and rubber gaskets are used. Not with screw-on or metal lids.
Pour 1 liter of heated water (about 70°C) into a deep baking tray and place six tightly closed jars. It is important that they do not touch each other or the walls of the oven. The baking tray is placed on the 2nd level from below.
The process is complete when the liquid in the jars boils (bubbles appear). The duration of the program for different types of products is indicated in the instructions for the models.
Automatic preparation AUTObake
The AUTObake program contains more than 80 recipes. You need to select the amount of product, the degree of frying or baking and the completion time.
Multiple stages of STEPbake
Gorenje+ ovens can be programmed with up to three consecutive steps.
Operating instructions for Gorenje ovens
The operating instructions for Gorenje ovens will become a faithful adviser and assistant. With its help, you can master all the capabilities of the oven and eliminate errors during its operation.
How to connect a Gorenje oven
It is best to entrust the installation to the service center employees. If their services are not available to you for some reason, and you have experience working with household appliances, you can do it yourself. Keep the power source nearby and do not use extension cords. Before installation, inspect the oven for damage. The door should open without difficulty. Be sure to check that the device fits in size in the niche intended for it. The furniture itself must be heat-resistant and withstand heating temperatures of 100 degrees. If in doubt, it is better to install heat-insulating linings on the walls.
- Prepare the necessary tools: screwdrivers - Phillips and flathead.
- Do not deviate from the installation instructions.
- Leave a technical gap between the back wall and the plane on which the oven will be installed at least 15 mm. And between the back wall of the appliance and the kitchen wall - at least 20 mm. Only this will provide the necessary ventilation. It is needed to prevent equipment and surrounding surfaces from overheating.
- The oven can take its usual place under the countertop, hob or in a column cabinet. Don't cover it with a decorative door.
- Insert the equipment into the niche parallel to the floor, do not tilt it, so as not to damage it and the furniture.
- Check the quality of fastening of the oven to the unit.
- Make sure that the power cords of an oven or other equipment are not in the heating zone.
If a gas oven is selected, its connection must be carried out by a service specialist.
How to turn on the oven
You have already checked the wires for integrity before installation. Now is the time to make sure your oven's voltage and frequency ratings are suitable for your outlet. Compliance with electrical safety measures is very important. If the power source is located some distance away, look for models with a suitable cord length. After turning on the equipment, the sensors on the control panel should light up.
How to use the Gorenje oven
So, the oven is installed and connected. Now open the operating instructions for Gorenje ovens. In any case, let the equipment sit in your home for at least two hours, this will allow it to take on the temperature of the room. Open the door and make sure there are no foreign objects or packaging there. Wash the inside and all baking sheets with warm water and detergent. Then rinse with clean water. During the first warm-up (set it to 180–200 degrees), the factory grease will begin to burn. Therefore there will be a specific smell. Just ventilate the room.
How to set up an oven
You can choose a Gorenje oven with mechanical or electronic control. Selecting a heating mode will allow you to cook quality food. Additional functions: timer with switch-off, alarm clock (without switching off), automatic cleaning, quick warm-up.
How to use oven functions
Models are equipped with two mode options: automatic and semi-automatic. The first will allow you to program the start and end times of baking. A timer is used here. First, set the cooking duration, and then the shutdown time, mode and temperature. When the dish is ready, the oven will beep and turn off. The semi-automatic mode will help you prepare the dish in the required number of minutes or at the specified time (waiting time up to 10 hours).
How to cook in a Gorenje oven
To prepare dishes from different ingredients and weights, you need your own cooking temperature. Therefore, you can choose the usual classic option (heating from above and below). At the same time, the temperature is kept within 180–200 degrees. Then the dish will bake evenly. Do not use stainless steel cookware - it reflects heat. The second option is a grill, a large grill, with or without ventilation, a spit (not available in all models). Here the heating comes from above. Don't forget to place the drip pan down to catch any grease drops. The dish is prepared at a temperature of 240 C. The defrosting mode is interesting. This will allow you to properly defrost the products.
How to clean the oven
There are two options here: the usual “aquaclean” mode and PyroClean pyrolysis.
- The first method is to clean the surfaces with a soft cloth or sponge with a liquid cleaning agent (foams, gels, sprays). Abrasive substances and sponges are strictly prohibited. They can damage the top layer. If the camera itself is heavily soiled, it can be washed with the door removed. But it’s better to prevent this and wash the oven after each use with a damp cloth while the surface is still warm.
- Self-cleaning “aquaclean” is carried out in a special mode using water.
- PyroClean pyrolysis works at temperatures above 400 degrees. During this time, the door is locked to prevent you from getting burned. All existing contaminants, including fatty deposits, turn into ash. When the appliance has cooled down, the door will automatically unlock. And you can wipe off the residue with a cloth.
How to enable self-cleaning
Aquaclean mode. Place the baking sheet on the bottom tier of the oven. Pour 0.6 liters of water into it. Select the desired mode. In this case, set the temperature to 70 degrees. After 30 minutes, the fat will soften, become soft and pliable. And you can wash the oven walls with a damp sponge and dishwashing detergent.
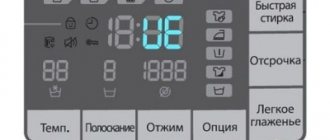
How to set the time on the oven
When turned on, the clock shows 12:00. To set them correctly, press the Menu button. The indicator will flash. Use + and - to select the correct hour and minutes. After five seconds, the function is activated and the indicator stops flashing.
How to turn off the oven
The operating instructions for Gorenje ovens describe the automatic shutdown of the appliance when finishing operation in any mode. After this, a beep will sound. The gas oven is turned off by turning the temperature regulator to position “0”.
How to unlock the oven
Locking the buttons helps ensure that the modes do not go astray during the cooking process. To unlock the oven, hold down the “up” and “down” buttons simultaneously for 5-6 seconds.
Oven errors Gorenje
If the equipment does not work, check the electrical connection and the presence of electricity in the house. The fuses in the distribution panel may have tripped. If this is not the reason, then use the tips below.
Before starting repairs, be sure to disconnect the device from the power supply by unscrewing the fuse or pressing the main switch or removing the plug from the power socket.
Main errors and malfunctions of Gorenje ovens:
- the sensors do not respond, the information on the display does not change - unplug the oven from the power supply for a few minutes (fuse or main switch), then connect it to the power supply again and activate it.
- the lighting does not work - most likely the light bulb needs to be replaced; the replacement algorithm is described in the instruction manual that comes with your device.
- the baked goods were not baked well - perhaps the temperature or heating mode was set incorrectly, or the door was not closed tightly.
- the display shows an error (E1, E2, E3...) - in case of malfunction of the software module, disconnect the device from the power supply for a few minutes (fuse or main switch), then connect it again and set the current time. If the error persists, contact the service center.
- The fuse of the household electrical wiring is constantly switched off - you need to call a service center specialist!
If it is impossible to resolve the malfunction in accordance with the recommendations given, contact the service center.
The warranty does not cover faults associated with improper installation, connection and use of the device. The consumer himself pays the costs of eliminating such faults. Published: 05/20/2021
Which ovens have a grill option?
The grill function is provided in many modern oven models, regardless of their type and manufacturer. Its presence increases the cost of household appliances by approximately 1.5-2 times. In the description of the stove, information about the grill is usually located in the “Ovens” section. From the technical characteristics you can find out what type of grill is used, as well as what additional capabilities it has (presence of convection, spit).
What is a grill in an oven?
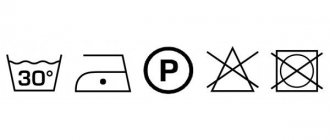
Most oven manufacturers (Gorenje, Ariston, Bosch, Electrolux) use the same icons to indicate the grill and its varieties. Most often it is a zigzag horizontal line, or several inverted triangles. If there is a convection mode, a fan (turbo grill) is added to the line and triangles. If there is a skewer, it is indicated by a horizontal arrow.
Recommendations for installing a kitchen stove
- The materials from which the walls of the cabinets adjacent to the stove are made must withstand temperatures of at least 90°C.
- The device must be leveled to the building level. Thanks to the legs, the height can be adjusted from 850 to 940 mm.
- Some models are equipped with tip-over protection - a special bracket is attached to the wall using screws and dowels.
- The cover is easily inserted into the slots of the latches, follow the instructions.
- The kitchen must have ventilation; the window must be opened for ventilation.
How to connect a gas stove Gorenje
Connection to the main networks of gas appliances is carried out only by service employees who have the appropriate permits. After completion of the work, a corresponding entry is made in the service book.
Gorenje stoves are supplied with a setting for natural gas H or E (20 or 25 mbar) or for liquefied gas (50 or 30 mbar), this is indicated on the nameplate. If the network conditions do not correspond to the settings, the specialist will reconfigure the device to the type of gas used: replace the jets and adjust the flow screws. Please note that after this, the valves and injectors must be sealed and a piece of paper with new parameters pasted over the factory data.
On the right side there is a gas pipe for connection to a gas source with an external thread EN ISO 228-1 or EN 10226-1/-2, also included is an adapter for liquefied gas and a non-metallic gasket (reuse is prohibited, permissible deformation - 25%) .
The connection is made using certified flexible rubber or metal hoses. In the first case, you cannot lay the hose as shown in the figure in position A, so that it is not damaged by heat. Metal can be placed this way.
In order for lighting and electric ignition to function in a gas stove, it must be connected to an electrical network. To do this, the cord is attached to the terminal box, which is located on the back of the device and must be covered with a lid after work.
After connection, the specialist checks all burners, the operation of gas control and electric ignition. The gas should burn with a blue-green flame.
How to unlock the Combustion stove
Locking the hob is possible for induction EIT6351XPD, EIT6341WD, EIT5351WD; to remove the block, you need to press the “key” symbol.
Models with IconLED are equipped with a safety lock function to prevent settings from being changed accidentally, for example by children. To turn it on, you need to press and hold the watch sensor for 5 seconds. “Loc” will appear on the display for 5 seconds.
There are two options:
- If the safety lock is activated and no function other than the current time is set, the oven will not operate.
- If you turn on the lock after setting one of the programmer functions, the oven will work, but it will be impossible to change its operating parameters.
How to connect a Gorenje electric stove
The manufacturer recommends installation with the help of service center employees, only in this case the device will have a 1-year warranty plus a year of service. Make sure that there is a mark on the warranty card.
A three-phase connection is recommended using a 5x1.5 mm connection cable 2 type H05VV-F5G-1.5 (formerly CGLG 5Cx1.5), (fuse 3x16 A).
For single-phase connection, use cable H05VV-F3G-4 (formerly GGLG 3Cx4), (fuse 32 - 40 A depending on type). The ends of the wires are crimped into terminals, secured with screws, and the lid is closed.
How to turn on the stove Combustion
The process of turning it on for the first time is quite simple. Remove the transport packaging and baking sheets from the oven and wipe the surfaces with a damp cloth.
Turn on cast iron burners for 3-5 minutes at maximum power so that they burn, the protective coating forms a durable layer. There is no need to place dishes. When heating for the first time, smoke and the characteristic smell of a new device may appear. The kitchen needs to be ventilated.
Gas burners are turned on by turning the switch. Electric ignition is performed by pressing the handle or button, depending on the model. The thermostat should be in the “Large Flame” position. A spark jumps between the candle and the burner and ignites the gas. Keep the switch pressed for approximately 5 seconds to allow the flame to stabilize. If after 15 seconds the gas does not ignite, then turn the knob to 0 and wait at least 1 minute. Then repeat.
The heating zones of glass-ceramic stove models are turned on by turning the regulator. There is no need to warm them up; you can immediately place the dishes and cook.
The induction model EIT6351XPD is equipped with recessed switches to control the oven. On the hob there is a touch control panel, where the heating is set by pressing + and -.
How to set the time on a Gorenje stove
In addition to mechanical timers with an alert function in Combustion stoves, there are several types of programmers:
- Electronic gas
- Electronic with analog display in the Classico series
- Electronic with buttons in the Infinity series
- Touch programmer IconLED
How to set the time on an electronic programmer: after connecting to the network, the numbers 0:00 and the S3 indicator will flash on the display. You need to simultaneously press buttons 2 and 3, then + and - set the time. The S1 indicator will light up, which means that the device is operating in manual mode.
How to set the clock on a programmer with an analog display: all functions are selected by pressing button A, each of which is accompanied by a sound signal. A value, such as time, is set by rotating this button. The indicator for the selected function flashes on the display. The selection is confirmed by pressing again.
On the IconLED, the clock is adjusted by pressing the arrows. After a power outage, the parameters will need to be set again. If you want to change the time, press the watch sensor.
How to disassemble the stove Combustion
Of course, it is prohibited to disassemble the device; this may affect its functionality, not to mention the fact that the operation of faulty equipment can lead to a breakdown of the electrical network or a gas leak. But you can remove the parts for cleaning and replace the oven light bulb yourself. Just unscrew the lamp cover.
Possible replacement (look at the markings on the nameplate):
- Halogen bulb: G9, 25 W, 230 V.
- Regular light bulb: E14, 25 W, 230 V.
For cleaning, the inner glass of the door or the entire door is removed.
- Open the sash completely.
- With a standard hinge, open the latches completely. With GentleClose - 90°.
- Slowly close the door, lift it up and remove it from the hinge slots.
- To remove the inner glass, you need to lift the latches, lift it by the bottom edge and slide it out. In some models, the fastening is made using screws; they can be unscrewed.
- Install in the reverse order, making sure that the latches are completely closed, otherwise the powerful spring may forcefully slam the door shut.
In some models, you can remove the container for storing dishes; it is removed like a regular box from a cabinet. To put it back, you need to get the runner into the guide; if the runners are equipped with wheels, then this is even easier.