Home / Useful little things / How to upgrade CISS in Canon and Epson printers. How to remove air from CISS. Rules for using CISS
09.11.2014 Useful little things 38
An eternal problem for owners of inkjet printers with CISS is air in the tubes, because... The printer has not been used for a long time or the system has not been refilled with ink on time. Often these are Epson and Canon, because... It is on the printers of these manufacturers that users most often install the Continuous Ink Supply System for economical and hassle-free printing. But this printing does not always become so; if you treat this device carelessly and without care, then printer repair is inevitable!
Causes of blockages
Most often, the print head does not want to work properly:
After a long period of inactivity
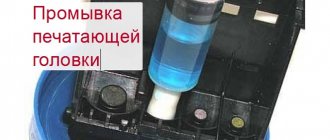
When the ink has simply dried out. In this case, several sessions of cleaning the nozzles through the printer utility program can help. If cleaning twice does not help, use the “Deep cleaning” function; you can repeat it after a day. Didn't help again? This means the problem is much more serious and may require flushing.
Due to mixing of incompatible paints
Burnt out nozzles
Water-based and pigment inks categorically do not want to cooperate, they curl up, give sediment, and quickly clog the nozzles. It’s good if you noticed the problem in time and the nozzles did not have time to burn out. Also, paint of the same type from different manufacturers may be incompatible. Ideally, ink tanks should be refilled with the same consumables. Some experts even advise not to print with new original cartridges if you are going to refill them later, but to immediately rinse and refill with the exact ink that will always be used.
As a result of printing with an empty cartridge
Carefully monitor the condition of the ink tanks, refill them on time, as printing with leftover ink quickly damages the ink tank. First, the nozzles become clogged, and then, if you do not pay attention to the print quality in a timely manner, the nozzles burn out. Here, washing will not help; such a head cannot be restored.
Universal filling platform (clip) for pumping cartridges
535.00 rub.
Buy The disadvantage of this method is the high consumption of ink, because... Not all colors are filled evenly.
Photo 7
How to bleed CISS in Canon printers, where the print head is separate from the cartridges
I do this in two ways:
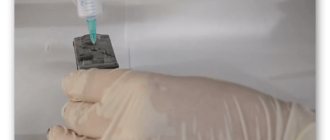
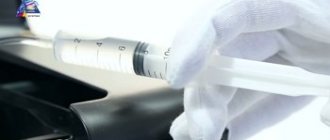
1. As in the previous case, I fill the cartridges, fill the ink cable with ink, connect one to the other, and install it back into the printer.
2. The second method is probably for the lazy, but you need to get the hang of it, the point is that you raise the ink containers above the cartridges by about 20cm. and the ink begins to flow by gravity into the cartridge. But because The cartridges are not always filled evenly, so you have to cover the outlet holes of the cartridges with something, often your fingers :)
In conclusion, I note that the CISS works stably with fresh ink and when it is sealed, if this is not the case, then there will always be air in the tubes and any other problems with print quality.
Approach any task wisely and everything will work out for you!
In this article, I tried to share as much of my knowledge in this area as possible with the hope that someone will be able to help in this delicate and sometimes difficult matter. The article will most likely be supplemented with pictures and videos, so come back often :)
I will be glad to receive your comments, and don’t be lazy to share the article on social media. networks by clicking the special buttons below!
You can repair or update your printer in Simferopol at the service center on the street. Starozenitnaya, 9 (entrance from the fence). Please contact us during business hours from 9.00-18.00 at +7 (978) 797-66-90
Don't forget to rate the post and share it with your friends on social networks by clicking the special buttons below. Don't forget to leave a comment and subscribe to our Youtube
Save
Save
Rate this article:
(
29 ratings, average: 4.28 out of 5)
Share with friends:
Related posts:
Where is fuse F1 or F2, F3 located in an Epson printer? SMD marking is pre...
Compatibility of Epson print heads and their part number
Waste ink drain outlet for Epson L210, L222, L350, L355, XP-406, XP-313, ...
How to upgrade CISS in Epson L100, L110, L200, L210, L300, L350, L355, L550, L555,…
USB Debug for restoring Samsung, Xerox, Dell printers.
Recommended products:
- In stock
Code: 00024
How to remove the print head
Canon iP3600 Print Head Lock
Open the cover while the printer is turned on to allow the carriage to move out of the parking space. Turn off the printer. Remove the cartridges. The print head is clearly visible, but it is too early to remove it.
In different printer models, the latch holding the PG looks different, although the principle of operation is the same in almost all models. On the right side there is a lever, or the frame has a certain shape. You need to lift it up.
The MG5440 model has a slightly different principle. The latch here is a bar with the image of ink colors, which does not rise up: you need to pull it towards you until it clicks. Now the PG is free, tilt it forward and carefully remove it from the printer.
Why reset the diaper at all?
In Canon PIXMA household inkjet printers, the likelihood of an error associated with absorber overfilling is not high. To do this, you need to print a lot and often, so one of the printer parts (most often the print head) is more likely to fail. Although the physical fullness of the “diaper” does not always coincide with the meter readings, this does not mean that you can forget about the latter. If the waste cartridge is actually overfilled, ink may leak and cause the printer to fail. In addition, any manipulations with the service mode and reset of counters lead to loss of warranty on the device. First, think carefully about whether it's worth it.
On a number of printers, the “diaper” reset only works BEFORE error 5B00 occurs. Fortunately, the Service Tool displays the meter readings and you can check them in advance.
Software cleaning
Epson, HP, Canon nozzle test We recommend performing this before starting any actions with the cartridge.
The simplest and most accessible way to clean the head on any personal computer is special software. It is supplied by the equipment manufacturer and installed on the PC when connecting and setting up a printing device. It is recommended to use the software method before starting more complex manual physical influence.
To use this program and perform cleaning, follow the instructions:
- Open the “Devices and Printers” tab through the “Start” button and “Control Panel”.
- Find your printing device in the list.
- From the context menu, select Printer Properties.
- On the tabs at the top of the window that opens, find “Maintenance” or “Service”, depending on the manufacturer and model, the names may be different.
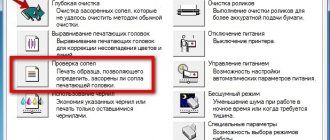
- Click on the "Print Head Cleaning" button or the "Deep Cleaning" option. You can carry out the procedure several times.
- Print a nozzle check sheet or any color picture to see the result.
If after 3-4 times of cleaning the print quality remains at the same level, then the only solution to the problem will be manual mechanical washing of the print head.