Few owners of washing machines understand their architecture and design. In most cases, the owner of household appliances does not ask questions about the principles of its operation as long as it works successfully. As soon as the car breaks down, such owners call repairmen or take the equipment to a service center where professionals take care of it. However, not in all cases the costs of the services of specialists are justified. The pressure switch of a washing machine is one of the vulnerable components. If it malfunctions, it is quite possible to check and replace the device on your own. To do this, you must first study how this device works and what it is.
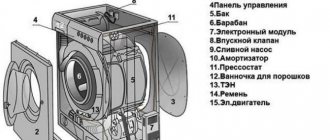
Before opening the pressure switch
After detecting a malfunction in the system, it is necessary to understand whether the pressure switch was really the cause. Carefully inspect the filling system, examine the hose and fitting of the water intake sensor, its transition chamber. The inspected elements should not contain:
- abrasions, tears;
- deposits from laundry detergents.
If you find dried detergent on the parts, be sure to rinse the components and try to start the machine again. Perhaps these measures will help restore the functionality of the pressure switch.
Next, you should check the stability of the connection of the power supply wiring to the sensor. Perhaps a wire has become frayed or bent. If a defect is found, fix it and check the washer for functionality.
And finally, it is necessary to inspect the contacts of the pressure switch; if they are dirty, they should be cleaned. Then start checking the water intake sensor. For diagnostics, you will need a tube with a diameter similar to the permanent sensor hose. One end of the tube will have to be put on the inlet fitting of the device, and lightly blow into the free second hole. When the sensor is working properly, it makes a clicking sound. If after such a check no problems were found, it is necessary to disassemble the pressure switch.
Preliminary actions
As soon as you discover a malfunction, you should understand whether the reason actually lies in the part that controls the water level. It is necessary to carefully inspect the water intake system, check the sleeve and fitting of the water intake sensor, and the transition chamber section. When inspecting these parts, you should not find any tears or abrasions, as well as deposits from washing powder.
If detergent is detected on the parts, all components must be washed, after which a second attempt is made to start the washing machine. It is quite possible that you have restored the ability of the pressure switch to work. Secondly, the correctness and strength of the electrical wiring connection to the part is checked.
There is a possibility that one of the wires is worn out or bent. Having discovered such a defect, we eliminate it and perform a test run again.
Diagnostics is performed using a tube whose diameter matches the size of the part’s hose. We put one end of the tube on the instrument fitting, and blow into the second. If the part that controls the water intake is in good condition, light clicking sounds will be heard.
When this method of checking does not help identify problems, the pressure switch will have to be disassembled.
[custom_ads_shortcode3]
Hardware sensor test
Before trying to check the pressure switch on a Bosch Maxx 4 (or Samsung) washing machine using a tester or improvised means, you should weigh the validity of this action. If the washing machine is under warranty, unauthorized interference with the operation of the unit will be grounds for refusal of warranty service by the seller or manufacturer.
Sequencing:
- Unplug the power cord from the outlet.
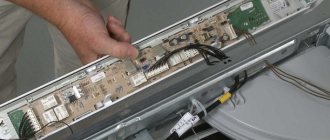
- Remove the top panel by removing the two small screws located on the back wall and sliding the panel back and up.
- Find a sensor cantilevered to one of the walls of the housing.
- Remove the connector, release the fastening (screw), and remove the sensor hanging from the tube from the machine.
- Using pliers, open the clamp on the supply tube and remove the device.
Water level switch
Before checking the adjustment of the device using tools, you can evaluate the overall performance of the sensor. To do this, you will need a piece of tube identical to the rubber tube of the relay. Having pulled the device out of the machine, you need to connect it to a short tube, blow strongly into it and determine whether the relay inside the device clicks in response to a change in pressure. If not, the sensor is faulty.
To check the pressure switch of an Ariston, Samsung, LG or Bosch washing machine using a multimeter, you need to:
- prepare a device for testing resistance;
- place the multimeter probes on the contacts corresponding to the electrical circuit of the sensor;
- create pressure in the air tube until a certain relay contact is activated.
If the resistance value does not change when the contact is activated, it means that the sensor must be replaced.
Checking pressure switches
Diagnostics
How to adjust the pressure switch in the Indesit washing machine? First you need to provide access to the pressure switch. As a rule, it is located on the side wall of the washing machine, closer to its top. Proceed in this order, the scheme is as follows:
- Unscrew the two rear bolts that hold the top cover in place and remove it.
- Unscrew the level sensor. Most often it is secured with one or two bolts.
- Disconnect the electrical contacts and tube from the indicator. The tube is secured with a clamp, so you will have to unscrew the clamp. Disconnecting the wires is not particularly difficult.
- Inspect the pressure switch to see if it is damaged. Inspect the tube for damage. It must not be damaged or clogged. A damaged tube must be replaced, a clogged tube must be cleaned.
- Inspect the indicator contacts. If they are dirty, clean them.
- Check the pressure switch. To do this, take a 10-centimeter piece of tube of the same diameter that is constantly used on the sensor.
- Place the tube at one end onto the inlet fitting of the indicator, and blow into the other end. If the pressure switch is working properly, then characteristic clicks are heard.
Important! You can also use a multimeter: with increasing air pressure, the conductivity changes. .
[custom_ads_shortcode2]
Replacing the sensor
It is not possible to repair the pressure switch in all cases, so the best solution would be to purchase a new one and replace it. The sensor is supposed to be replaced with one similar to the type and model of the washing unit. Before purchasing a new unit, it is recommended that you do the following:
- Clearly rewrite the name of the pressure switch that has become unusable, double-checking each symbol or letter.
- Inform the seller of the model to eliminate the possibility of error.
Ideally, you would purchase a marked relay, in accordance with the number written on the sensor housing element.
To install, just use the following algorithm:
- Install the tube that was originally removed from the used pressure switch in the same place, but only on a different sensor.
- All electrical wires must be connected to the sensor.
3.Using bolts, the pressure switch is installed in its intended place.
- The top cover of the washing unit is reinstalled in its intended place, but do not forget about securing it with bolts.
- Now you can connect the machine to the electrical network.
- Loading laundry into the drum is the next operation.
- Set the recommended washing mode and start the mechanism.
After the repair has been carried out, it is strongly recommended to be nearby to observe how the unit functions, so you can conclude whether everything was done correctly. In the absence of comments or other failures, there is reason to believe that everything is normal.
Video material
Every detail in a washing machine, even the smallest and most inconspicuous, is important and performs its function. Only if each component is in good condition will your equipment work correctly. Therefore, pay attention in time to any deviations from the normal washing cycle, and if possible, carry out repairs yourself; if not, contact a specialist!
Sources:
- tehnika.expert
- stiralkainfo.ru
- technopomosh.com
- serviceyard.net
How to check the sensor
To make sure the sensor is working, you need to check it. There are several useful recommendations that will help you check the serviceability of the part.
Where is
Before proceeding with dismantling, you should understand the location of the product. Many washing machine owners mistakenly believe that the part is located inside the drum, but this is not the case. Most manufacturers install a level switch on top of the drain body, which is mounted near the side wall. This arrangement is considered very convenient, as it simplifies the removal of the product from the structure.
However, on some models the sensor may be installed in other locations. For example, in modern models of Samsung or Ariston washing machines, the part is installed on the right near the front wall. For cars, the relay is located in the central part of the left side wall.
How to dismantle
It is quite easy to dismantle the pressure switch yourself. However, despite this, you need to familiarize yourself with how to do it correctly. The dismantling process is carried out in several successive stages:
Removing the top cover. To get rid of it, you will have to unscrew two bolts that are located on the back wall. The top cover is then carefully slid back and removed. Detaching a part. The relay is connected to wires leading to the control unit and a hose
Before removing the product, you must carefully disconnect the wiring and hose. Removing the pressure switch. It is connected to the wall with mounting bolts that must be unscrewed.
Checking with a multimeter
There are different methods for checking the functionality of a device, but most often they use a multimeter for this.
It is set in advance to resistance mode, after which the probes are connected to the contacts of the removed part. After connecting the probes, the values on the tester display should change. If the numbers have not changed, then the relay is faulty and will have to be completely replaced with a new one.
Repair features
The pressure switch works according to a specific scheme, which is not complicated. The owner of the washing machine can independently clean the pipe, remove the sensor, or replace the device. A broken water level sensor can cause serious problems with your washing machine. If the user fails to clean or repair the part in a timely manner, the following problems may appear:
- water will stop collecting;
- the spin of washed clothes will deteriorate;
- Over time, the heating element may burn out;
- the laundry will be poorly washed;
- the tank will overflow with water.
In case of minor breakdowns of the pressure switch, you should not buy a new mechanism; tuning the old device can help with this situation. The sensor is replaced as follows.
- Removing the old relay by disconnecting the wires and hoses. The procedure must be carried out with extreme care to avoid unwanted damage. After this, unscrew the mounting bolts that secure the housing.
- Installing a new relay. The structure is screwed to the place where the old one was. After this, a hose is attached to it with a clamp and the electrical wiring is installed.
Before installing a new relay, it is worth checking its functionality in advance. Immediately after repair work, the machine should be checked in several washing modes. In order to prevent breakdowns of the pressure switch, experts recommend listening to the following advice.
- Do not use the washing machine while idling. Before washing, the drum is filled more than half with liquid. If the device is empty, the sensor will soon break.
- Wash exclusively with warm water. For a high-quality laundry cleaning procedure, the temperature of the liquid should not be more than 45 degrees.
- Clean the drain on a regular basis. To ensure that water drains from the tank without obstructions, the drain must be cleaned once every 30 days.
Each washing machine is equipped with a pressure switch, which is responsible for the water level in the drum. In some cases, the relay may break down, after which it will need to be repaired or urgently replaced. If it is difficult for the owner to check or replace it, then it is better to use the services of professionals. To increase the service life of household appliances, as well as their parts, it is recommended to use the machine strictly according to the instructions provided by the manufacturer.
To learn how the pressure switch works, see below.
Operating principle and choice of relay for a washing machine
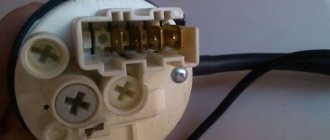
The pressure switch is made in the form of a round tablet. It is located under the top cover of the washing machine. A tube extends from the body of the part into the tank. The more water the machine takes in, the higher the pressure in the tube rises. As a result, one of the contacts closes and the module sends a signal to turn off the intake valve.
You can select the correct sensor based on the serial number or model of the SMA. The series numbers are indicated on the pressure switch itself, so it’s easier for you to dismantle it and go to the store. There, show the part to the consultant, and he will suggest a suitable replacement.
Signs of a pressure sensor failure are failures in the water filling and draining system:
- The liquid is collected until an overflow or leak occurs.
- The waste liquid does not leave the tank.
- The wash cycle runs normally, but does not go into rinse.
- The display shows a fault code.
- The cycle begins even though the water has not reached a certain level.
All these “quirks” are associated with incorrect operation of the pressure switch. To carry out additional diagnostics and replacement, the element must be dismantled.
How to replace a relay?
All you need is a screwdriver and a short tube. Unplug the machine by unplugging the plug from the socket. Close the water inlet valve. Unscrew the screws securing the top cover. Slide the panel back and remove it from the body.
You will see a pressure sensor on the side wall. How to remove the part:
- In some SM models, the pressure switch is bolted. In others - on latches. In the first case, unscrew the fixing screw. In the second, turn the part clockwise to release the latches.
- Disconnect the wiring connectors.
Disconnect the hose. Check it for blockages. Often it becomes clogged with debris that comes from the main line. Therefore, the relay may give incorrect readings.
Before replacing the level sensor, perform diagnostics. Connect a hose of the same diameter in place of the pressure tube. Blow lightly into it. When the contacts close, clicks should be heard. If you don't hear anything, it means the contacts are not working and the part is broken.
Another way to check for serviceability is with a multimeter. Set its toggle switch to resistance measurement mode. Connect the probes to the relay contacts. Blow into the tube and watch the readings on the screen. If nothing has changed, the sensor is faulty.
Prepare a new pressure switch. Reinstall it and secure the mounting bolts. Connect the wires. Put the hose in place and secure it with a clamp.
Without replacing the lid, run the wash cycle on a short cycle. Does water flow in and out normally? This means that the SM repair was carried out correctly.
During operation, it is recommended to clean the inlet hose and filter from debris and rust. Install cleaning filters to prevent small debris from the water supply from clogging tubes, hoses and other equipment parts. The video shows the stages of work:
https://youtube.com/watch?v=T4WqANQOZ9s
Bad 1
Interesting
Super
Setting up the expansion valve
The factory setting of a correctly selected and correctly installed thermostatic expansion valve will in most cases satisfy the needs of the respective system. The superheat at the evaporator outlet should be about 8-10 K. If it is necessary to adjust the expansion valve (additional adjustment), use the adjusting screw. To measure the superheat at the evaporator outlet, it is necessary to install a thermometer on the surface of the pipe at the evaporator outlet and connect the pressure gauge to the suction line. The difference in the readings of the pressure gauge on the temperature scale and the thermometer is overheating.
REMEMBER! When the screw is rotated to the right (clockwise), the overheating increases . When rotated to the left (counterclockwise), it decreases . A full turn of the screw changes the superheat by approximately 4 K for expansion valves of type T2 and TE2 and by 0.5 K for expansion valves of type TE5 at an evaporation temperature of 0°C. If liquid refrigerant enters the compressor (superheat below 7 K) or pulsation of the expansion valve is observed, it is necessary to increase the superheat .
When setting up a TE5 type expansion valve, in order to avoid overfilling the evaporator with liquid, you must proceed as follows (see Fig. 8-2.a). By rotating the adjusting screw to the right (clockwise), increase the superheat until the pressure pulsations stop. Then gradually turn the screw to the left until the pulsation begins. After this, turn the screw to the right about one turn. With this setting, there are no pressure pulsations and the evaporator operates in optimal mode. Changes in superheat within the range of ±0.5°C are not considered as fluctuations.
If the evaporator is overheating, this may be due to insufficient liquid supply. You can reduce overheating by rotating the adjusting screw to the left (counterclockwise), gradually reaching the pressure pulsation point (see Fig. 8-26). After this, turn the screw to the right one turn. With this setting, pressure pulsations stop and the evaporator operates in optimal mode .
What is a pressure switch?
The main task of this unit is to determine the amount of water collected in the tank by the pressure of its column. Liquid is supplied to the sensor through a tube connected to the bottom point of the washing container. Contact groups are used to transmit information signals to the electronic control unit of the machine.
The more washing modes or other functions the machine offers, the more complex its pressure switch will look. Each group of contacts is activated when a certain amount of liquid is poured into the tank. But in the general case, the assembly looks like a flat, round, tablet-shaped structure, to which a wiring harness fits on one side and a fluid supply tube on the other.
Operating rules
To prevent the pressure switch from breaking, you must use washing equipment correctly. There are several operating rules that should be followed when using the machine:
- The machine cannot be used idle. Before starting the wash, the drum is filled at least halfway. If it is empty, the pressure switch will quickly break.
- Wash in warm water. Its temperature should not exceed forty-five degrees.
- Clean the drain regularly. To ensure that water drains well from the tank, you need to clean the drain hose once a month.
Description
The pressure switch of a washing machine is a device that controls the volume of water in the tank. The main task of the device is to determine the amount of liquid by the pressure of its column. The relay looks like a disk, inside of which there is an air chamber with wires and a tube. The complexity of the pressure switch design depends on the number of washing modes that the machine is characterized by.
For this reason, the pressure switch from one unit will not necessarily function in another. The sensor is made from high quality plastic; it usually looks like a rounded part. A mechanism is needed for the proper functioning of the washing machine and high quality washing. This simple mechanical assembly consists of the following elements:
- frame;
- inductor;
- magnetic core;
- a diaphragm that changes shape under the influence of water pressure and displaces the core;
- contact group.
The electronic liquid level sensor may be located in the following parts of the unit.
- Under the top cover in classic-type washing machines, where there is a front door for loading things.
- In the lower part under the tank in a technique that is characterized by a vertical type of loading of laundry.
- In the area of the rear part of the case, slightly below the laundry container, the pressure switch is located in those machines that have plastic drums.
Prevention
In order for the pressure switch in the Ariston, Electrolux (Electrolux) washing machine to work for a long time and control the required pressure, it is recommended:
- Follow all operating instructions of the washing machine manufacturer;
- Eliminate the slightest malfunctions promptly and competently;
- Protect the unit from voltage surges in the network using special voltage stabilizers;
- Use hard water softeners;
- If the washing machine is still under warranty, it is better to have it repaired by a service center;
- Regularly check the drain hose filter for dirt, foreign objects, and deposits;
- Carry out a preventive examination and preventative washing once every 12 months;
- Repairing the washing machine pressure switch yourself should only be done if you have a certain level of knowledge and experience.
- How to wash a bathroom curtain
- How to remove glue from clothes
vote
Article rating
Instructions for verification
There is no point in going into the machine without a reason. Before diagnosing the pressure switch in an LG washing machine, it is worth checking for certain signs of a faulty water level relay. A breakdown does not happen without consequences, so the unit will let the owner know about the problem with the following signals:
- the drum rotates or the heater turns on without water in the machine;
- insufficient or excessive filling of the tank is noticed;
- in the rinse mode, the water is pumped out and refilled;
- there is a burning smell;
- the fuse on the heating element trips;
- The laundry does not spin.
Even one present “symptom” is a signal for diagnosing the pressure switch. But you cannot blame only the level relay for problems, since other faulty parts can also lead to similar troubles. To eliminate the error, we take out the sensor and check its functionality.
- Unscrew the two screws from the back of the case that hold the top panel.
- Press the cover away from you and remove it.
- We find a round plastic box of black or white color near the side wall - this is the pressure switch.
- Disconnect the connected wiring and pipes from the sensor.
- We loosen the fixing bolts and pull out the housing with a long tube going into the tank.
Having taken out the sensor, we begin the inspection. First of all, we assess the condition of the tube visually: there should be no damage or blockages, and the external lamellas on the connectors can only be clean and not oxidized. If problems, corrosion, oxidation or contamination are noticeable, the relay is carefully cleaned and washed. Then we proceed to the actual verification:
- we find a hose or tube commensurate with the opening of the pressure switch fitting;
- put the tube on the fitting;
- bring the block to your ear and the end of the hose to your mouth;
- blow into the hose and listen to see if there is a click. There are usually two or three clicks, but some models allow the contact to operate once. The main thing is that there is no silence, which signals a faulty pressure switch.
There is another way - connect an ohmmeter or multimeter to the sensor terminals. If you close and open the contacts, the device should detect a sharp change in resistance. In order not to make mistakes when connecting to the connectors, it is recommended to first study the electrical connection diagram in the factory instructions.
Variety of temperature sensors
An automatic washing machine can be equipped with only one of the following three temperature sensors:
- Bimetallic;
- Thermistor;
- Gas-filled.
Each of these three temperature sensors has its own different capabilities and may differ in design and operation, so each of them is replaced and tested differently.
The bimetallic temperature sensor looks like a tablet, approximately 20-30 millimeters in diameter and 10 millimeters in height. Inside this small tablet is a bimetallic strip. During the process of heating water, when it reaches a certain temperature, the plate bends and creates a closure of the contacts. Under this condition, the heating process is completed.
The thermistor has become a fairly popular element among modern washing designs, which has replaced the temperature sensor.
The thermistor looks like a small elongated cylinder. Its diameter is about 10 millimeters, and its length reaches about 30 millimeters. This cylinder is attached directly to the heating element. The principle of operation of such an element does not involve any mechanical work of the part, but simply changes the resistance during the process of heating the water to the temperature you need.
A gas-filled temperature sensor has only two parts: the first is a tablet made of metal with a diameter of approximately 20-30 millimeters and a height of about 30 millimeters.
The first element is mainly located inside the tank itself, and is always touching the water to change the temperature. The second part of the temperature sensor is made in the form of a copper tube, which is connected to the temperature controller (external), which is located on the control panel of the washing machine. Inside these elements there is a gas, the name of which is freon. Under the temperature of the water, this gas can compress or expand, thereby forming contacts that lead to the heating element.
How to check the pressure switch?
Check the serviceability of the pressure switch yourself by removing it from the washing machine.
Part removal procedure
- Disconnect the device from the network by unplugging the power cord from the outlet.
- Remove the top cover by first unscrewing the fastening bolts located on the back of the machine and slightly sliding the cover.
- Find the water sensor (usually it is located on the upper side of the side wall).
- Disconnect the air compression hose after first removing the mounting clamp.
- Without removing the sensor, try to blow out the hose. If it is clogged, this is difficult or impossible to do. In this case, the sensor did not work because there was no excess pressure entering it. The compression tube is cleaned with an elastic wire. Visible damage to the hose is a reason for replacement: excess air comes out of the tube, and the pressure switch membrane does not work.
- If the reason is not in the tube, continue to remove the pressure switch.
- Disconnect the electrical wire connector. An unreliable (floating) contact at the connector is the reason for the incorrect operation of the washing machine.
- Remove the sensor by unscrewing the fastening at the wall of the machine.
Checking legs, hoses, bolts
It is best to start with the bolts that secure the drum during transportation. They are located on the back panel, installed in the right places and fixed. With their help, the tank is not subject to vibration and accidental damage. Any tilt of the bolts hints that the car was handled carelessly during transportation and the tank has moved out of its place. And if it is made of plastic, then, most likely, cracks have appeared on it. It is best to abandon such a car in time.
Let's move on to the legs of the SMA. There are four of them in total, and each one will have to be screwed in to make sure there are no defects. The installation process should go smoothly without any obstacles. Serviceable legs will ensure the evenness of the working body, which will affect its service life.
The hoses must be intact, and they will have to be inspected at least visually
In this case, pay attention to the fastenings so that the diameter of the hoses corresponds to their size. The drain hose, through which water is directed into the sewer pipe, is attached to the back wall of the washing machine and is already connected to the pump
Its structure is corrugated, the material used for manufacturing is distinguished by its thinness. The hose feels fragile to the touch and is highly likely to suffer damage from mechanical impacts. So this element of the machine will have to be checked thoroughly, because it is through it that most leaks occur.
The inlet hose has a denser structure. At its ends there are plastic nuts, with the help of which the hose is mounted to the water pipe and to the machine itself. All elements must be intact and free of chips and cracks. The nuts must be tightened without fail to check the condition of the threads and the tightness of the fit.
The washing powder tray must be completely dry and clean. You can even smell the item to make sure it hasn't been washed with chemicals.
Principle of operation
To find out where this sensor is located in the washing machine, you will have to remove the top cover of the unit. The pressure switch looks like a flat corrugated washer, to which wires are connected on both sides, and at the end there is a plastic tube. There are washing machines with an oval sensor that has only two contacts - a wire and a tube.
The sensor is essentially a pneumatic relay, which is triggered by air pressure created in a tube connected to the tank of the washing unit. The water flowing into the drum creates a certain pressure, the air begins to press harder on the relay membrane, which closes or opens the contacts, allowing current to pass through the wiring and transmit the necessary command to the control unit.
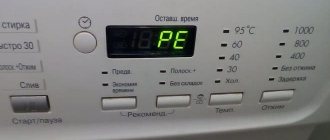
If there is no signal to start the operation, or there is a lack of continuity in the circuit, the control unit stops the program, sending an alarm signal to the display panel. Eg:
- LG gives PE signal;
- SMA Ariston and Indesit signal with codes F04 and F05, respectively;
- SMA from Bosch will tell you about the problem with code F26;
- Electrolux has several versions for this case - E11 - E 12; E21 – E22;
- Kandy – F03.
If the water control sensor begins to work incorrectly, certain malfunctions may appear in the future:
- water will overflow in the tank, the device will constantly draw and drain liquid;
- there will be insufficient water for washing, which will deteriorate the quality of the washing machine;
- the water after washing will not drain completely; after spinning, the laundry will remain damp;
- the program will start without water, after which the water heating element will overheat and fail.
Operating principle of the pressure switch
When a certain water level in the tank is reached (depending on the washing mode), one of the switches is activated. The water level sensor in the automatic washing machine gives a command to shut off the water supply valves. After this command, the flow of water into the tank stops and the machine starts washing. If the wash cycle is changed, the pressure sensor may command water to be added to the tank and then shut off the water supply again.
You can find out where the pressure switch of an LG, Samsung, Indesit or Bosch Maxx 4 washing machine is located by removing the top panel of the unit. The pressure switch looks like a flat plastic (monochrome or multi-colored) corrugated washer, to which wires with connectors fit on both planes, and a plastic tube at the end.
Options for pressure switches
The water level sensor is essentially a pneumatic relay, triggered by air pressure filling a tube connected to the tank of the machine. Depending on the pressure created by the water flowing into the drum, the air pressure on the internal membrane of the relay increases. The membrane, in turn, closes and opens certain contacts, passing current through the connected wires and triggering the corresponding command in the electronic control unit.
The absence of a “response” from the relay to the started operation or the absence of continuity in the control circuit in electronically controlled units causes the washing program to stop and an error signal appears on the dashboard indicator.
Water level sensor
Pressostat error codes depending on the manufacturer and model of the equipment:
- LG – PE;
- Ariston (Indesit) – F04 (F05);
- Electrolux – E11-E12; E21-E22;
- Bosch (Maxx 4) – F26 (F19);
- Samsung – E7 (E2; E3).
The operating principle of the water level switch of a washing machine is based on the effect of pressure on a special membrane (diaphragm). When water is drawn into the tank of the washing unit, water fills the compression chamber and pressure corresponding to the level of the collected water is injected into the sensor housing through a special tube.
Double-chamber pressure sensors are specially developed for washing machines with small and large loads. When the load is low, one membrane is activated and water is supplied in a minimum amount. When the drum is heavily loaded, the second membrane is activated, the contacts close and the control processor gives a command to supply the maximum amount of water.
As a rule, the membrane installed inside the sensor is made of rubber or elastic polymer and is designed for repeated on and off cycles. The operating principle of the pressure switch combines the sequential influence of air pressure on the mechanical part, above which the electrical contacts are located, and a direct electrical impulse on the control processor of the washing unit.
How much do the services of a master cost?
If you were unable to cope with replacing the pressure switch yourself, you need to call a specialist. You can find it through an ad on the Internet or in a newspaper. It is possible that someone you know used the services of such a specialist and was satisfied with his work.
To minimize the risk of encountering scammers, it is better to contact a large company that repairs household appliances. Such organizations have their own website, and reviews of their work are always available on the Internet.
Reputable workshops can provide free visit of a technician and diagnostics of the device, and discounts are often provided to pensioners and low-income citizens.
The cost of replacing the pressure switch is about 1,600 rubles. This procedure does not take more than an hour. Reputable organizations provide a guarantee for all work performed, which should not be less than 6 months.
Prices for the services of a master may vary depending on the locality. However, they should not be 2-3 times more expensive. If a specialist asks for too high a price, you should not trust him.
Private craftsmen can offer more favorable terms of cooperation. However, when calling such a repairman, you should not be alone with him. If he demands money for a service he did not perform, you need to threaten to call the police.
Everything about repairing Samsung washing machines is in this section.
Checking the pressure switch
If you have the slightest doubt about the correct operation of the pressure switch, you must immediately replace it with a new one. But before that, you need to gain confidence that the problem is with the sensor. Checking the pressure switch of a washing machine is quite simple:
- The top panel must be removed. You can remove it by unscrewing the special bolts and sliding it in the opposite direction from you. On most models, the sensor is located at the top of the side wall.
- Experts recommend simply unscrewing the pressure switch. It is usually secured with several screws, which are quite easy to unscrew.
- After this, disconnect the tube and contacts from the sensor. The hose is secured with special clamps; they will either have to be carefully disassembled or cut off and then replaced with new ones.
Carefully examine the dismantled pressure switch: there should be no damage or formations on the housing. Check the tube and the condition of the insulating material of the wiring no less carefully. If necessary, clear blockages and repair minor damage. Clean the sensor contacts.
Now let's check the device itself. Typically, a ten-centimeter hose is used for this, identical in diameter to the one already removed earlier. Having connected the tube to the inlet fitting of the pressure switch, blow strongly into it.
At this moment, clicks should be heard from the sensor. Their number depends on the blowing force.
This small device is necessary for the entire system. When it fails, it deprives you of the ability to wash, and can lead to various breakdowns. Replacing the pressure switch in an automatic washing machine is a troublesome, but not complicated process.
Pay attention to the behavior of your machine, and you will be able to notice a malfunction in time
After some time from the moment of operation of the washing machine, any of its elements may lose their functionality. For example, a violation of water intake, expressed in underfilling or overfilling of liquid, will tell you that there are problems with the sensor that controls its intake. It is not always necessary to replace it; sometimes it is enough to adjust the pressure switch of the washing machine so that it works normally. By performing these steps yourself, you will not spend extra money on a new element and will extend the life of the existing sensor.
Adjustment
In some situations, rotation of the water level sensor can be avoided if proper configuration and adjustment is performed. To adjust the element that controls the water level in the washing unit, there is no need to contact repair specialists, since such work can be done on your own
It is necessary to follow the sequence of operations accurately and work carefully
Before making adjustments, you need to find out the location of the element. A large number of washing machine owners mistakenly believe that the sensor is located in the body of the drum, but this is incorrect. The lion's share of manufacturers place a pressure switch at the top of the drain body, which is located near the side panel.
So, the sequence for adjusting the water level sensor of a washing machine looks like this:
- the machine for removing dirt from laundry is disconnected from the power supply and utilities;
- Having unscrewed the bolts and disconnected the electrical wiring, remove the water level sensor;
- we find specialized screws, through which the contacts in the body of the device are tightened or loosened;
- clean the surface of sealant.
All of the above actions can be considered the preparation stage, since the key work on regulating the pressure switch is still ahead. You will need to try to catch the moment of bringing together and disconnecting the contact group using cleaned screws. In this case, the well-known “scientific poking method” is practiced, since only a professional washing machine repairman can have a specialized device for carrying out such work. You will need to act like this:
- the first screw is turned half a turn, the water level sensor is connected to the machine, it starts working;
- if from the very beginning the machine took in little water, but as a result of adjustment it became more - you are on the right track, all that remains is to turn the screw more firmly in the chosen direction and cover it with a sealing compound;
- if actions with the screw give the opposite result, it will need to be turned in the opposite direction, making one or 1.5 turns.
Symptoms of a problem
Sometimes it is quite difficult to determine the malfunction of a product, especially for people who do not understand technology. It is recommended that you familiarize yourself with the common signs that indicate a faulty pressure switch.
Stops drawing water into the tank
People who have their own washing machine often experience that liquid stops filling into the tank. There are several reasons for this problem:
- Problems with the valve responsible for supplying water. Liquid enters the system under tap pressure. The supply is opened using a special built-in valve, which begins to operate after a signal from the control module. If it is faulty, the liquid will not begin to flow.
- Control module failure. Due to a malfunction of this part, the valve does not receive a signal, and it does not begin to draw water.
- Blocker failure. He is responsible for blocking the hatch door. If the lock is faulty, the machine will not start working.
However, the most common cause is considered to be a faulty pressure switch. If this product does not work, the machine will not be able to evaluate and will not begin to fill the tank.
Repeated cycles of water supply and drainage
Modern washing machines are equipped with an automatic liquid collection system. Not only valves, but also level switches are responsible for the flow of water. All these parts function using special commands coming from the control unit.
The control unit perceives this as a failure to comply with the command, and therefore it re-sends the signal to supply water. This results in the supply and drain cycles being repeated many times. Due to repetition of cycles, the washing time can increase significantly.
Reduced rinse and wash quality
Sometimes, after using a washing machine for a long time, the quality of rinsing and washing clothes gradually deteriorates. Many people attribute this to the use of inappropriate powders. However, there are other reasons why things begin to wash worse.
A common reason for poor washing quality is a faulty level switch. Due to the breakdown of this part, the washer cannot determine how much water is in the tank, and because of this, it often does not fill completely. This leads to the fact that the collected liquid is not enough to properly wash and rinse the washed items.
Water remains after finishing washing
There are times when, after completing work, some water remains inside the drum. This can happen because the pressure switch has failed and stopped functioning normally. If it does not work correctly, the control unit of the device will not receive a signal about the need to clean the tank. This will lead to the pumps not starting to work to pump out excess water.
However, there are other reasons for this problem:
- Pump filter clogged. Obstruction of liquid from the tank sometimes occurs due to a clogged filter. It will have to be cleaned for the drain to start working.
- There is a blockage inside the pipe. During the draining process, the waste liquid passes through the pipe. Experts advise cleaning it once a month to prevent it from becoming clogged.
Consequences of ignoring the problem
Failure of the pressure switch leads to serious consequences, which should be familiarized with in advance. If you do not replace the broken part in time, the following problems will appear:
- Water does not fill up. If the level switch is broken, the liquid stops collecting. In this case, the heating element may turn on, which will lead to further damage to the heating element. Therefore, before starting washing, be sure to check that the tank is not empty.
- Deterioration in wringing out washed items. Sometimes, due to a component failure, the fluid stops draining normally. Because of this, things turn out much worse.
- Tank overflow. Sometimes, due to a broken part, too much water is pumped into the tank, causing it to overflow.
See also
What to do if a computer chair creaks and how to fix the problem