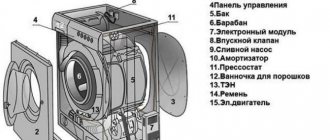
The Korean company LG was the first to patent the use of direct drive for washing equipment. Connecting the motor to the drum directly made it possible to improve the functionality of the devices, reduce the number of breakdowns and increase the service life of the units. However, like any other equipment, the LG direct drive washing machine can break down over time. In this article we will talk about the main malfunctions characteristic of this type of machine, and also discuss the pros and cons of such devices.
LG was the first to release direct drive units. The technology was called Direct Drive
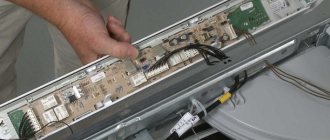
How to repair a board yourself
To determine the breakdown, inspect the board for traces of damage and burnout of elements.
When to change the entire module
A complete replacement of the control board is required if it cannot be repaired. Controllers for popular models are sold in hardware stores. You can purchase and replace it yourself. In all other cases, it is better to contact persons competent in this matter.
The most common types of controllers: Arcadia / Arcadia, AKO, Computime / Computertime, Invensys / Invensis, Samsung MFS.
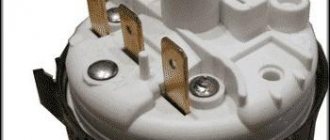
Where is the controller located
The control unit is located behind the front panel of the washing machine. You can see it when you remove the top cover. The location may vary depending on the type of laundry load, but in general it should not be difficult to find.
Dismantling
To remove the processor from the machine body, you need to perform several steps:
- be sure to unplug the power cord from the outlet;
- turn off the water supply;
- remove the top cover;
- remove the powder compartment;
- disconnect the chips with wires;
- unscrew the fastenings of the board to the case;
- get the part.
To facilitate the subsequent installation process, we recommend taking photographs and notes on the parts.
Functionality check
It is impossible to check the board's functionality when removed, without special instruments. You can only visually assess the presence of burnouts, oxides, and mechanical damage. Any part can fail. Most often these are diodes, resistors, thyristors, relays and other small components.
An example of checking a board with a multimeter:
We fix soldering ourselves
Due to the enormous vibration load on the machine during operation, the soldering of electronic elements may fail. To eliminate defects you will need a soldering iron, solder, flux and the ability to solder.
Capacitors
The capacitor performs voltage stabilization. You can determine the breakdown by swelling of the element or with a multimeter. If the device displays:
- "0" - short circuit
- "1" - break
When replacing, be sure to note that the capacitor has polarity.
Resistors
Checking resistors is divided into two stages according to the order of the elements:
- 8 Ohm, up to 2 A - first order resistors,
- 10 Ohm, up to 5 A - second order resistors.
If the specified parameters do not comply, mandatory replacement of the elements is necessary.
Thyristor block
The unit fails due to frequent changes in the network or impulse noise. Carry out the test only after you are sure that the capacitors are working properly. For the operation, you will need to install a negative resistance. The voltage of first order diodes should not exceed 20 volts. The burnout of the output contacts is checked with a multimeter in continuity mode. The voltage on the filter should be within 12 volts. Observe the polarity of all elements and handle the thyristor ports with care, otherwise repairs will result in large financial expenses.
Checking trigger status
Often its failure is also due to problems with capacitors. The trigger itself breaks quite rarely. Poor or vibration-damaged soldering leads to problems with the assembly. To eliminate them, solder the output contacts. The output voltage should not deviate too much from 12 volts. If the module has been replaced, before commissioning, measure the threshold voltage and output resistance, which should fluctuate within 12 volts 20 ohms, respectively.
How to re-flash the controller of an automatic machine
If the control board is intact, but problems remain, you can try to reflash the machine program. To do this, the module must have connectors for connecting equipment (if they do not exist, new firmware will be installed only in a service center, but directly into the processor).
You will also need a program or driver for flashing. They can be downloaded from the official websites of manufacturers or special resources - for example, bineep.ru and eeprus.ru.
To flash via USBDM:
- Connect the programmer to the appropriate connector and then to the computer.
- Install the driver that comes with the programmer on your computer.
- Open Windows Device Manager. Find the ESBDM item.
- Select the Target tab. Click Detect Chip to have the system detect the board model. If the model is not recognized, check the controller, semiconductors, triacs and other elements again with a multimeter - perhaps it is damaged after all.
- If everything is fine, click Load Hex Files... and select the program for the machine.
- Click Program Flash and wait for the process to complete.
https://www.youtube.com/watch?v=qaIXqShtdZQ
Electrics
Carrying out electrical repairs yourself without sufficient knowledge is difficult. The main actions in this case come down to checking all the wires and terminals present in the assembly, going from the control module to all elements, parts and assemblies.
The test is carried out using a multimeter - this way you can find out basic information about the condition of a particular device. It is also necessary to carry out visual inspection. It will help you find torn clamps, fragments of wires that are without insulation, the presence of burning and melted contacts. All wiring problems can be resolved by replacing failed conductors or terminals.
Features of LG washing machines
The quality of LG washing machines is determined by the technologies used:
- The direct connected inverter motor has a warranty period of 10 years. The principle of innovation is to attach the drum directly to the motor, so the design is reliable and provides a low noise effect.
- The “six caring movements” principle is based on an inverter motor and the absence of a drive belt. This allows you to maintain the rotation of the drum in different variations, based on the mode, fabric and level of dirt.
- On-line diagnostic methods help save money when a device fails. To determine the type of malfunction, just call technical support or use a special application installed on your mobile phone.
- The TurboWash feature reduces the standard work cycle from 95 minutes to 59.
- The True Steam option involves applying hot steam to things. In this case, steam mixes with water, softening clothes and ensuring 100% dissolution of the powder. Additionally, bacteria and allergens are neutralized and odors are eliminated, facilitating easy ironing without the use of chemicals. A simple version of this function is three modes - hypoallergenic, cotton + steam, children's clothing.
It is noteworthy that almost all automatic devices have points 1-3, and the rest depend on the specific model.
Advantages
Traditionally, machines are equipped with commutator motors with a belt drive. The use of a motor combined with a drum allows torque to be transmitted directly and gives the units a number of advantages.
Differences in the design of belt and direct drive motors
Among the advantages it is worth noting:
- reduced noise levels (models without direct drive are equipped with a belt and pulley that create noise when washing);
- no vibration (good balancing);
- reduction of engine breakdowns and increase in the service life of the device;
- high quality washing and spinning;
- economical energy consumption during the washing process.
You can get more complete information about the direct drive device and the advantages of such units by reading our article “Inverter washing machine”.
The introduction of new technologies has increased the reliability and durability of washing machine engines. However, experts note that innovations have not affected all important components and systems of equipment, so it is not immune from breakdowns. In addition, direct drive machines have other disadvantages, for example, the high cost of both the units themselves and repair work.
Possible difficulties and ways to overcome them
When trying to disassemble an LG washing machine on their own, a person without experience may encounter some difficulties.
Tips to help overcome them:
- If you have little experience working with household appliances, then it will be difficult to put the washing machine back together. In order to correctly connect all the wires and screw the parts, the entire disassembly process must be captured on a smartphone camera.
- Sometimes when you remove the top cover it gets jammed. However, you should not pry it with sharp objects. The cover can be removed by short swings without applying excessive force.
- If any metal parts are stuck or rusty, they can be treated with a lubricant such as WD-40.
Sometimes during the process of assembling a washing machine, people are faced with the fact that they cannot find suitable bolts, since there are many of them. To avoid such a problem, they can be placed in bags, making appropriate notes.
Preparatory stage
To avoid searching for the right screwdriver during repairs, you should prepare in advance all the tools that may be useful:
- curved and slotted screwdrivers;
- pliers, simple and bent;
- round nose pliers;
- wire cutters;
- hammer;
- mites;
- set of open-end wrenches;
- socket wrenches (heads).
If you are repairing a car for the first time, also stock up on a camera.
By filming each stage of disassembly, it will be easier for you during assembly - using photographs. You will be able to reproduce the reverse sequence of actions faster and without errors.
For some reasons (lack of finance or lack of trust in specialists), washing machine owners prefer not to contact a service center in the event of a unit breakdown. Even a beginner can repair an Ariston washing machine with his own hands, unless there is a serious breakdown.
The next topic will be of interest to owners of Beko washing machines. Here everything is about eliminating the main faults of the unit.
A washing machine is a complex piece of equipment, which is why, among other types of equipment, it is washing machines that cause the most trouble for their owners. Using this link https://aquacomm.ru/cancliz/mnogokvartirnyie-doma/santehnika/stiralnaya-mashina-ardo-remont-svoimi-rukami.html we will look at the features of repairing devices under the Ardo brand.
Basic criteria for choosing a washing machine
If the future owner is faced with a dilemma - an LG washing machine, which model to choose, then first you need to identify the main parameters of the equipment:
- The type of loading in LG representatives is divided into two options - frontal and vertical.
- The drum volume in some models reaches 12 kg, the standard one is 5 kg.
- Models come in three types - classic, narrow and super narrow, equipped with direct drive.
- Energy saving class from A+ to G.
- The devices are mainly represented by an electronic type of control, but there are models with mechanical program switching.
- The tank is made of plastic or stainless steel.
Samsung WD806U2GAGD
For lovers of metallic gray, we present the Samsung WD806U2GAGD washing machine. In addition to its non-standard design, it has a striking feature - the presence of a dryer, which allows you to dry up to 4 kg of laundry at a time. The remaining features of the machine are as follows:
- optimal classes of energy consumption and washing efficiency with spinning are A+, A and B, respectively;
- spin intensity about 1200 rpm;
- varying the spin speed and turning it off;
- partial protection against water leakage;
- “child lock”;
- plastic tank;
- opening the hatch door 180 degrees, which ensures convenient loading and unloading of laundry;
- 10 modes with pre-program, stain removal and express wash;
- cycle start delay timer;
- Diamond drum, Eco Bubble washing and Smart Check self-diagnosis;
- VRT plus technology, which reduces noise levels to minimum values.
The washing machine is located in the price segment from 50,000 rubles, which is explained by its excellent performance characteristics. This machine was appreciated by many consumers, and the average rating of the unit is 4.5 on a five-point scale. Among the advantages are a narrow body, lack of vibration, gentle washing and functionality. There are also negative comments - the tank leaking after a year of use and a slight knock during the spin cycle.
Basic malfunctions of Lg washing machines
If there is no intelligent control, you will have to analyze the state of the machine yourself. Eg:
If the machine does not turn on, check whether the plug is inserted into the outlet and whether there is voltage in the electrical network.
If the machine does not draw water, check whether the inlet tap is open and whether there is water in the pipeline.
If the washing machine takes a long time to wash and the wash cycle has increased, check whether there was a power outage, etc. during the wash.
In addition, you can interrupt the cycle yourself and drain the water, clean the filter, and check the contents of the drum for foreign objects. Some problems can be solved on your own, but not all. If you need more in-depth diagnostics, or even more so, disassembling the front panel or case, you should contact a professional.
Prevention of breakdowns
To avoid breakdowns and costly repairs, you need to follow simple recommendations:
- plug the unit into a separate outlet, do not use surge protectors;
- If the water is too hard, install a filter on the water supply. This will help avoid breakdowns of the heating element;
- use special anti-scale products;
- turn on the drum cleaning mode every 15-20 washes (the function is provided in many models);
- check things before loading - coins and small debris often remain in pockets (they can cause a blockage in the drain system and damage the drum).
It is better to entrust the installation, connection and maintenance of the machine to professionals
If you follow these simple rules, your washing machine will work without interruption and will serve you for a long time.
1.Test mode of models WD-6021, WD-8021, WD-1021, WD-6022, WD-8022 and WD-1022:
— After pressing the “Spin” (spin) and “Temp” (temperature) buttons simultaneously, press the power button. The signal should sound twice, you are in service mode.
— Press the “Start/Pause” button to move to the next stages of the test.
— To exit the test, press “Start” more than four times!
Start button | Checking devices | Display indications |
| No | All indicators are on | Board code displayed |
| 1 once | Rotate the drum counterclockwise | Revolutions per minute |
| 2 times | Low rotation speed | Revolutions per minute |
| 3 times | High rotation speed | Revolutions per minute |
| 4 times | Pre-valve operation | Pressostat frequency |
| 5 once | Main valve operation | Pressostat frequency |
| 6 once | Water intake | Level relay frequency |
| 7 once | Air Conditioning Valve Operation | Level relay frequency |
| 8 once | Rotate the drum clockwise | Engine speed |
| 9 once | The heating element operates for 3 seconds. | Water temperature |
| 10 once | Pump operation | Level sensor frequency |
| 11 once | Auto power off operation | All indications are turned off |
2.Diagnostics of models WD-1021, WD-1041, WD-8030, WD-1223 WD-1220 WD-1020 and WD-1050:
To enter, press the “POWER” button, and then simultaneously the “SPIN” and “RINSE” buttons and press the “START/PAUSE” button.
The device verification test is similar to previous models.
Press the “Start/Pause” button to move on to the next steps.
Error code | Description of the error | Causes |
| I.E. | Water does not enter the tank The water has not reached the first level in allotted time (4 minutes). | 1. There is no water in the water supply. 2. Low water pressure. 3. The water inlet valve is faulty. 4. The water level switch (pressure switch) is faulty. |
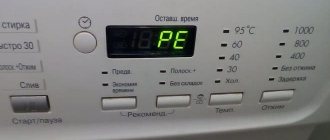
| P.E. | Error in water level sensor (pressostat) An error code is displayed if within for a certain time, the tank was not filled with water to the nominal level (after 25 minutes) or filling with water occurred faster than the allotted time (4 minutes). | 1. The water level sensor is faulty. 2. Unacceptably low or excessively high water pressure in the water supply. |
| F.E. | Tank overflow An error code is displayed if the maximum water level in the tank has been reached. | 1. The causes of the error may be caused by defects in the electronic controller, level sensor or water inlet valve. |
| dE | The hatch door is closed | 1. In most cases, to reset the error, you need to close the hatch again. 2. If this does not help, check the serviceability of the hatch locking device, as well as the electronic controller itself. |
| O.E. | No water draining An error occurs if, 5 minutes after the drain pump started operating, the water has not been drained from the tank. | 1. The water drain path (drain system) is clogged. 2. The electronic controller is faulty. 3. The drain pump is faulty. 4. The water level sensor has failed. |
| UE | Drum imbalance | 1. In most cases, to reset the error, you must manually distribute the laundry in the drum (remove lumps) or add laundry if there is not enough of it. 2. Otherwise, check the functionality of the electronic controller or identify defects in the drum drive (bearings, etc.). |
| tE | Unacceptable water temperature | 1. The error occurs if the temperature sensor in the SM is faulty (break or short circuit). |
| L.E. | Lock error | 1. In most cases, such an error is caused by low voltage in the supply network. 2. It is also necessary to check the serviceability of the electronic controller and drive motor. |
| PF | Lockout error Low voltage | 1. In most cases, such an error is caused by low voltage in the supply network. 2. It is also necessary to check the serviceability of the electronic controller and drive motor. 3. PF means that there was a power failure while the program was running. When mains voltage appears after pressing the power button (on some models without pressing), this message appears - PF. When you press the START/STOP button, the previously set program continues from the point before the mains power failure. It is necessary to check the serviceability of the electronic controller. |
| C.E. | Electric motor overload A similar error most often occurs when the SM is overloaded with laundry. | 1. If, after removing excess laundry from the drum, the error occurs again, check the serviceability of the electronic controller and drive motor. 2. In a direct drive SM (with index DD), the defect also manifests itself in “twitching” of the drum. |
| E3 | Load detection error | no information |
| A.E. | Auto shutdown error | no information |
| E1 | Water leakage into SM pan | 1. Water leaked into the SM pan due to depressurization of the tank, hoses or other elements of the SM. 2. The water leakage sensor is faulty. |
| HE | The water heating element is faulty | 1. Check the heating element and its power supply circuits. |
| S.E. | Drive motor Hall sensor error | 1. Check the Hall sensor (installed in direct drive vehicles with the DD index), as well as its wire connections. |
To check the spin cycle, look at the block diagram:
Simultaneously press the “WASH” and “RINSE” buttons
Manual, forced opening of the washing machine door
In any case, if the door of a Bosch washing machine does not open, in order to detect a malfunction, test it and subsequently repair or replace the defective part, you must first open the door in order to gain free access to the mechanisms of the unit.
This is not at all difficult to do after carefully studying the provisions of the manufacturer’s instructions regarding the repair of this model of washing machine. If instructions are missing, you should use the following rules, common to all modifications of such household appliances:
- Turn off the power supply to the device.
- Open the drain filter door. It is located at the bottom of the machine on its front part.
- In the picture that opens to you, find the cable (orange) intended for emergency opening of the drum receiving hatch. After locating the cable, gently pull it, thereby unlocking the door.
- First of all, handle any household appliances with care. When closing and opening the hatch of the washing machine, do not apply more force than is required. And don't do this unless absolutely necessary.
- Secondly. Do not load the maximum amount of laundry into the tank. Especially if it prevents the door from closing.
- Third. Respond promptly even to apparent operational problems. A minor malfunction that is not corrected in a timely manner can lead to larger and more serious breakdowns, up to and including complete failure of the entire washing machine.
If you are not confident in your ability to repair the device yourself, use the services of a specialist, which will definitely save you nerves, money and time.
The indicator signaled to you that the laundry has already been washed, but the washing machine door does not open? And he doesn’t heed the requests “Sim-sim, open up”? Don’t despair, and most importantly, don’t try to use excessive physical force on the machine! Better use our tips!
First of all, check to see if there is any water left in the washing machine after finishing work? If there is standing water in the tank, the hatch will not unlock to avoid a flood. This is true? Then your problem most likely lies in the fact that the machine does not drain the water: we discussed this issue in detail in the article “Wet business”.
- If there is no water in the drum, the wash has completed a full cycle, but the door has not unlocked, wait a while
: in modern machines, the unlocking command can be sent to the control panel within 3-5 minutes after finishing work. Therefore, first of all, just wait a little, and then try to open the door again. - If it still remains locked, it is recommended to unplug the washing machine from the power supply for 20-30 minutes
(be sure to unplug it!), then turn it on and try to open the door again. This measure is due to the fact that sometimes failures occur in the control board, and the signal to unlock the hatch does not reach the UBL (Hatch Locking Device). - If suddenly it is not possible to wait, there is an alternative option in case of such failures - start the washing program again
. The machine will check whether the door is closed: first it will unlock it, then it will lock it again and then begin the washing cycle. Without waiting for the moment when the door is locked again, interrupt the program (it is easy to understand that the machine has unlocked the door - you will hear a characteristic click).
Our advice did not help and your attempts to “free” the laundry remained unsuccessful? Then, most likely, the machine is faulty.
Emergency opening
After the water leaves the tank, the automatic door lock is released. However, in the case of manual draining, it happens that the water has not completely drained and the water control sensor does not allow the lock to be opened.
It also happens that due to a failure in the software settings, the lock gets stuck and the door cannot be opened even if there is no longer any water in the drum. Sometimes the cause is a mechanical failure of the latch.
Manufacturers have provided such options, so you can deal with a stubborn lock yourself, without the help of service workers. You can read about them and the necessary algorithm of actions in the instructions for the device.
But before using these methods, the machine must be unplugged. If it was not possible to drain the water first, you need to make sure that a huge puddle does not form on the floor after the emergency measures taken.
Emergency opening rope
Many washing machines come with a cable that can be used to open a locked door. You can find it at the bottom of the device, next to the filter.
Usually this cable is made in a contrasting color, red or orange, so it is impossible not to notice it. To outwit the lock, you need to pull it smoothly, without jerking.
Opening with a cord
If there is no cable in the car, but you have a thin synthetic cord or strong fishing line at hand, you can try to open the car with their help. This method is a folk one, so the possibility of its use depends on the design of the lock.
This method of breaking the lock will only work if the lock tongue snaps towards the body of the machine. If the tongue is directed in the other direction - away from the body or up - it will not be possible to open the door using the cord.
It’s unlikely that you’ll be able to understand exactly how the lock works when the door is closed, but if you don’t have time to wait for the locksmith and other methods don’t help, you can try this one. You will need to put the cord around the edges of the hatch around the entire perimeter and pull its ends up, as a result of which the cord will compress the latch and allow you to open the door.
https://youtube.com/watch?v=a9xm8uHm1Xc
Opening with a spatula
If you don’t have a cord at hand, but have a thin flexible spatula, you can use it. The principle of operation is the same as when opening the door with a cord. The end of the spatula must be inserted into the gap between the hatch and the car body and, pressing it, try to open the door.
Removing the panel
This method is practically fail-safe, but requires certain technical skills, tools and physical strength. In addition, to use it, you must drain the water from the unit by any available method. After there is no liquid left in the drum, the machine is disconnected from the network and the top cover is unscrewed.
In rare cases, the bolts can be removed using a standard screwdriver, but most often manufacturers secure the parts with special bolts, and to unscrew them you need to use TORX keys. The difficulty lies in the fact that even the presence of a key of the required model does not guarantee the ability to remove the bolts - their size may not fit the key model. Most often, manufacturers use the T15, T20 and T25 options.
Did the keys fit? Great. You need to carefully remove the top cover and then tilt the machine back slightly. This will allow the drum to move away from the hatch and make it easier to access the lock. After that, sticking your hand inside and pressing the latch is no longer difficult. When the door is open, the lid is returned to its place. But if you have doubts that you will be able to perform the described steps yourself, it is better to wait for the wizard.
Most methods of emergency interruption of washing and subsequent opening of the door are not only quite troublesome, but also unsafe for equipment. After pressing the “Start” button, the program installed in the machine begins to work and its sudden interruption is undesirable.
Of course, any manufacturer provides a certain safety margin in case of emergency situations, so a one-time intervention will most likely not cause harm to the equipment. But if you do this regularly, the electronic boards may fail, which will lead to a serious failure of the settings or a complete failure of the machine.
Therefore, it is worth asking yourself the question of how critical the situation is and whether emergency intervention is really required, since it can result in equipment failure and subsequent expensive repairs.
When does it need to be replaced?
LG washing machines with commutator motors are equipped with graphite electric brushes. They are needed to transmit electricity to the motor armature. The parts are represented by small rectangular cylinders with copper contacts and steel pressure springs.
When the motor rotates, the surface of the brushes comes into contact with the rotor, so they are subject to wear. Despite the fact that special alloys are used for their manufacture, spare parts are subject to abrasion.
Their average service life is 5 years, subject to active use of the washing machine. The wear process of carbon brushes is accelerated by dust getting into them.
They change shape, causing the engine to malfunction. As a result, the washing machine begins to function improperly.
Signs indicating wear:
- Noise and crackling. It appears when the engine is running. Extraneous sounds are heard most strongly from the place where the motor is mounted.
- Wet laundry after spinning. The washing machine does not have enough power to cope with this task.
- Stop washing. This can happen when running any program.
- The appearance of smoke, sparks and a burning smell.
- An error code appears on the display. If the electric brushes malfunction, the CE code may appear on the display of the LG washing machine.
Faulty brushes cannot be ignored. The sooner they are replaced, the better. If you continue to operate the device in this mode, serious damage cannot be avoided.
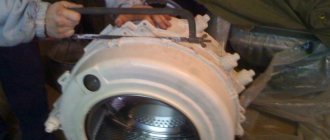
Disassembling the washing machine. Step by step instructions
Now the unit is disconnected from all communications (drainage, water supply and power supply) and you can begin disassembling:
- The top panel is removed. On the back panel, in the upper part, there are two screws that secure the cover. After unscrewing them, lightly pressing on the lid, you can easily remove it.
- The bottom panel. Behind it there is a drain filter and an emergency drain hose. Therefore, easy removal of this panel is provided by the manufacturer. The panel is held in place by three latches. By pressing on the panel on the sides and top, it can be separated manually (or pry it off with a screwdriver). Newer models may add one screw.
- The detergent distribution hopper is removed (there is a plastic button inside, when you press it, the tray comes out easily, you just need to pull it towards you).
- Top control panel. Under the powder hopper is the first of the screws that secure the panel. The second screw is usually located at the opposite end of the panel, at the top. The fasteners are removed, the panel is pulled towards itself and removed. On the reverse side of the panel there is an electronic control module. For convenience, it can be placed on the top of the machine.
- Rubber clamp. Sometimes it may be necessary to free the front wall from the rubber ring clamp. On the cuff you need to find the place where the clamp connects. As a rule, this is a small spring that needs to be tucked. Now you can pull back and pull off the clamp in a circle. The cuff is tucked inside. To remove the clamp, you can use round nose pliers, pliers, or a screwdriver (depending on the model of the clamp).
- Front panel. At the bottom of the front element (where the bottom panel was), four screws are unscrewed. 2 screws are located in the hatch lock area. Under the top control panel there are 3 more fasteners, by unscrewing which you can remove the front part of the machine. It is usually held on by hooks, and to remove the panel you need to lift it up a little. To completely separate the part, you need to remove the electrical connector from the hatch locking device.
- Back wall. Attaching the back of the case are a few more screws, unscrewing which you can gain access to the back of the device.
Disassembling the LG washing machine
This is how the main parts of the frame are removed, allowing access to the internal parts. We can say that this is a preparatory operation, and further actions will depend on the inspection performed and the malfunction identified.
When the top panel is removed, many wires prevent it from being completely removed. Some models are equipped with service hooks where you can secure the unit during repairs. You can also disconnect all the wires, but first mark them with a marker so as not to confuse them.
What is needed for repair?
To repair a faulty pump yourself, you will have to stock up on some tools and components. Their number directly depends on the scale of the problem that has arisen and the habits of the master. If we consider the worst case scenario of pump failure, the following parts will be required:
- drain pump;
- impeller;
- axis;
- contacts;
- pump sensor;
- cuff;
- rubber gasket;
- pulley.
You should be careful when selecting replacement parts - the spare parts must ideally fit the existing LG model. Ideally, you need to dismantle the old drain and ask the store salesperson to find suitable analogues. Another guideline will be the serial numbers, which must be applied to all pump components.
The set of tools is several times smaller. Most of the work can be done with a Phillips screwdriver and a pocket knife. Sometimes you can’t do without a multimeter, which can be used to test contacts, sensors and power elements.
What are the reasons for how to remove the blocking?
If the LG washing machine issued a CL code, but the owner of the household appliance did not activate the child lock mode, perhaps one of the family members did this.
Or the function was turned on accidentally during the previous use of the device. The peculiarity of the Child Lock mode is that if you do not disable it, then even after turning off the machine from the network, it will still remain active. This happens automatically.
To disable Child Lock mode on an LG washing machine, you need to press a combination of keys located on the front panel. Their set differs for different models of household appliances. This can be clarified in the Operating Instructions for the device.
If for some reason you don’t have the user manual at hand, you can solve the problem using the selection method. You don't have to press all the buttons in a row. There are three most common options to remove the blocking.
Three keyboard shortcut options to resolve the CL error:
- Super rinse + prewash.
- Extra rinse + intensive wash.
- Temperature + optional button.
It is not always possible to resolve a CL code using this set of buttons. Sometimes you need to press a special key to unlock the front panel. Next to it can be a picture of a child’s face, or a castle with a smile.
Despite the fact that the CL code most often indicates that the front panel buttons are blocked, sometimes it can still signal a malfunction of the LG washing machine.
This can be understood by two signs:
- the lock was not turned on, and the inscription appeared in the middle of the wash cycle;
- The code cannot be eliminated by pressing the keys listed above.
The video will tell you what the CL error on an LG washing machine means and how to fix it:
How to fix the problem?
If it has been determined that the CL error code does not indicate the activation of the child lock function, you need to solve the problem in another way. Experts say that there can be two reasons for the appearance of such an inscription on the screen - the wires were broken, or the control module failed.
To understand what exactly the problem is, you will have to disassemble the LG washing machine. The procedure is as follows:
- Disconnect household appliances from the network.
- Remove the top panel. It is attached to two screws, which are located on the back wall, in its upper part.
- When the cover is removed, you can see the wires underneath. If they are killed or chewed by mice, it will not be difficult to detect this. In this case, the wires just need to be replaced.
If the wiring is intact, then most likely the control module is faulty. It will not be possible to repair it on your own. You will need the help of a technician who understands electronics.
Prevention of recurrence
To prevent the CL error from appearing in the future, you must follow simple recommendations:
- Before you start using your LG washing machine, you should read the User Manual.
It describes the rules for using the device. After reading the document, a person will not have any questions about what the CL sign on the screen means and how to eliminate it. - If the machine is in a country house or country house, you need to take care to remove rodents. They can cause serious damage to household appliances.
- It is necessary to maintain normal humidity in the bathroom. If the room is too damp, the parts of the washing machine will fail faster.
- To prevent the control module from breaking and causing an error in the operation of the equipment, you must use the machine according to the instructions for use. It is unacceptable to interfere with the operation of the device if it has not finished executing a particular program.
Connection rules
After placing the washing machine in the required place, it must be connected to communications.
The plug is inserted directly into the socket; the use of adapters and tees is not recommended , as this increases the risk that the equipment will burn out during power surges.
Sockets must be equipped with a cover through which moisture does not penetrate. The minimum permissible distance from the device is 70 cm.
The device is connected to the water supply using special hoses that are included in the kit. The drain hose is cut into a sewer pipe or lowered into a bathtub. The first method is preferable.
If the equipment is compatible with a smartphone, the devices need to be synchronized . To do this, install the official application on your phone and follow the instructions.