How to lubricate the cooler
Almost any lubricant that is not very thick and at the same time not too thin is suitable for this. Universal silicone, machine oil for household appliances, CIATIM-201, Vaseline or automobile motor oil are suitable.
But under no circumstances should you use sunflower, olive or any other edible oil: it will dry out quickly and will only worsen the condition of the fan. Do not use the all-purpose WD‑40 product, since it is not a lubricant and is not at all intended for such purposes.
Fan operating principle
Most fans are supported by journal bearings, which consist of a shaft that rotates inside a cylinder or sleeve.
The cylinder consists of porous metal lubricated with oil. When the shaft begins to rotate, some of the oil from the bushing moves closer to the shaft, creating an oil film. This way the metal parts hardly touch, are not damaged, and the noise is almost inaudible.
Ideally, there is always enough oil inside the cylinder and the fan does not wear out. But at some production costs, for example, if the bearing is poorly glued, some of the oil evaporates. Then the fan will start to work slower, its parts will begin to rub against each other and wear out, and the computer will overheat. There will be noise.
In this case, you should add one drop of oil into the cooler.
How to lubricate a cooler
Prepare everything you need
You will need:
- Screwdriver;
- tweezers;
- knife;
- soldering iron;
- soft brush;
- cotton buds;
- wet wipes;
- threads;
- syringe;
- alcohol;
- lubricant
Remove the cooler
Depending on the device, the process of removing the fan will have specific features. But in any case, the computer will need to be disassembled, which will void the service warranty. Keep this in mind.
From the computer
In stationary models, just turn off the power, remove the side cover, and then disconnect the cooler cable, unscrew the fastening screws with a screwdriver and carefully remove the fan. More details can be found in our instructions for cleaning your computer from dust.
From laptop
Laptop PCs cannot be avoided without complete disassembly. This is a rather non-trivial task, especially for those who are doing this for the first time. It is best to find instructions specifically for your model on YouTube and study them carefully.
The general algorithm is as follows: the battery, RAM, and storage are removed, after which the back cover is removed. This is usually enough to access the cooler. But in rare cases, you will also have to dismantle the front panel. Find the nuances of the process in our instructions for removing dust from laptops.
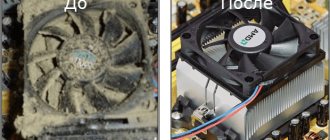
Clean the outside of the cooler
Shot: Bantu Tech Insight / YouTube
Once the fan is removed, the first thing you need to do is put it in order. To do this, brush off dust from the body and blades with a soft brush, and then wipe everything clean with damp wipes or cotton swabs soaked in alcohol.
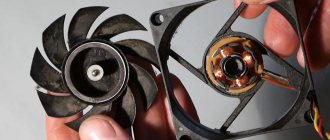
Disassemble the cooler
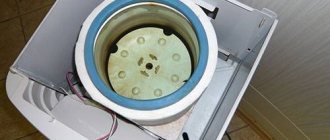
To lubricate the fan you need access to its shaft. Depending on the design, it can be obtained in different ways. In the simplest case, it is enough to peel off the sticker, but in the most difficult case, you will have to tinker with removing the impeller or drilling a hole where you can drip grease.
On the computer
Collapsible cooler
Frame: Murk Power / YouTube
The standard serviceable fan is easy to disassemble. It’s easy to understand that this is exactly what you have: turn it over with the impeller down and carefully pry off the sticker in the center of the body with a sharp knife. If there is a rubber plug underneath, you're in luck.
Frame: Murk Power / YouTube
Remove this plug by poking with a thin screwdriver or needle. In front of you will be a shaft and bushing that can be lubricated through the hole.
Frame: Murk Power / YouTube
If the impeller rotates freely, simply machining the shaft is sufficient. If the cooler falters, you first need to clean out the remains of the old, dried product. To do this, carefully pry and remove the lock washer (the white cut ring), and then pull out the impeller along with the shaft.
Then remove the accumulated dirt with a cotton swab soaked in alcohol and wet wipes.
Non-separable cooler
This is exactly what you have, if there is no hint of a removable plug under its sticker. But this does not mean that the cooler cannot be disassembled! There are at least three ways.
Frame: TopTenVideo / YouTube
The impeller can be removed by pressing it out of the bearing. To do this, turn the cooler over, and then, carefully and evenly pressing on the blades closer to the center, try to push the part out to open access to the bushing for lubrication. Here it is important to feel the pressure and not overdo it, so as not to break the blades. If this does not work, it is better to use another method.
Frame: ZAG PC / YouTube
Another option, which is most often used for video card coolers, is to pull off the impeller. Make three loops from strong threads and put them on the fan blades, evenly distributing them in a circle. Fold the ends into one bun and gently pull it, slightly rocking the part from side to side and at the same time holding the body. The first time the element is removed with quite a lot of effort, but the next time it will be easy.
Frame: Nitroxsenys / YouTube
The third way to get to the bushing is to drill a hole in the housing. Suitable if you don't want or can't remove the impeller. In this case, take a drill with a diameter of 1–1.5 millimeters and, placing it in the center on the back side of the cooler, make a hole in the plastic. You can use a screwdriver, but be very careful. It's better to try it by hand: drill very little there.
On a laptop
Collapsible cooler
Shot: INERTICO Service / YouTube
Some laptops use coolers with a collapsible design. They are easy to recognize by the screws on the cover. If you have one, unscrew the holders with a screwdriver, remove the top panel and simply pull out the impeller.
Non-separable cooler
Shot: INERTICO Service / YouTube
Miniature coolers are often made non-separable. Instead of screws, plastic rivets are used, and the impeller cannot be easily removed. In this case, carefully cut off the plastic parts with a sharp knife and lift the top cover by prying it off with the same tool or a thin screwdriver.
Frame: INERTICO Service / YouTube
To remove the shaft, turn the fan over and use tweezers to press on the edges of the round base of the impeller.
Apply lubricant
Shot: Murk Power / YouTube
Now that you have access to the shaft and bushing (bearing), you can lubricate the rubbing surfaces. Using a syringe or other method, apply one or two drops of the product to the parts. Rotate the impeller so that the lubricant spreads over the surfaces, and add literally one more drop.
Assemble the cooler and install it in place
On the computer
Collapsible cooler
Shot: Murk Power / YouTube
On the cooler being serviced, insert a rubber plug into the body, wipe the plastic around it with a cloth soaked in alcohol to degrease it, and return the sticker to its place. If the sticker does not attach or is damaged, it can be replaced with a piece of good adhesive tape or electrical tape.
Install the fan into the system unit, insert the power connector and attach the cover.
Non-separable cooler
If you squeezed out or pulled off the impeller on an unmaintained cooler, then you can simply put it back in place. It is held in place by a magnet, so it will not fall out, even if it is inserted quite easily.
Frame: TopTenVideo / YouTube
If you did not touch the impeller, but drilled a hole in the housing, then wipe the area around the hole with alcohol and seal it with tape or tape.
Return the cooler to its place, connect the power connector and secure the side cover of the system unit.
On a laptop
Collapsible cooler
Shot: INERTICO Service / YouTube
Insert the impeller and shaft into place, cover the structure with the top cover and secure it with the fastening screws.
Install the fan into the laptop and assemble the device.
Non-separable cooler
Shot: INERTICO Service / YouTube
Install the impeller into the bearing and check that it rotates freely. Replace the top of the case by aligning the cut pins with the holes in the cover and clicking them into place. Clean the soldering iron, heat it up and lightly melt the pins to make rivets.
After this, return the cooler to the laptop and assemble the entire structure.
Helpful information
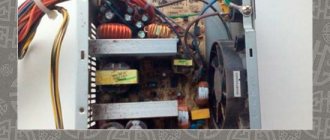
Sometimes it happens that the power supply cooler makes noise even after lubrication. This indicates that a more serious breakdown has occurred. In this case, you can go to a service center to try to repair it, or buy a new one, which will be more appropriate. Some craftsmen decide to completely disassemble the fan, removing the coil with winding, magnet, and carry out various repair procedures. Whether it is worth going to such tricks is up to each user to decide for themselves. The fact is that such actions can have the opposite effect - the fan will work even worse.
Sometimes it happens that the cooler does not spin or is noisy, and when disassembling the user discovers that there is no sticker, and it is not clear how to get to the axle. This situation occurs most often with GeForce video cards. Such fans are called non-separable, and, as the name suggests, there are no options for lubrication. The best solution is to simply change it, but folk wisdom has found a way to solve the problem. A small hole is drilled at the intended location of the axis (in the center of the fan) and oil is dropped into it. After this, it is sealed with tape. It is worth noting that the effectiveness of this method has not been proven, and it is hardly rational.
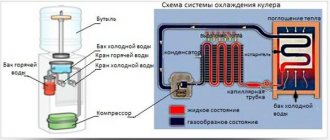
Remove CD/DVD disc
A CD left in the drive may make noise. This happens on laptops of outdated models. If the user forgets to remove the disk from the device, then every time the explorer is opened, it will spin up, make an unpleasant noise, and the computer itself will begin to freeze a little.
If a disk that is needed for work is noisy, then you need to take it out and inspect it for scratches and damage. Most often, system cracking occurs precisely from them. Cracking may also occur due to an unevenly applied label. To solve the problem, you can install special programs that will help reduce the rotation speed of the CD during operation.
Processor Cooling System Lubrication Procedure
Having disassembled the cooler, proceed directly to lubricating its parts:
- Under the rubber ring there is a bushing and fan axis that need to be lubricated. Apply a small amount of oil to the fan axis.
- The lubricant should cover the axle, but do not drip very much, otherwise, by applying a rubber plug, the liquid may leak from the recesses into the housing itself and stain it. In addition, the previously removed label will not stick to the greasy area. Using a medical syringe will help you avoid all this. It will help distribute the oil more evenly over the entire surface. The lubricant should not be thick, as this will prevent it from flowing out of the syringe.
- You can also treat the inside of the fan with oil, but to do this you need to completely disassemble it. Experts do not recommend doing this at home unless you are sure that such delicate work will not end in damage to the cooler.
- Now you need to return the rubber plug to its original place, making sure that the lubricant does not spread and stain the body.
- Wipe the body from any remaining oil, and then return the label to its place. Often, after peeling off, it loses its shape or does not want to stay in place. In this case, it is advisable to replace it with stationery tape. Cut out a piece of the same shape and size.
- They assemble, install the fan, and at the end connect it to the connectors. That's all, actually.
Cleaning the processor cooler will have a positive effect on its performance. But we must not forget that after a certain period of time, due to thermal effects, the lubricant will evaporate - which is why this procedure must be carried out on a regular basis.
BIOS setup
If the fan makes a lot of noise and the laptop hums a lot, then the user will need to configure the BIOS. Quite often, a lot of noise from a gadget comes from incorrect operation of the BIOS. Typically, owners of personal computers encounter such problems, but there are cases of BIOS failure on laptops as well.
If, after checking the processes in the task manager, the fan noise in the device has not decreased, then you need to restart the system. When the gadget loads, the user should press the F9 or F11 key. After this, the BIOS system will open. Next you need to go to the “Power” section. In the window that appears, you need to view the following parameters:
- q-fan Function. Next to this line you must put the value Enabled in cases where it is replaced by Disabled;
- cpu temperature target. This is an indicator responsible for the temperature of the system. Many experts recommend setting the settings to 50 degrees. If the BIOS is set to high values, then the problem of strong noise was hidden precisely for this reason.
If the measures described above did not help, and the device is still cracking, then you need to try to clear all the file “garbage” on it.
Which oil to choose?
Based on the above, the following oils have the best characteristics for lubricating fans:
- quite liquid;
- forming a film on the surface;
- having the effect of filling roughness and gaps.
This is a fairly large group of materials, and they definitely do not include animal and plant compounds in any proportions or variations.
The following products are most suitable for treating computer coolers:
- Low viscosity oils.
Among them are weapons-grade, transformer, machine, spindle, etc. They are distinguished by excellent penetrating ability and create a very thin film. Recommended for high-speed mechanisms with low dynamic loads. - Medium viscosity oils.
This includes engine, transmission, etc. They form a thicker film, penetrate well and fill gaps, stay on the surface longer and can cope with high loads. They have a minus - they load the mechanism.
Separately, it is worth mentioning about high-viscosity lubricants. These include solid oil, lithol, etc. They can be used, but with caution, applying a tiny amount, and only for processing powerful coolers (for example, used in power supplies). Thick lubricating compounds do not penetrate well, but forced pressing into the gaps can help start up an almost “dead” device for some time (before purchasing a new fan). Small and microfans in laptops cannot be lubricated with such compounds. Meanwhile, specialized stores offer a wide range of lubricants for coolers. These synthetic lubricants are completely inert and operate in a wide temperature range (from -20 to +200...300 °C). Ease of use and precise dosing are ensured by a special syringe containing oil. And in most situations, it is better to use a ready-made solution (for example, SPO-1
or
SPO-2
).
Types of bearings
Before you begin disassembling and lubricating, it is advisable to know the type of bearing that is used in your cooler. This affects the choice of oil and lubrication method.
The following bearings are used in fans of household and computer equipment:
- Sleeve bearing is the most common and simplest type, which consists of a bushing with a rotating shaft. The bushing is covered with anti-friction material. WD-40 is suitable for lubricating them.
- Slides with screw threads (rifle bearing, Z-Axis bearing) - have specific threads on the axle bushing that recirculate the lubricant.
- Hydrodynamic (FDB bearing) - a modernized sliding bearing, where the rotation of the shaft is carried out in a layer of liquid substance, which is held inside the sleeve due to the pressure difference created during operation
- The rolling element (ball bearing, ceramic bearing) consists of two rings (balls), rolling elements and a separator. Ceramics can be used as a material. For rolling bearings, grease (silicone) is used.
- Oil Pressure Control (SSO) - Improved fluid dynamic bearing. A distinctive feature is a large amount of liquid (lubricant). To reduce wear, the shaft is centered by a permanent magnet installed in the base.
- Self-lubricating plain bearing (LDP) is an improved plain bearing. There is IP6X dust protection and a special slot for recovered oil, which increase the service life of the fan.
- Polyoxymethylene bearing (POM Bearing) is a modernized plain bearing. To increase service life, the shaft is coated with polyoxymethylene, which has a low sliding friction coefficient.
The article will discuss the lubrication of coolers with bearings of the first and fourth types: sliding and rolling.